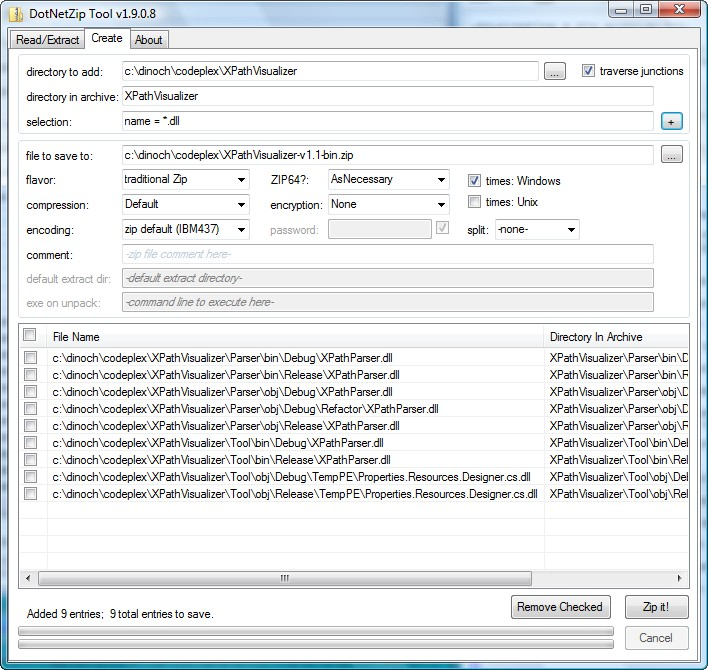
The DotNetZip Graphical Tool
The Tools/Utilities downloads for DotNetZip include a graphical tool for creating and extracting zip files.
If you use the MSI installer, you will have the chance to associate .zip files to this tool. If you associate .zip files to this tool, double-clicking on a zip file from within Windows Explorer will open the zip file in the tool. If you don't associate .zip files to this tool, you can open the tool using the Start menu.
The tool uses a tabbed-pane interface. One tab is used for reading or extracting zip files, another is used for creating zip files.
Creating a Zip Archive
Create a zip file in two steps: first, select which files to add into the zip, then add creating the zip with those files.
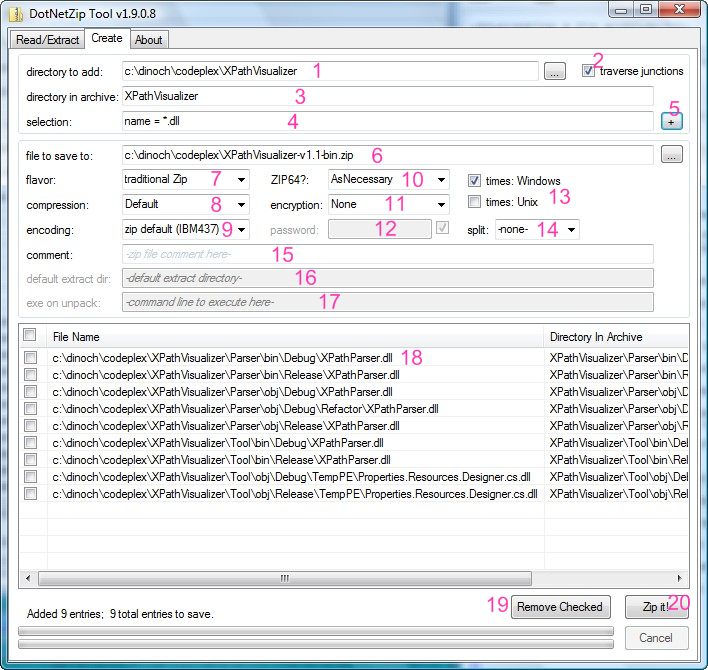
An overview of the UI elements:
- the directory to add. Specify where in the filesystem to find the files to be added into the zip file.
- check this box to traverse Windows NTFS Junctions; leave it unchecked to not traverse junctions
- the directory to be used within the zip archive for the files that get added.
- The selection criteria for the files to be added to the zip.
- Click this button to add the files that match the selection criteria, to the listbox below (label #18)
To select additional files, you can then repeat steps 1-5 as many times as is necessary.
When you've selected the files you want to include in the archive, - Specify the name of the zip file to create.
- Specify whether to save a regular zip file, or a self-extracting archive.
- Specify the compression level to use. Higher compression levels requires more compression time.
- The text encoding to use for the filenames.
- Whether to use ZIP64 extensions
- whether to encrypt the file data, and if so, whether to use AES encryption.
- the password to use. The adjacent checkbox allows you to show or obscure the password characters. This box is enabled only if encryption is in use.
- Use these checkboxes to specify whether to include extended timestamps in the generated zip file, in Windows or Unix formats.
- Whether to create a split archive, and if so, the size of the segment.
- The comment attached to the zip file
- The default extraction directory. This feature is enabled only for self-extracting archives.
- The command to run after extraction. This feature is enabled only for self-extracting archives.
- The list of files to be added to the zip archive. Each file has a checkbox associated to it.
- Click this button to remove any checked files from the list.
- Finally, click this button to actually create the zip archive.
Extracting files from a Zip Archive
Extract files from a zip archive by opening the DotNetZip-WinformsTool.exe, and selecting the Read/Extract tab in the UI.
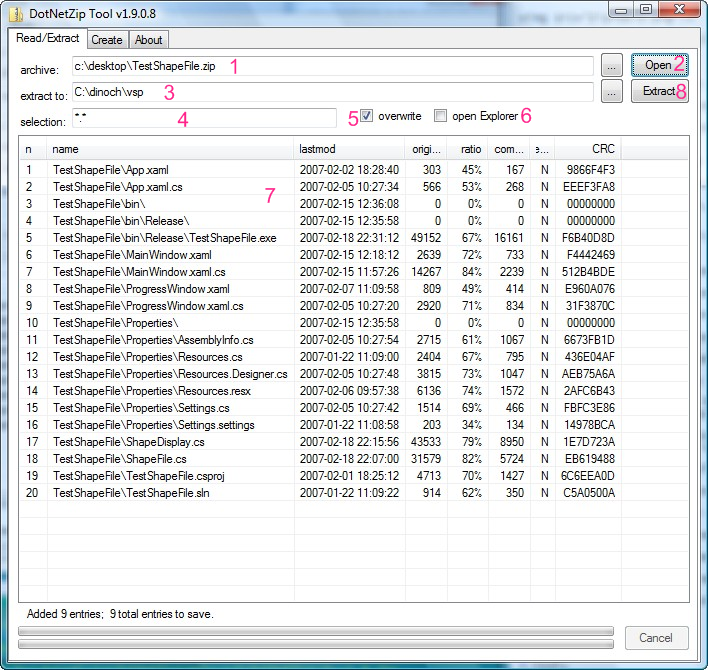
An overview of the UI elements:
- the zip file to read or extract.
- click here to open and read the specified zip file. The list of entries in the zip will be displayed in the listbox below (label #7).
- The directory to extract entries into
- The selection criteria for entries to extract.
- Check this to overwrite existing files during extraction.
- Check this box to open Windows Explorer after extraction.
- The list of entries in the zip file.
- Click this button to extract the specified entries in the zip file.
Syntax for the Selection Criteria
Using the a selector string, you can specify a set of criteria for the files to be added to the zip file. Specify the criteria in statements of 3 elements: a noun, an operator, and a value. Consider the string "name != *.doc" . The noun is "name". The operator is "!=", implying "Not Equal". The value is "*.doc". That criterion, in English, says "all files with a name that does not end in the .doc extension."
Supported nouns include name for the filename; atime, mtime, and ctime for last access time, last modfied time, and created time of the file, respectively; attributes for the file attributes; and size for the file length (uncompressed). The attributes and name nouns both support = and != as operators. The size, atime, mtime, and ctime nouns support = and !=, and >, >=, <, <= as well. The times are taken to be expressed in local time.
Specify values for the file attributes as a string with one or more of the characters H,R,S,A in any order, implying Hidden, ReadOnly, System, and Archive, respectively. To specify a time, use YYYY-MM-DD-HH:mm:ss as the format. If you omit the HH:mm:ss portion, it is assumed to be 00:00:00 (midnight). The value for a size criterion is expressed in integer quantities of bytes, kilobytes (use k or kb after the number), megabytes (m or mb), or gigabytes (g or gb). The value for a name is a pattern to match against the filename, potentially including wildcards. The pattern follows CMD.exe glob rules: * implies one or more of any character (not including dot), while ? implies one character (not including dot). If the name pattern contains any slashes, it is matched to the entire filename, including the path; otherwise, it is matched against only the filename without the path. This means a pattern of "*\*.*" matches all files one directory level deep, while a pattern of "*.*" matches all files in all directories.
To specify a name pattern that includes spaces, use single quotes around the pattern. A pattern of "'* *.*'" will match all files that have spaces in the filename. The full criteria string for that would be "name = '* *.*'" .
Examples of Selection Criteria
| Use this Command... | to do this... |
| name = *.jpg | |
| any .jpg file | |
| mtime > 07/01/2009 | |
| any file with a last modified time after midnight on 1 July 2009. There is also ctime and atime for created time and accessed time. | |
| ctime > 07/01/2009-07:53:00 | |
| any file with a created time after 7:53am on 1 July 2009. | |
| size > 320mb | |
| any file with a size over 320mb. You can use kb or gb, too. Or omit the characters for a size in bytes. And you can use <, >, or = as operations. | |
| attr != H | |
| any file that does not have the Hidden attribute set. Other attributes include S=system, R=Readonly, A=Archive. Of course you can test that the attribute is ON as well, using = instead of !=. | |
| attr != H and size > 320mb | |
| include the files that satisfy both conditions. You can also use OR as a conjuction. Use parens to group complex expressions. | |
| name = *.jpg or name = *.gif | |
| include the files that satisfy one or the other condition. | |
| (name = *.jpg) or (name = *.gif) | |
| same as above. | |
| (mtime >= 07/01/2009) and (mtime < 07/02/2009) | |
| any file modified on July 1st. From midnight to midnight. | |
| (name = *.jpg) AND (mtime >= 07/01/2009) and (mtime < 07/02/2009) | |
| any .jpg file modified on July 1st. | |
| (name = *.jpg) and (size >= 100kb) and (mtime >= 07/01/2009) and (mtime < 07/02/2009) | |
| any .jpg file, 100kb or more in size, modified on July 1st. | |