Performing landmark registration on two volumes
From Delft Visualisation and Image processing Development Environment
| Performing landmark registration on two volumes | Previous Top Next |
In the MRI retrobulbar fat mobility study, multiple MRI datasets are made of a subject during different directions of gaze. Although great care is taken to prevent rigid head motion, this does still occur. So before the deformation of the fat is calculated, rigid head motion has to be eliminated by means of a landmark-based rigid registration.
One of the directions of gaze is chosen as the central or reference direction: all other datasets
have to be registered onto this dataset. In this way, all datasets will share a common frame of
reference.
In the next subsections, we will explain how to perform one such registration. This obviously
has to be performed for all datasets that you have to register onto the reference dataset. The
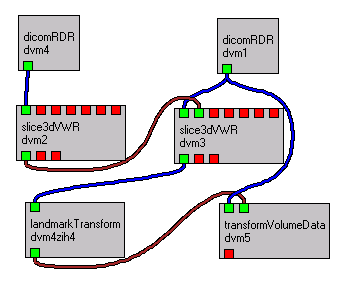
figure below shows an example DeVIDE network for performing this landmark-based rigid
registration. Refer to it during the following explanation.
Select source and target points
Select at least 3, preferably more rigid landmarks that can be accurately localised in all
datasets.
Select these points in the reference datasets by using the mouse cursor in a 3D slice3dVWR.
You have to name these points (in the slicedVWR control panel, enter the name into the
"name'' input box before clicking on the "Store this point'' button. The names of these points
have to start with "Target'', for example "Target Zygoma 1''.
Save your network regularly!
Now load in the first dataset that you want to register onto the reference dataset. Select and
store all corresponding points in this dataset. Use a separate slice3dVWR. The names of
these points all have to start with "Source'', for example "Source Zygoma 1''.
It is very important that you select these points in the same order as the target points.
Derive the transform
Instantiate a "landmarkTransform'' module from the Filters category. Read its help by right-
clicking on the module and selecting "Help on Module''.
Briefly connect and disconnect the first output of the reference dataset "slice3dVWR'' to any
input of the second "slice3dVWR''. This will copy the "Target'' points to the second
"slice3dVWR''.
Now connect the first output of the second "slice3dVWR'' to the input of the
"landmarkTransform'' module. This module will now have access to the source and target
points of the two datasets that you are trying to register. As mentioned earlier, the order of the
source points should be identical to that of the target points.
Transform the dataset
Connect the output of the "landmarkTransform'' to the second input of a
"transformVolumeData'' module (category "Filters''). Connect the dataset that you are
registering onto the reference dataset to the first input of the "transformVolumeData'' module.
The output of this module will be the transformed volume dataset. You can add it to one of the
reference dataset's slice3dVWR's inputs for an overlay. Select the "Primary LUT fusion''
overlay mode in the slice3dVWR control panel. The Alpha-parameter can be adjusted to
"fade'' from the reference dataset to the registered dataset and back.
Don't forget to save your transformed dataset: Connect the output of the "transformVolume''
module to the input of a "vtiWRT'' module for example. Double click on the "vtkWRT'' module
and then click on the browse button to select a filename. For all writer modules, you HAVE to
click on the "Execute'' button for it to save the file.