Now you remove the code for the circular tile creation and call the DrawShape subroutine to draw the appropriate shape instead.
To add event handlers for the dialog box
- Open the Code window for gpDialog.
- Enter
the following code at the top of the window:
Private Sub gp_poly_Click()
gp_tsides.Enabled = True
ThisDrawing.tshape = "Polygon"
End Sub
Private Sub gp_circ_Click()
gp_tsides.Enabled = False
ThisDrawing.tshape = "Circle"
End Sub
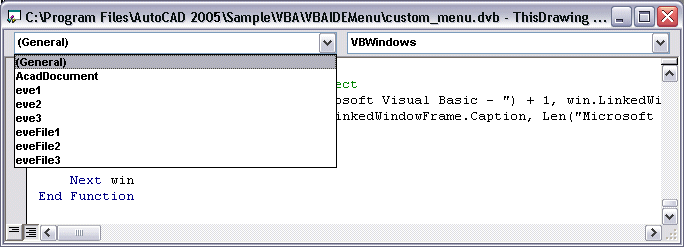
Notice that the subroutines gp_poly_Click() and gp_circ_Click() are named after the two option controls you added earlier, with the addition of _Click. These subroutines are automatically executed when the user clicks the respective control. Also notice that the Object Box lists the controls on the form, sorted alphabetically by Name property.

- Place your cursor on the Private Sub gp_poly_Click() line and
open the Procedure/Event Box.
You see a list of all the events that you can respond to for the gp_polyoption control. The two subroutines you entered handle the Click event. You can also add code to respond to the DblClick event that would automatically be executed when the user double-clicked the control. You can add code for any of the events listed. These types of subroutines are called event handlers.
Look at the code you entered for these two event handlers. The first event handler responds to the Click event for the gp_poly option control. The first line of code enables the text box for the number of sides. This text box is available only for polygons, so it is not enabled unless you select the Polygon control. The next line of code sets the tshape variable to Polygon.
The second event handler responds to the Click event for the gp_circ option control. This handler disables the text box for the number of sides and sets the tshape variable to Circle.
- Add
the following event handler for the OK button:
Private Sub accept_Click()
If ThisDrawing.tshape = "Polygon" Then
ThisDrawing.tsides = CInt(gp_tsides.text)
If (ThisDrawing.tsides < 3#) Or _
(ThisDrawing.tsides > 1024#) Then
MsgBox "Enter a value between 3 and " & _
"1024 for the number of sides."
Exit Sub
End If
End If
ThisDrawing.trad = CDbl(gp_trad.text)
ThisDrawing.tspac = CDbl(gp_tspac.text)
If ThisDrawing.trad < 0# Then
MsgBox "Enter a positive value for the radius."
Exit Sub
End If
If (ThisDrawing.tspac < 0#) Then
MsgBox "Enter a positive value for the spacing."
Exit Sub
End If
GPDialog.Hide
End Sub
This code tests whether the final choice of shape was polygon. If so, the code retrieves the number of sides from the gp_tsides control. The value the user enters is stored in the Text property. Because it is stored as a text string, you convert the string to the integer equivalent using the CInt function. Once obtained, the event handler tests the range of the value to make sure it is between 3 and 1024. If it is not, a message is displayed and the event handler is exited without further processing. The result is that a message is displayed and the user is given an opportunity to change the value. After the OK button is clicked again, this event handler triggers and tests the value again.
The macro obtains radius and spacing values, but these values are doubles, not integers, and are obtained using the CDbl function. These values are also tested to make sure they are positive.
After the values are obtained and verified, the gpDialog.Hide statement hides the form, passing control back to the subroutine that first called the form.
- Add
the following event handler for the Cancel button:
Private Sub cancel_Click()
Unload Me
End
End Sub
This simple event handler unloads the form and ends the entire macro.
The only thing you haven't done is add the initial values for the form. There is an event called Initialize that applies to the form. It is executed when the form is first loaded.
- Add
the following event handler for the form initialization:
Private Sub UserForm_Initialize()
gp_circ.Value = True
gp_trad.Text = ".2"
gp_tspac.Text = ".1"
gp_tsides.Text = "5"
gp_tsides.Enabled = False
ThisDrawing.tsides = 5
End Sub
This code sets the initial values for the form and for the tsides variable. The tsides variable must be set to a positive number greater than 3, even if the user selects a circle. To understand this, look in the DrawShape subroutine that you entered earlier. There is a variable there called points that is defined using the number of sides for the polygon. That variable gets memory allocated to it whether or not a polygon shape has been requested. Because of this, tsides must have a valid range defined for it. The user is free to change this value during macro execution.


