Purchase Order - Selecting the Supplier
From Amicus


| Amicus | |
| Purchase Order - Selecting the Supplier | |
| See Also Submit feedback on this topic | |
| Key Areas > Suppliers > Common Tasks > Creating a Purchase Order > Purchase Order - Selecting the Supplier |
Glossary Item Box
The top section of the Add/Edit Supplier Order screen contains the supplier information.
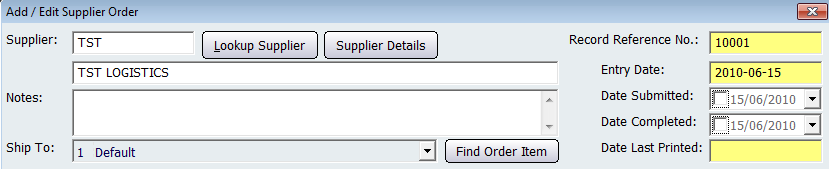
Figure : Top section of the Add/Edit Supplier Order screen
By default, you will be prompted to select a supplier number for this sale. If you know the supplier number, enter it in the Supplier field and press Tab or Enter.
If you want to bring up a list of all suppliers in NBS Amicus, click Lookup Supplier. Select the supplier from the list and then click on the Select button. This will then populate the Add/Edit Supplier Order screen with the selected suppliers details. The Supplier Details button will open up the Add/Edit Supplier Details tab which will allow you to edit the master supplier file for the selected supplier. Note that any changes made to the supplier details using this method will affect all associated records in NBS Amicus.
The Ship To field allows you to select the Site where the order will be shipped to. The Find Order Item button allows you to search for the product that you want to order from the supplier.
The Record Reference field is yellow because it is automatically generated by Amicus. This field will populate only after a product has been entered into the order. The Entry Date is automatically populated with the date that the order took place on.
Enter the date for this order in the Date Submitted field. The tick box next to this field is used to record whether this order has been submitted to the supplier. If the date is greyed out, NBS Amicus will treat this order as not being submitted to the supplier.
The Date Completed field is used to record first, whether the goods have been received and second, the date when the goods were received. If the goods have not yet been received, ensure the tick box is not ticked so that the Date Completed field is greyed out. If you have already received these goods, tick the tick box and enter the date the products were received, so the product records can be updated.
The Date Last Printed is automatically populated with the date when the order was last printed.