Place an Order screen
From Amicus


| Amicus | |
| Place an Order screen | |
| See Also Submit feedback on this topic | |
| Modules & Other Devices > Modules > Hospitality Module > Meal Order Table Service > Managing Meal Orders > Create an Order > Place an Order screen |
Glossary Item Box
The order screen is split into several sections.
In the top right there are short cuts or hot buttons, these allow you to quickly access a commonly used course. To the left of screen a list containing the items ordered. The right of screen displayed all the categories and items available on the menu. Each of these 2 sections contains their own controls to the bottom of screen.
Short Cuts
When a hot button or shortcut is selected from the to right that course will be jumped to displaying only the items associated with that course.
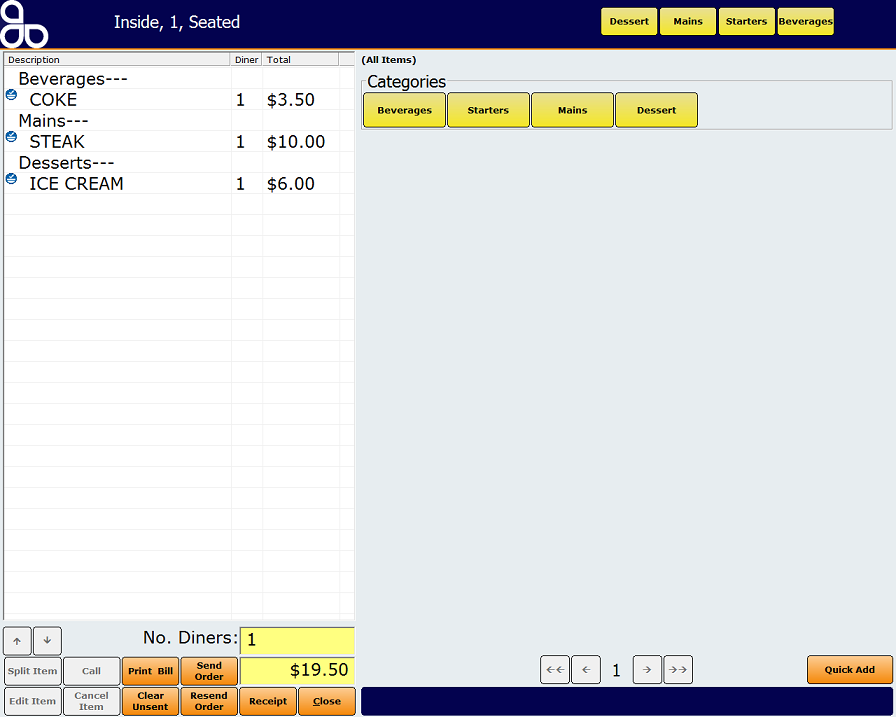
Figure : Place an Order screen
Order Elements
Depending on the element chosen table service order, meal order, take away, The available options to the user will change, however the following lists all the components to the Order section
The order list will contain all the items selected from the menu, each item is grouped by the course it is added to. If an item is quick added the item will be added to the default course.
The list on this screen has the following columns:
-
Item Description—A description of the item being ordered and all the options that have been selected. If a note exists for this item, it will be added as well. Select the item to see view the note.
-
Qty—The number of items being ordered
-
Price—The price of this item. The user will not be allowed to change the price.
-
Total—Shows the total price for the number of items added.
-
Diner—The patron who has order the item.
-
Order Status—How the order for each item is progressing.
There are several states an order can be in, each is indicated by a different icon:
-
New Order—
 The item has been added to the order.
 -
Sent—
 The item has been sent to the kitchen for preparation.
 -
Called—
 The item has been called to be served asap.
 -
Served—
 The item is ready to be served.
 -
Cancelled—
 A cancelled item will display a red cross to indicate that is has been cancelled. To un cancel an item refer to the Uncancel Items page.
 -
Scroll Arrows—Allows a user to scroll up and down the list of items in an order.
No. Diners—A number pad will be displayed when this field is selected. Enter the number of diners at the current table.
Cancel Item—Removes the currently selected item in the order.
Call—Sends a message to the kitchen to say the patrons are ready for that item.
Split Item—If an item has multiple quantities, splits that item into a number of your choosing.
Edit Item—Allows the user to edit a selected item; adding quantity, changing course, available options or the price.
Send Order—Sends the order to the configured printer. The order will be split into categories such as entrees, mains and drinks.
Resend Order—Sends a revised order. Items will be listed as ‘already sent’ ‘modified’ and ‘new’.
Clear Unsent—Clears the screen. The user will be presented with a Clear Screen dialog asking the user to confirm.
Print Bill—Provides a copy of the order to the customer. This is not the final sale amount because items can be disputed by the customer.
Order Total—Displays the total of this order to date. This field will be updated when any change is made to the items.
Receipt—Creates a sale. It closes the Place an Order screen, and the order will be added to the NBS Amicus sale screen.
Close—Closes the screen and returns to the Table Service screen.
Menu Elements
Depending on the element selected; category, parent category, item, The available options to the user will change, however the following lists all the components to the Menu section.
Category Navigation Buttons—If there are many categories, the grey navigation buttons in the bottom right allow the user to scroll through each available page.
Up to "category"—The Up to button will alow a user to go back up one level when selecting sub categories and items.
Quantity—Use the Qty. up and down arrow buttons to increase or decrease the quantity of the selected order item
Course—Allows the user to set the course an item will be served upon.
Options—Available options are listed by type.
Additional Notes—Allows the user to input a note.
Add to Order—Adds the selected item to the order.
Cancel—Cancels adding an item.
Change Price—At the users discretion, allows an items price to be manually set.
Options Navigation—If there are many options available for that item the page navigation buttons will be activated allowing a user to scroll to all the available options.