wbtools
From WinBuilder
WinBuilder Tools
Overview
There are many tools that can be used to assist in the development of scripts or to help in the process of completing a project. In addition, there are also some tools available for specific tasks.
We can divide these Tools under two categories and will also describe in more detail the internal WinBuilder tools. These tools were added with the purpose of combining the several steps necessary to produce, test, run and publish new scripts.
Whenever this information is not complete enough and you have doubts on how to make things work, don't hesitate in placing your questions on our forum so that aditional information can be added to these pages. We also welcome requests on the forum for new tools to be added in the future.
Compatibility
These tools were created with the intention to work under Windows 32 bit environments since Windows 95 up to Windows Vista. No major compatibility issues are present, except for limitations specific to individual tool. For example, tools like WimUtil should be executed on NTFS partitions to properly handle WIM images.
You might also be required to run some of these tools under an account with Administrative level privileges.
Script Editor
Scripts are not static and you can edit or modify them as needed - this is a very simple and intuitive process. Select the script you wish to edit from the Main window and then click on the Edit button (the small icon that looks like a little wrench). This script editor contains several tabs - each one with a specific purpose

Note: Clicking on the logo image of the script will also enter edit mode.
Interface Editor
With this tool you can manage the objects placed within the interface of the script. These objects are very simple to handle. You just need to press the add button and select the object you wish to add from a list.
If you wish to remove a component you should select it and then press the delete button.
Selecting an object will also allow you to resize it and add your customizations. Some scripts have this interface locked - clicking on the small lock at the upper-right corner will unlock the interface.
You can also select multiple items. To do this, use the SHIFT button when selecting the various items you wish to adjust as a group.
Description
On this tab you can write the details that will be mentioned on the main section of your scripts.
It also lets you select a logo image to help identify your script. You can use images in some popular formats like BMP, JPG and GIF - animated Gif's are also supported.
Attachments
Use this tool to add files inside your scripts.
To allow your script to properly include binary files and still be editable with any text editor - these files will be encoded into an text form. These files can later be extracted while the script is running to the location you wish.
- When adding your files, please be careful not to include very large files or software that are not authorized to be freely distributed inside scripts.
Script File Options
On this tab you can change the behavior of the script when it is enabled (i.e. Selected to be run) from the main window. It was added to ensure that other required scripts or even other scripts that are incompatible get disabled or enabled (i.e. selected or deselected) automatically.
In each box you can specify the path to the scripts you wish to control. To avoid using static paths you can use these variables to make the path dynamic
- %ProjectDir% - is the full path to your project folder
- %ScriptDir% - it's the path where this script is located
- %BaseDir% - is the path where WinBuilder.exe was executed from (base)
You can also list more than one script on this text box, just split each script with a comma. Be careful of any spaces in the data you enter, which is why it is best to use the variables mentioned above to help isolate problems that might be caused by the location of the project.
- Dependencies - If this script is "enabled" (i.e. goes from an un-selected state to selected, all the scripts listed here will be enabled (if possible), and all the files listed will be checked to make sure that they exist. Notes:
- This means that if you select a script that has dependencies, WinBuilder will try to find those dependencies and if it is a script, will mark that script as "enabled" - i.e. mark it with a checkbox so it will be executed.
- This functionality can only "enable" dependent scripts. It will NOT turn them off (or deselect them) if this script is later un-selected.
- The user could still decide not to run these scripts by manually "un-selecting" them later.
- Disable - Only scripts should be listed here. When this particular script is "enabled", WinBuilder will search for the listed script files, and try to disable them (i.e. make sure they are not currently "selected" to be executed. Notes:
- This functionality can only "disable" scripts. It will NOT turn them back on (or select them) if this script is later un-selected.
- The user could still decide to run these scripts by manually "selecting" them later.
Finally, a note for script writers...If you change these settings, be sure to do a "refresh" of the scripts, since WinBuilder loads this information as it is parsing the scripts in the project - i.e. It is not dynamically reloaded as an individual script file is modified.
Source Code
This tab allows you to edit the source code of your script. It's the place where you can view and add your commands.
One of the main benefits of using this editor is that there is a built in syntax help system. To use it, either use the "magic wand" icon, or just press the right-click (context) button of your mouse to view a menu that contains all available commands. Once you select a command it will be added in the place where your cursor is placed.
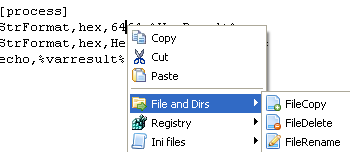
This command will also contain a quick template of the proper syntax as an example to show how to use it. With this menu you won't need to memorize all functions.
In the template that is inserted into the code, the items or values used in the command should be self-explanatory. In addition, the following conventions are used:
- [ ... ] means that this parameter or value is optional
- { ... | ... | ... ... } means that it requires only one of the items between the separators (|)
The Tools Tab
There are many optional settings and tools available by selecting the tools function
WinBuilder Options
The options tab allows to change some of the WinBuilder executable settings to work as you prefer.
- Local Registry
This box contains settings that allow you to associate WinBuilder related files to open with your favorite text editor. You have the option to add the file association to your registry and later remove it if needed.
You can also make sure that WinBuilder assigns script files to be handled by your favorite text editor when it is started.
- Log Options
Control the behavior of your log window after a project is concluded.
- The option "View in browser after saving" means that when you press the Save log button inside the log window your log.html file will be created and opened using you favorite browser.
- The option "Open log window after process" will automatically show you the contents of the log window when your project has finished running all scripts. This is an useful option when debugging your projects and scripts.
- The other options control the amount and types of information put into the log file. They are provided here as an easy way to change the settings stored in the WinBuilder.ini Settings file.
- Network support
You can enable or disable network support inside WinBuilder. This affects the following:
- Web tab
- Download Center
- FTP client
- New Download Server
- Single script upload
Use this option under restricted environments where the program is not authorized to access the internet.
Create new script
This is a tool that helps creating new scripts and use a small set of templates and wizards to make this process as user friendly as possible.
To create a new script you will only need to specify where you wish to place it using the "Location" box and write a filename under the "Filename" box.
On the right you find a text window that is already filled with some default values.
Pressing the create button will create a script with details and code you've written.
Convert Tool
Use this tool to convert files from one file format into text compatible to be used inside scripts.
You can convert the following formats Text files BartPE plugins
Please note that the bartPE plugins does not completely translates all code and will only help converting most of the plugin into usable script format - you will still need to edit and adapt the resulting code as needed
Upload
This is a very important tool for anyone who wishes to create a new Download Server. Imagine you are a project author who wants to make his project available via the WinBuilder download functionality.
What you have to do is:
- In a WinBuilder project folder containing ONLY your project, click the "Tools button, then the navigate to the "Upload" tab.
- Fill in the two text fields and click "Create".
- Upload (preferred FTP) your complete project folder to your server.
The first field on this form is the name of the project as it will appear in the download tab, so you should probably use the name of the project. The second field is used to specify the name of a default web page that will be displayed next to the project folder when in the download view. Use this to give an overview of the project and to provide other links that might be useful.
- Note: You might just want to put the html file inside the project folder so it will already be uploaded to the web server.
When you click the "Create" button, WinBuilder will generate the following two files (updates.ini and index.html) in your project folder. The first is used by winbuilder to manage the update/download process. At this point, you have a complete set of files that can be accessed over the web through the WinBuilder download interface, including a very good HTML formatted "index" for the project which has the names, versions, sizes, descriptions and authors of all the script files that are part of the project.
License Agreement
Clicking on the "View license Agreeement" box will open a new window that will display the terms of WinBuilder's license. As you might know, this program is freeware for both personal and commercial uses - but distribution and usage has to comply under the terms of this license.
It's not meant to be restrictive to the end user since WinBuilder is always provided for free in good faith, but these are the formal terms in which WinBuilder can legally be used and shared. These terms were needed to be written in order to avoid any abuse of rights in the future.
To avoid having to distribute WinBuilder.exe along with a separate license file - these license terms were merged inside the binary itself where they are always available for everyone to read.
Language Support
WinBuilder can support multiple languages and users can submit their own language files. Each term to be translated uses a numeric key to allow the same term be applied on similar cases. This avoids having to write thousands of messages which would only become a very tedious task for anyone proposing himself to complete a translation.
Since our program is constantly changing values and adding new features - languages would grow outdated quite quickly and surely most translators wouldn't always be available to provide the needed updates.
Whenever a language file is available, this program will compare it against the internal language database (in default english) and will add the missing terms.
This also means that even old translated language files that are not completed with the latest changes will still be valid to be used and you'll be able to complete yourself what needs to be corrected.
How to create your own language wb? - You can start by clicking on this button from the Language tab
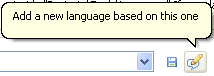
This button will open a box asking for a filename to describe your language. Use only english compatible characters and description so that it can be understood under as many languages as possible.
How to edit your language? - On the same tab you find the window that lists all values and corresponding translated terms - just write each term the way it best fits your language and press the save button.
Where do I find my language file? - All language files are placed under %BaseDir%\Projects\Tools\Languages (remember that %BaseDir% is the same path from where you run WinBuilder). If this folder doesn't exist, English language is used as standard - when creating a new translation file this folder is automatically generated. You can edit any of these language files with a simple text editor.
How do I share my language file? - Look on community forums for the language specific sub-forums where you might find more people that share the same language, if there isn't a forum created then you can post on the main WinBuilder discussion forum.
Other Tools
Code Box
Code box is a tool added to quickly help you test new commands. It is an Advanced command and must first be enabled from the Options page.
It will create a small template script that will be executed whenever you press the play button inside this tab. With this tool you can run commands to see how they work and view the results on the log window.
You can also add commands using the right click menu in the same way as the internal source code editor. Each code box script runs exactly under the same conditions as any other script inside your selected project, making this a good tool for debugging variables and commands.
The code you add inside the Code Box is automatically saved inside a file called CodeBox.txt which can be found on the root of each project where you use it - this way we ensure that you can have a Code Box specific to a single project.
Download Center
The Download interface was added to help people keep in touch with the community. From this page you can quickly view the latest discussed topics from our forums.
It also may allow you (if supported by the project) to update your scripts without having to download the entire project. Scripts may be marked with specific "Download level" in the [MAIN] section of the script file. This allows you to focus on checking the project according to the level specified.
The intention is that the script writer or project owner would mark scripts starting from the most important/critical to the least ones. So:
- Level 1 stands for core scripts that the project cannot be built without.
- Level 2 includes the core scripts and scripts that add a normal environment without much fluff
- Level 3 adds up all the scripts in the previous levels and scripts on this level add fluff and special features
- Level 4 is intended to specifically mark scripts available as beta to interested testers, was never used by developers. I am not sure if it will includes all scripts marked in previous levels.
These levels are displayed as
- Minimum (i.e. Download_level=1)
- Recomended (i.e. Download_level=2)
- Complete (i.e. Download_level=3)
- Beta (i.e. Download_level=4)
The script on the project server will be process if the value selected is greater than or equal to the value included in the script. This means that if the value is equal to zero (or is not specified), the script will always be processed.
Scripts are compared based on the version number in the script's [MAIN] section by default.
This check can be changed as one of the options (in the options tab) on this screen. In addition to the Options tab, the different servers that are checked can also be managed on this screen as well. These are stored in the WinBuilder INI file, but the graphical controls on the lower right side of the screen are provided to allow you to add new links, cause WinBuilder to refresh the script checks with the selected servers or to remove the selected links.
WinBuilder.ini
The WinBuilder.ini settings are documented here
Frequently Asked Questions
Q: I want to create a new script with these tools, but I still have lots of doubts about scripting and all things that need to be done to get my programs working - where can I find more info?
A: Perhaps the best help you can get is reading other scripts that work the way you need and apply them to run your programs. Don't forget to also ask people whenever you find something a bit harder to understand or do, nobody knows everything from scratch so take one step at time and things will start to make sense quickly.
Bugs
Bugs and requests are welcome on our discussion forum dedicated to these reports here.
Please remember to add as much details as possible and it would also help if you described exactly how this bug can be reproduced.
Also check if you're also using the latest version since a lot of bugs tend to be corrected as new versions become available.
Whenever in doubt you can also help yourself and use the Search function inside the forums to find other members who might have reported similar cases to yours. You might even find answers to how they've solved the same issue or add your comment to ensure that it gets solved sooner.