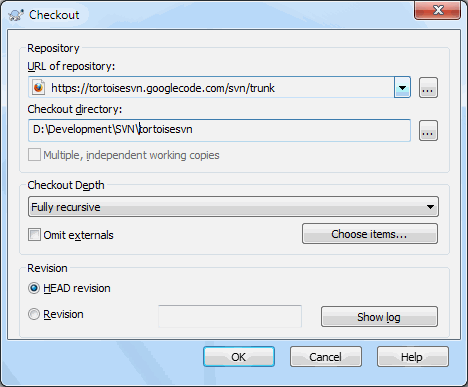
To obtain a working copy you need to do a checkout from a repository.
Select a directory in windows explorer where you want to place your working copy. Right click to pop up the context menu and select the command → , which brings up the following dialog box:
If you enter a folder name that does not yet exist, then a directory with that name is created.
![[Important]](important.png)
|
Important |
|---|---|
|
In the default setting, the checkout menu item is not
located in the TortoiseSVN submenu but is shown at the top
explorer menu. TortoiseSVN commands that are not in the submenu
have |
You can choose the depth you want to checkout, which allows you to specify the depth of recursion into child folders. If you want just a few sections of a large tree, You can checkout the top level folder only, then update selected folders recursively.
- Fully recursive
-
Checkout the entire tree, including all child folders and sub-folders.
- Immediate children, including folders
-
Checkout the specified directory, including all files and child folders, but do not populate the child folders.
- Only file children
-
Checkout the specified directory, including all files but do not checkout any child folders.
- Only this item
-
Checkout the directory only. Do not populate it with files or child folders.
- Working copy
-
Retain the depth specified in the working copy. This option is not used in the checkout dialog, but it is the default in all other dialogs which have a depth setting.
- Exclude
-
Used to reduce working copy depth after a folder has already been populated. This option is only available in the Update to revision dialog.
To easily select only the items you want for the checkout and force
the resulting working copy to keep only those items, click the
button. This opens a new dialog
where you can check all items you want in your working copy and uncheck
all the items you don't want. The resulting working copy is then known
as a sparse checkout. An update of such a working
copy will not fetch the missing files and folders but only update
what you already have in your working copy.
If you check out a sparse working copy (i.e., by choosing something other
than fully recursive for the checkout depth), you can
easily add or remove sub-folders later using one of the following methods.
Right click on the checked out folder, then use → and select . This opens the same dialog that was available in the original checkout and allows you to select or deselect items to include in the checkout. This method is very flexible but can be slow as every item in the folder is updated individually.
Right click on the checked out folder, then use → to bring up the repository browser. Find the sub-folder you would like to add to your working copy, then use → .
In the check for modifications dialog, first shift click on the button
. The dialog will show all
the files and folders which are in the repository but which you
have not checked out as remotely added.
Right click on the folder(s) you would like to add
to your working copy, then use
→ .
This feature is very useful when you only want to checkout parts of a
large tree, but you want the convenience of updating a single working
copy. Suppose you have a large tree which has sub-folders
Project01 to Project99,
and you only want to checkout
Project03,
Project25 and
Project76/SubProj.
Use these steps:
-
Checkout the parent folder with depth “Only this item” You now have an empty top level folder.
-
Select the new folder and use → to display the repository content.
-
Right click on
Project03and → . Keep the default settings and click on . You now have that folder fully populated.Repeat the same process for
Project25. -
Navigate to
Project76/SubProjand do the same. This time note that theProject76folder has no content except forSubProj, which itself is fully populated. Subversion has created the intermediate folders for you without populating them.
![[Tip]](tip.png)
|
Changing working copy depth |
|---|---|
|
Once you have checked out a working copy to a particular depth you can change that depth later to get more or less content using → . In that dialog, be sure to check the Make depth sticky checkbox. |
![[Tip]](tip.png)
|
Using an older server |
|---|---|
|
Pre-1.5 servers do not understand the working copy depth request, so they cannot always deal with requests efficiently. The command will still work, but an older server may send all the data, leaving the client to filter out what is not required, which may mean a lot of network traffic. If possible you should upgrade your server to at least 1.5. |
If the project contains references to external projects which you do not want checked out at the same time, use the Omit externals checkbox.
![[Important]](important.png)
|
Important |
|---|---|
|
If Omit externals is checked, or if you wish to increase the depth value, you will have to perform updates to your working copy using → instead of → . The standard update will include all externals and keep the existing depth. |
It is recommended that you check out only the trunk part of the
directory tree, or lower. If you specify the parent path of the
directory tree in the URL then you might end up with a full
hard disk since you will get a copy of the entire repository tree
including every branch and tag of your project!
![[Tip]](tip.png)
|
Exporting |
|---|---|
|
Sometimes you may want to create a local copy without any of those
|
