This final section documents the steps involved in setting up a number of popular Java IDEs to effect the easier editing of Spring's XML Schema-based configuration files. If your favourite Java IDE or editor is not included in the list of documented IDEs, then please do raise an issue and an example with said favorite IDE/editor may be included in the next release.
The following steps illustrate setting up Eclipse to be XSD-aware. The assumption in the following steps is that you already have an Eclipse project open (either a brand new project or an already existing one).
注意
The following steps were created using Eclipse 3.2. The setup will probably be the same (or similar) on an earlier or later version of Eclipse.
-
Step One
Create a new XML file. You can name this file whatever you want. In the example below, the file is named
'context.xml'. Copy and paste the following text into the file so that it matches the attendant screenshot.<?xml version="1.0" encoding="UTF-8"?> <beans xmlns="http://www.springframework.org/schema/beans" xmlns:xsi="http://www.w3.org/2001/XMLSchema-instance" xmlns:util="http://www.springframework.org/schema/util" xsi:schemaLocation=" http://www.springframework.org/schema/beans http://www.springframework.org/schema/beans/spring-beans-2.0.xsd http://www.springframework.org/schema/util http://www.springframework.org/schema/util/spring-util-2.0.xsd"> </beans>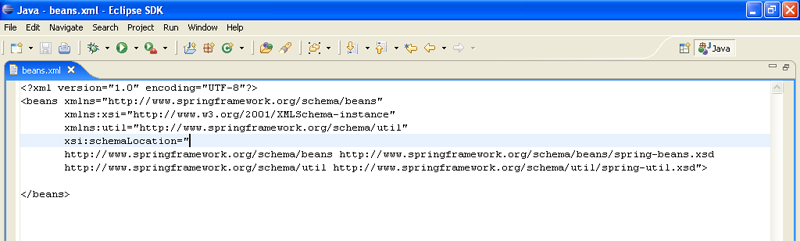
-
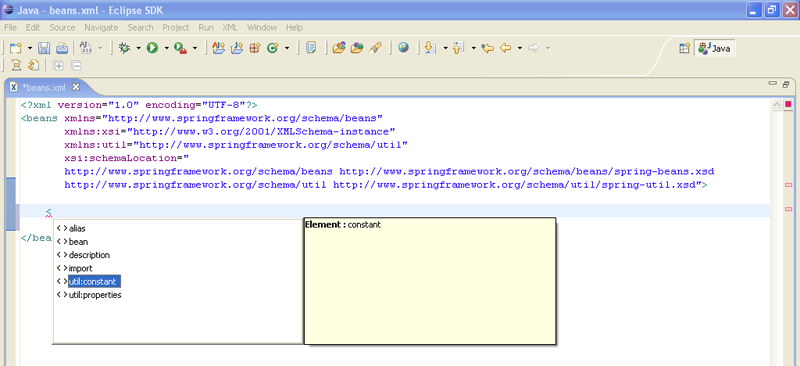
Step Two
As can be seen in the above screenshot (unless you have a customised version of Eclipse with the correct plugins) the XML file will be treated as plain text. There is no XML editing support out of the box in Eclipse, and as such there is not even any syntax highlighting of elements and attributes. To address this, you will have to install an XML editor plugin for Eclipse...
表 A.1. Eclipse XML editors
XML Editor Link The Eclipse Web Tools Platform (WTP)
http://www.eclipse.org/webtools/ A list of Eclipse XML plugins
http://eclipse-plugins.2y.net/eclipse/plugins.jsp?category=XML Unfortunately, precisely because there is no standard XML editor for Eclipse, there are (bar the one below) no further steps showing you how to configure XML Schema support in Eclipse... each XML editor plugin would require its very own dedicated section, and this is Spring reference documentation, not Eclipse XML editor documentation. You will have to read the documentation that comes with your XML editor plugin (good luck there) and figure it out for yourself.
-
Step Three
However, if you are using the Web Tools Platform (WTP) for Eclipse, you don't need to do anything other than open a Spring XML configuration file using the WTP platform's XML editor. As can be seen in the screenshot below, you immediately get some slick IDE-level support for autocompleting tags and suchlike. The moral of this story is... download and install the WTP, because (quite simply, and to paraphrase one of the Spring-WebFlow developers)... “[WTP] rocks!”
The following steps illustrate setting up the IntelliJ IDEA IDE to be XSD-aware. The assumption in the following steps is that you already have an IDEA project open (either a brand new project or an already existing one).
Repeat as required for setting up IDEA to reference the other Spring XSD files.
-
Step One
Create a new XML file (you can name this file whatever you want). In the example below, the file is named
'context.xml'. Copy and paste the following text into the file so that it matches the attendant screenshot.<?xml version="1.0" encoding="UTF-8"?> <beans xmlns="http://www.springframework.org/schema/beans" xmlns:xsi="http://www.w3.org/2001/XMLSchema-instance" xmlns:util="http://www.springframework.org/schema/util" xsi:schemaLocation=" http://www.springframework.org/schema/beans http://www.springframework.org/schema/beans/spring-beans-2.0.xsd http://www.springframework.org/schema/util http://www.springframework.org/schema/util/spring-util-2.0.xsd"> </beans>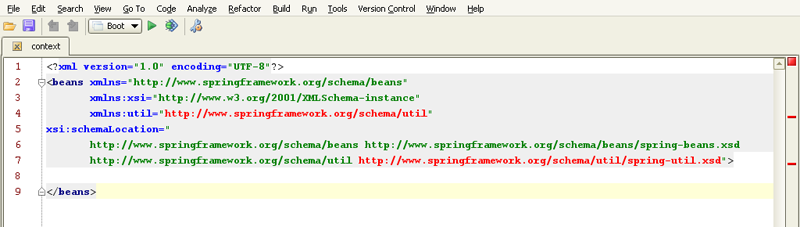
-
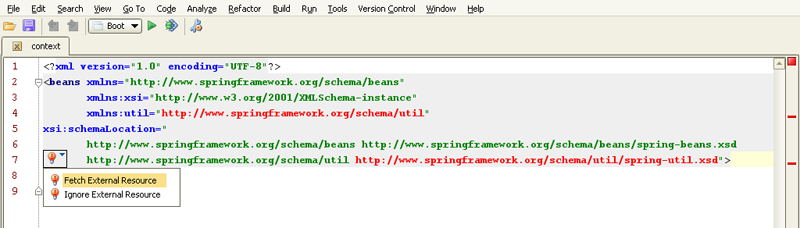
Step Two
As can be seen in the above screenshot, the XML file has a number of nasty red contextual error markers. To rectify this, IDEA has to be made aware of the location of the referenced XSD namespace(s).
To do this, simply position the cursor over the squiggly red area (see the screenshot below); then press the Alt-Enter keystroke combination, and press the Enter key again when the popup becomes active to fetch the external resource.
-
Step Three
If the external resource could not be fetched (maybe no active Internet connection is available), you can manually configure the resource to reference a local copy of the attendant XSD file. Simply open up the
'Settings'dialog (using the Ctrl-A-S keystroke combination or via the'File|Settings'menu), and click on the'Resources'button.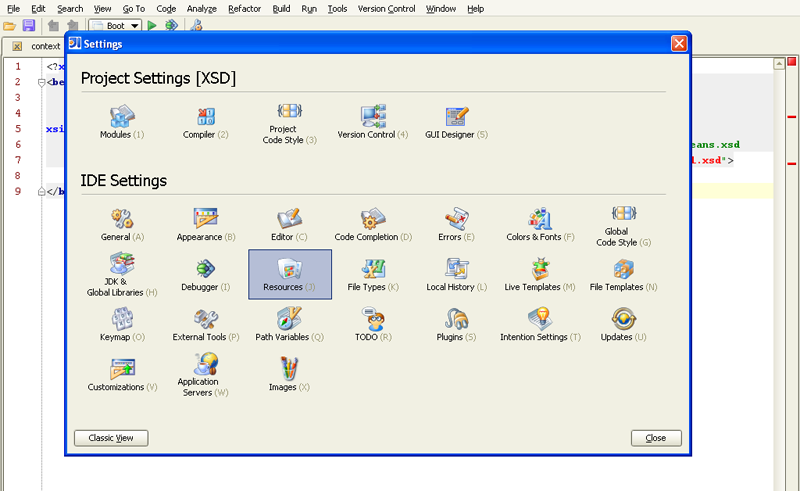
-
Step Four
As can be seen in the following screenshot, this will bring up a dialog that allows you to add an explicit reference to a local copy of the
utilschema file. (You can find all of the various Spring XSD files in the'src'directory of the Spring distribution.)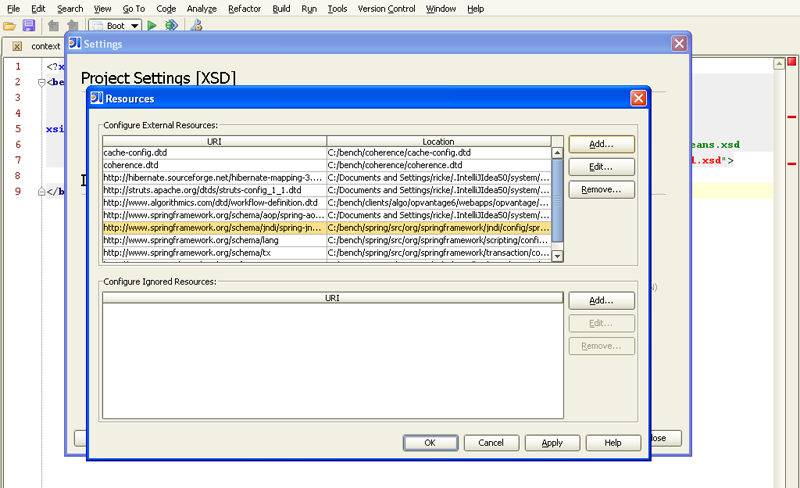
-
Step Five
Clicking the
'Add'button will bring up another dialog that allows you to explicitly to associate a namespace URI with the path to the relevant XSD file. As can be seen in the following screenshot, the'http://www.springframework.org/schema/util'namespace is being associated with the file resource'C:\bench\spring\src\org\springframework\beans\factory\xml\spring-util-2.0.xsd'.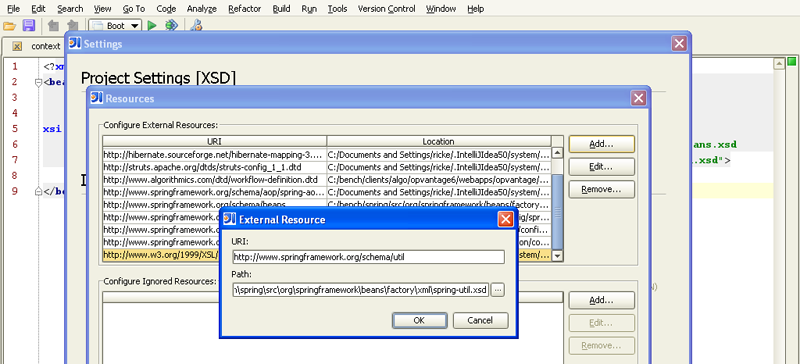
-
Step Six
Exiting out of the nested dialogs by clicking the
'OK'button will then bring back the main editing window, and as can be seen in the following screenshot, the contextual error markers have disappeared; typing the'<'character into the editing window now also brings up a handy dropdown box that contains all of the imported tags from theutilnamespace.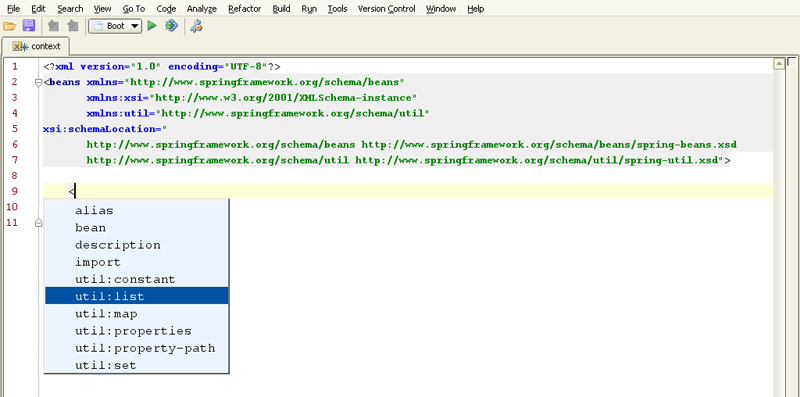
This final section details integration issues that may arise when you switch over to using the above XSD-style for Spring 2.0 configuration.
This section is quite small at the moment (and hopefully it will stay that way). It has been included in the Spring documentation as a convenience to Spring users so that if you encounter an issue when switching over to the XSD-style in some specific environment you can refer to this section for the authoritative answer.
If you are using the XSD-style for Spring 2.0 XML configuration and deploying to v.3 of Caucho's Resin application server, you will need to set some configuration options prior to startup so that an XSD-aware parser is available to Spring.
Please do read this resource, http://www.caucho.com/resin-3.0/xml/jaxp.xtp#xerces, for further details.