Strategy Guide
This guide explains some common terms used in Reversi and describes a few general strategies for winning.
Stable Discs
A disc played in a corner cannot be outflanked. These are considered stable discs since the opponent cannot flip them.
During the course of a game, discs at other positions will become stable once they can no longer be outflanked. This makes gaining corner squares very advantageous. They can serve as an anchor to gaining stable positions starting along the adjacent edges.
Figure 1 below shows Black with nine stable discs anchored to the upper left corner.
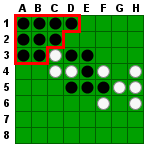 Figure 1
Positioning
While corner squares are desirable, making a move on a square next to an open corner is not. Doing so may open up the corner for your opponent.
Given the strategic importance of these squares, they are commonly referred to as C-squares and X-squares, as shown in Figure 2.
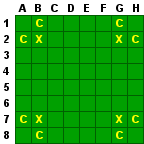
Figure 2
In particular, you should avoid playing the X-square next to an open corner.
Mobility
One strategy that is effective throughout the game is to leave your opponent with as few legal moves as possible while not limiting your own choices. This is called mobility.
This can force your opponent into making a bad move. Figure 3 shows a situation where, on White's turn, the player is forced to play B2 (an X-Square), as he has no other legal move.
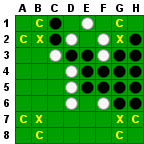
Figure 3
This leaves the board as shown in Figure 4.
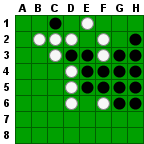
Figure 4
This allows Black to take the corner at A1, as seen in Figure 5.
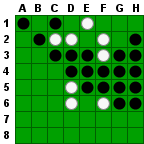
Figure 5
Forfeits
Leaving your opponent with no legal moves will force him to forfeit his turn. This can be very advantageous as you are able to play two (or possibly more) of your discs consecutively.
Likewise, you want to leave yourself with as many potential moves as possible, so you won't be forced to make a bad one or forfeit your turn. While the object of the game is to finish with more discs on the board than your opponent, it is often better to have fewer discs in the early stages of the game as this helps limit your opponent's choices.
Frontier Discs
One easy way to measure mobility is to count how many frontier discs you have vs. your opponent. A frontier disc is one that is adjacent to an empty square (including diagonals).
The fewer frontier discs you have, the fewer moves your opponent will likely have on subsequent turns.
In Figure 6, White has 16 discs in all while Black has ten. However, 15 of White's discs are on the frontier (the only White disc not adjacent to an empty space is at E5). Black has only five discs on the frontier.
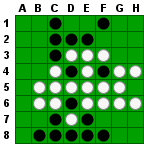
Figure 6
At this point, White has only three possible moves, at B4, B7 or B8. Two of those moves are next to the corner, which Black can subsequently take. Black, on the other hand, will have a number of possible moves to choose from on his next few turns.
Wedges
Take a look at Figure 7. If Black plays D1, he can take the corner at H1 on his next move. Because D1 is between two of White's discs along the edge, there would be no way for White to flip Black's disc back. Such a play is called a wedge.
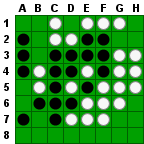
Figure 7
Also note the left edge of Figure 7, where Black has a pair of discs with two empty squares between them. If White where to play either the A5 or A6 square, Black could flip White's disc back by playing the other square. In general, if you have an odd number of empty squares between two of your discs along an edge, you opponent can play a wedge. But if you have an even number of empty squares between them, the wedge can be avoided.
Unbalanced Edges
Figure 8 shows a situation where Black has a row of five discs along the left edge. This is commonly referred to as an unbalanced edge.
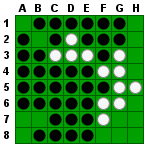
Figure 8
In Figure 9, White plays B7. This would normally be considered a bad move since it is an X-Square and, as in this case, will allow Black to take the corner at A8.
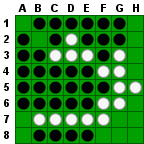
Figure 9
Black does so, as shown in Figure 10.
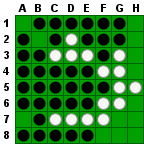
Figure 10
However, White can now play the wedge at A7. Figure 11 shows the result.
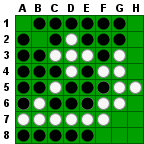
Figure 11
Black cannot do much at this point, settling for a move at H3 as seen in Figure 12.
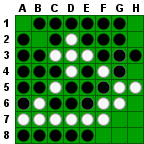
Figure 12
White can now take the corner at A1, shown in Figure 13. Note that White can subsequently take the corner at H1 on his next turn as well.
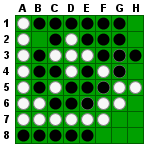
Figure 13
Parity
Near the end of a game, isolated regions of adjacent, empty spaces may appear on the board. Figure 14 shows an example where four such regions have formed, one near each corner of the board.
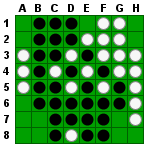
Figure 14
It is usually advantageous to make the last move in such regions. In the above example, White is to move next. By playing his disc in a region with an odd number of empty squares, he is likely to have the last move in that region (assuming neither player must forfeit a turn). Conversely, he should avoid making a move in a region with an even number of empty squares, as would likely give Black the advantage.
Obviously, White should not blindly give up a corner or allow Black to capture an edge (or avoid gaining the same) just to achieve this parity advantage. But combined with careful play, it could mean the difference between winning and losing in a close game.