Server Cluster Recovery Utility: Recovering a shared disk
From Cluster Server Recovery Utility
Recovering a shared disk
The server cluster physical disk resource uses the disk signature to identify a disk and to map the real device to a physical disk resource instance. When a physical disk fails and is replaced, or when a physical disk is re-formatted with a low-level format (may be required if the IO subsystem information on the disk becomes corrupt for any reason), the signature of the newly formatted disk no longer matches the signature stored by the physical disk resource. There are other reasons that the disk signature may change, for example, a boot sector virus or a malfunctioning multi-path device driver can cause the signature to be re-written (see kb article Q293778 Multiple-path software may cause disk signature to change). In all of these cases, the physical disk resource cannot be brought online and action is required to get the applications using that disk up and running again.The cluster recovery utility allows a new disk, managed by a new physical disk resource to be substituted in the resource dependency tree and for the old disk resource (which now no longer has a disk associated with it) to be removed.
To replace a failed disk use the following procedure:
- Add a new disk drive to the cluster. In a storage area network environment, adding a new disk drive may involve creating a new logical unit and exposing it to the server cluster nodes with appropriate LUN masking, security and zoning properties.
- Make sure that the new disk is only visible to one node in the cluster. Until the Cluster service takes control of the new disk and a physical disk resource is created, there is nothing to stop all nodes that can see the disk from accessing it. To avoid file system issues, you should try to avoid exposing a disk to more than one node until it has been added to the cluster. In some cases (such as with low-end fiber channel RAID devices or devices in a shared SCSI storage cabinet) there is no way to avoid multiple machines from accessing the same disk. In these cases, a CHKDSK may run when the disk resource is brought online in step 5 of this procedure. Although this situation is recoverable through CHKDSK, you can avoid it by shutting down the other cluster nodes, although this may not be appropriate if the cluster is hosting other, currently functioning applications and services.
- Partition and format the new disk drive as required. Note: For a disk drive to be considered as a cluster-capable disk drive, it must be an MBR format disk and must contain at least one NTFS partition. Assign it a drive letter other than the letter it is replacing for now.
- Create a new physical disk resource for the new disk drive using Cluster Administrator (or the cluster.exe command line utility).
- Make the disk drive visible to the same set of nodes as the disk drive that it is replacing (in a typical configuration, a disk driver is visible to all nodes in the server cluster). In the event that the device does not appear to the cluster nodes, you may perform a manual rescan for new hardware using the device manager. At this stage you should try to bring the disk resource online and then fail it over all nodes of the cluster in turn to ensure that the new physical disk is correctly configured and can be viewed from all nodes.
- Use the Server Cluster Recovery Utility to substitute the newly created physical disk resou rce for the failed resource. Note: The Server Cluster Recovery Utility ensures that the old and new disk resources are in the same resource group. It will take the resource group offline and transfer the properties of the old resource (such as failover policies and chkdsk settings) to the new resource. It will also rename the old resource to have "(lost)" appended to the name and rename the new resource to be the same as the old resource. Any dependencies on the old resource will be changed to point to the new resource.
- Change the drive letter of the new physical disk to match that of the failed disk. Note: The new physical disk resource must be brought online first and then the drive letter can be changed (on the node hosting the physical disk resource) using the Disk Management snap-in available via Computer Management.
- Once you have validated that the new resource is correctly installed, you should delete the old physical disk resource as it no longer represents a real resource on the cluster.
- Once the cluster is configured, you should restore the application data to the new disk drive.
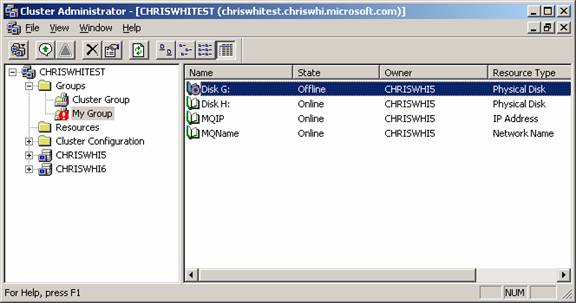
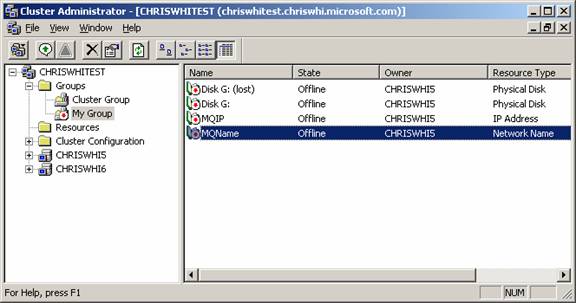
The following shows the affect of running the Server Cluster Recovery Utility. Start with the following cluster configuration. In this case, Disk G has failed and is to be replaced by Disk H. (Note, if the failed disk was in the cluster group, you may have to start the Cluster Administration tool on the cluster node itself using “.” as the cluster to connect to).
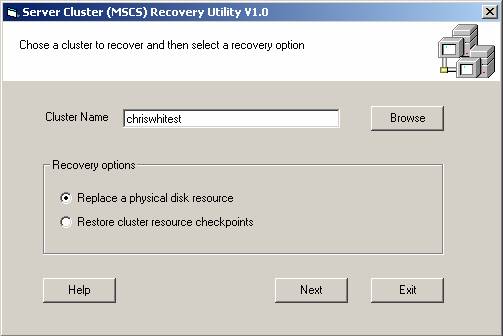
In the cluster recovery utility specify a cluster and select the “Replace a physical disk resource” option and click the Next button.
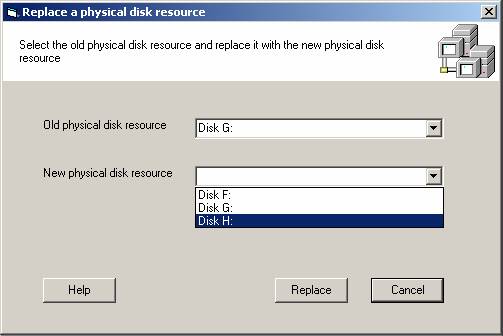
You now need to select the old (failed) physical disk resource and the new physical disk resource. You can either type the name of the resource or select it from the set of physical disk resources on the cluster (Note: The old and new physical disk resources MUST be in the same resource group for the replacement to succeed).
Once you have selected the resources, click the Next button. If the substitution was successful, the following message will appear to remind you of the procedures to ensure correct application operation.
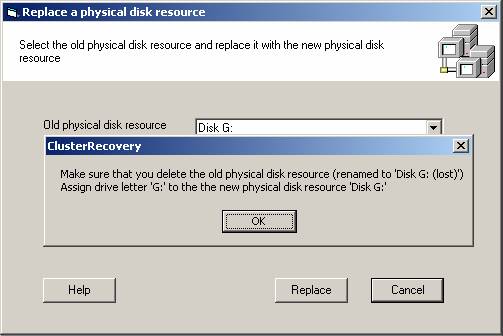
All appropriate public and private properties from the old resource such as failover policies, timeouts, chkdsk attributes etc. are carried from the old resource and applied to the new resource. Any dependencies and/or dependents on the old physical disk will be transferred to the new physical disk and the new resource is renamed to match the old one and the old resource is renamed with the suffix “(lost)”. After running the cluster recovery utility, the configuration above looks like:
To complete the replacement, you should bring the new disk resource online and use the disk management snap-in to change the drive letter to match the old disk resource (this is necessary because applications that are using the disk will typically reference files on the disk via a drive letter). Once you are happy that the new resource has the cluster properties that you want from the old resource, you can delete the old physical disk resource as it is no longer required.