Receive a Payment
From Amicus


| Amicus | |
| Receive A Payment | |
| See Also Submit feedback on this topic | |
| Key Areas > Customers > Common Tasks > Receive A Payment |
Glossary Item Box
Often you will sell products, whether they are goods or services, that your customers can pay for at a later date. Amicus offers the functionality to accept payments at a later date and this provides your customers with greater flexibility when purchasing goods/services at your business.
To process a payment for a past sale click on Sales from the Amicus Toolbar and then click on Receive Payments. Alternatively, click on Receive Payments from the Transactions menu.
Doing either of these options will open up the Receive Payments screen.
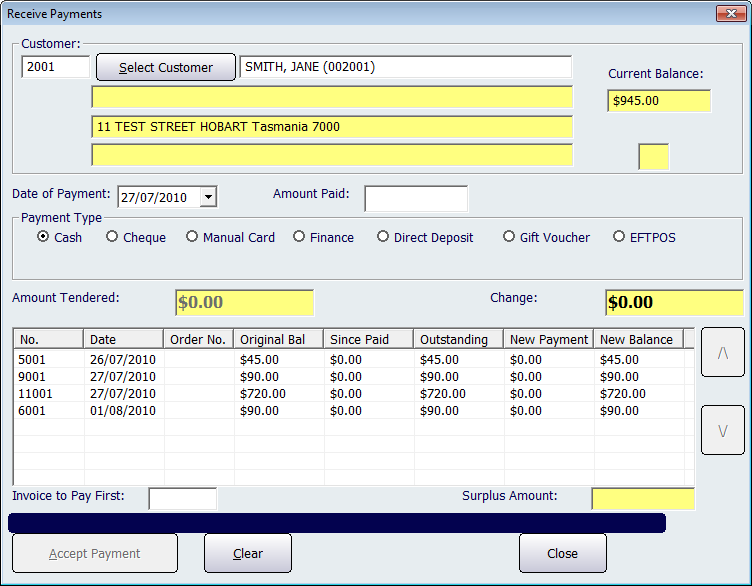
Figure : Receiving a payment
You will then be required to select the customer who is making the account payment. If you know the customer number, enter it in the Customer field.
If you know part of the customers name, you can enter part of the name in the Name field. A window will open up with all matching customers. Select the customer you want and click Select or press Enter.
If you want to bring up a list of all customers in NBS Amicus, click Select Customer. This will allow you to search all of the customers that exist in the database. These details may be sorted quickly by clicking on the column headings in the list to change the sort sequence. You can then type letters or numbers and NBS Amicus will try to find the corresponding entry within the selected column.
Once you have selected the correct customer, enter the Date of Payment and the amount the customer wishes to pay off their account in the Amount Paid field.
Select the Payment Type that the customer is using the pay the invoice. The payment options include:
-
Cash;
-
Cheque;
-
Manual Card;
-
Finance;
-
Direct Deposit;
-
Gift Voucher;
-
EFTPOS
Depending on the payment method, additional information may be required such as Cheque No. for cheques, Authorisation Code for cards, etc.
The yellow fields on this screen are automatically populated by Amicus based on the customer that has been selected. These fields are unable to be manually edited.
Accepting a Payment
By default, invoices will be paid in the order that they are listed, with NBS Amicus automatically paying off the oldest invoices first. If you want to change the order that invoices are paid off you will need to re-arrange the order. This is done by selecting the desired invoice on the list, or by highlighting the invoice with the cursor and then using either the Up Arrow or the Down Arrow to manually move the invoice in the list of outstanding invoices. Alternatively, enter the invoice number in the Invoice to Pay First field. This will move that invoice to the top of the list.
The New Payment and New Balance columns in the list will tell you how much will remain outstanding after this payment has been deducted from the invoice(s).
If the customer has chosen to pay by Cash or Gift Voucher the Amount Tendered field will be enabled. Enter the amount of cash tendered or the face value of the gift voucher tendered. If this exceeds the Amount Paid, then NBS Amicus will calculate the Change that is due to the customer.
When you are satisfied with the order of payment of outstanding invoices, select Accept Payment Split.
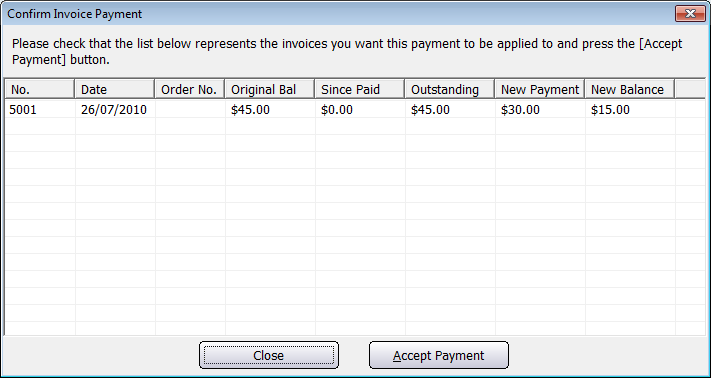
Figure : Confirm Invoice Payment screen.
NBS Amicus will then ask you to confirm this account payment before it is processed. If everything is correct select Accept Payment Split for a second time. An Account Payment dialog will then appear asking you if your would like to print a payment receipt. Click Yes to print a payment receipt or select No if you would not like a payment receipt printed. You will then be returned to a blank Receive Payments screen.
If you want to change the details you have entered, click Close and you will be returned back to the Receive Payments screen.
Click on the Close button to exit the Receive Payments screen.