


| SQL Server Setup Help | |
| How to: Configure SharePoint Integration on Multiple Servers | |
 See Also
|
|
|
| Configuring SQL Server 2008 > Configuring Reporting Services > Reporting Services Configuration How-to Topics > |
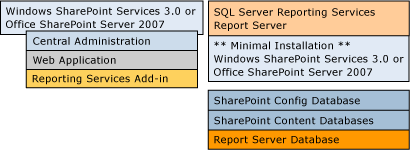
This topic provides step-by-step instructions for installing and configuring Reporting Services in SharePoint integrated mode in a multi-server deployment topology. This configuration is recommended if you have a large number of users who access reports from a SharePoint site. The following illustration shows the components you must install.
Prerequisites
Before you begin installing components, be sure to do the following:
-
Review the introduction to deployment configurations so that you are familiar with the components that you are about to install. For more information, click Deployment Topologies for Reporting Services in SharePoint Integrated Mode.
-
Review the configuration overview topic for best practice recommendations on service account configuration and to learn more about the configuration steps. For more information, click Configuring Reporting Services for SharePoint 3.0 Integration.
-
Review the hardware and software requirements that apply to all deployment scenarios that include Reporting Services in SharePoint integrated mode. For more information, click Requirements for Running Reporting Services in SharePoint Integrated Mode.
-
Review the remaining items in this section to learn about additional requirements that apply to a stand-alone server configuration.
Server Requirements for a Multi-server Deployment
You must have at least two or three servers. Hosting the application databases on a third server that is used exclusively by the Database Engine is common technique for improving performance if you expect a relatively large number of users.
If you are using two servers, each one should have the following components:
-
On one server, install SQL Server 2008 Reporting Services (SSRS) and Database Engine. This server will be used to host the report server along with the report server database and SharePoint application databases.
-
On the second server, install the Microsoft .NET Framework 3.0 redistributable package, an instance of a SharePoint product or technology, and the Reporting Services Add-in. This server will be the primary server in the farm. Central Administration will be installed on this server. Users will access report server content from the site collection on this computer.
Account Requirements for a Multi-server Deployment
You must have a domain user account to connect the instance of the SharePoint product or technology to the SharePoint_config database. Server farms require that you use domain accounts for services and database connections. If possible, create a new account that can be used for just this application. Avoid using your own credentials or those of any user who will be accessing a SharePoint site as a regular user (you will get access denied errors).
You must create a SQL Server database login for the domain account. The login needs DBCreator permissions on the server.
You must configure the SharePoint application pool process account to run as a domain user.
You must configure the Report Server service to run as a domain user account.
 Important: Important: |
|---|
| For distributed server deployments where the report server, the SharePoint Web application, and the server databases are on three different computers, you can use default settings that include the default Web site and port assignments. If you install the SharePoint Web application and the report server on different computers, but you put the SharePoint databases on the report server computer, you will encounter connection errors unless you follow the guidelines about service account configuration described in the previous section. For more information, see How to: Configure a Service Account for Reporting Services. |
Administrator credentials are required to run all Setup programs, to grant permissions to be the primary site collection administration, and to grant database access when you configure report server integration.
Installation Order
You can install the component technologies in any order. For best results, confirm that each server product or technology is installed correctly before you integrate them
The following list provides a summary of the deployment tasks:
-
Install Reporting Services and Database Engine. If you are installing server software on a production server or if you are using a three-server deployment configuration, plan on choosing the Install but do not configure the server option so that you can control when and how the report server is configured.
-
Configure the report server, and verify you have a valid installation.
-
Download and install the .NET Framework 3.0 redistributable package.
-
Install Windows SharePoint Services or Office SharePoint Server 2007. Plan on choosing the Advanced installation option so that you can specify a remote database server during configuration.
-
Run the SharePoint Products and Technologies Configuration Wizard and select the database server.
-
Configure the site collection features in Central Administration and open the SharePoint site to verify you have a valid installation.
-
Download and install the Reporting Services Add-in for SharePoint Technologies.
-
Configure the report server integration features in Central Administration.
To install Reporting Services and the Database Engine
-
Install Reporting Services and the Database Engine on the same computer or on different computers. For more information, see Considerations for Installing Reporting Services.
After Setup is finished, configure the report server for native mode operation to verify that the installation succeeded. Doing so allows you to use Report Manager to verify the installation.
For instructions on how to start the Reporting Services Configuration tool and configure the report server for operation, see Reporting Services Configuration How-to Topics.
To download and install the .NET Framework 3.0 redistributable package
-
On a different server that you will use for the instance of the SharePoint product or technology, download the
.NET Framework 3.0 redistributable package from the Microsoft Download Center. -
Run Setup. Setup runs in the background and might take awhile to finish. To check its progress, click the Microsoft .NET Framework 3.0 Installation icon in the notification area of the taskbar.
To install a SharePoint product or technology
-
Run Setup.exe from the installation media for Windows SharePoint Services 3.0 or Microsoft Office SharePoint Server .
-
Enter the 25-character product key.
-
Accept the software license agreement.
-
Click Advanced.
-
On Server Type, click Web Front End
-
The Data Location tab specifies file location for search index files. On Data Location, use the default value or select a computer that has excess disk space.
-
Click Install Now.
-
On Server Type, click Web Front End
-
Configure the SharePoint product or technology. The SharePoint Product and Technology Configuration Wizard should start after Setup is finished. If it does not, start it from Administrative Tools.
-
Click Next on the Welcome screen.
-
Click Yes to restart the services if required.
-
On the Connect to a Server Farm page, click No, I want to create a new server farm, and then click Next.
-
On the Specify Configuration Database Settings page, enter the database server name. If you installed the Database Engine as a default instance, the database server name is the computer name.
-
In User Name and Password, type the credentials of a domain user account that has permission to log on to the computer, a SQL Server database login, and DBCreator permissions on the server. If possible, specify an account that is used only to run this application. Do not type the credentials of a user who will later access the SharePoint site; otherwise, that user might receive access denied errors later when accessing content on the site. Click Next.
-
On the Configure SharePoint Central Administration page, click Next to accept all the defaults. If you know that impersonation and delegation features are enabled for Windows Authentication in your domain, you can select Negotiate (Kerberos) instead. Otherwise, select the default value and click Next.
-
On Completing the SharePoint Products and Technologies Configuration Wizard, click Next to start the configuration using the settings that you specified.
-
Click Finish.
-
Click Next on the Welcome screen.
To configure the SharePoint Web application
-
Click Start, click Administrative Tools, and then click SharePoint 3.0 Central Administration. Follow the checklist in the Administrator's Tasks. For more information about each task, click the link Read the deployment steps and then open the Quick Start Guide. The tasks in the following steps are required.
-
Create a Web application:
-
Click Create SharePoint Sites.
-
Click Create new Web application.
-
Select Create a new IIS web site (SharePoint - 80) using the default values. This includes using port 80, no host headers, default path, NTLM, and no Anonymous access. Be sure to specify the application pool process account. Choose a domain user account.
-
Click OK.
-
Click Create SharePoint Sites.
-
Click Create Site Collection on the Application Created page.
-
Enter a title.
-
Use all default values. When specifying Primary Site Collection Administrator, specify an account that has local administrator permissions.
-
Click OK.
-
Enter a title.
-
Open a Command Prompt window and type iisrest /noforce.
-
Click the URL to verify the site.
-
(Optional) In Central Administration, enable diagnostic logging.
To configure the report server for SharePoint integrated mode
-
Install and configure a SharePoint Web front end on the report server computer. For instructions, see How to: Install a SharePoint Web Front-end on a Report Server Computer.
-
A browser window will open to Central Administration on the primary server, allowing you to verify that the server farm configuration succeeded.
-
A browser window will open to Central Administration on the primary server, allowing you to verify that the server farm configuration succeeded.
-
Configure the report server for integration:
-
Start the Reporting Services Configuration tool and connect to the report server instance. For instructions, see How to: Start Reporting Services Configuration.
-
In the navigation pane, click Service Account. Verify that it is using a domain user account. If it is not, configure it to use one.
-
In the navigation pane, click Database.
Note: If you are using a remote Database Engine instance, see How to: Create a Report Server Database for SharePoint Integrated Mode (Reporting Services Configuration) for more information. -
Click Change Database.
-
Select Create a new database.
-
Click Next.
-
Specify the instance of the Database Engine that will host the database.
-
Click Test Connection to verify that you can connect to it.
-
Click Next.
-
In Database Name, type a name for the new database (for example, reportserverSharepointMode).
-
Select SharePoint Integrated Mode.
-
Click Next.
-
Specify credentials that the report server uses to connect to the report server database.
-
Click Next.
-
Click Next.
-
Click Finish.
-
Configure the unattended execution account and any other settings that you want to change. The values for the Report Server virtual directory should still be valid. However, Report Manager will no longer be available now that you have configured the report server to use a SharePoint integrated mode database (the tab for the Report Manager virtual directory should be shaded).
-
Start the Reporting Services Configuration tool and connect to the report server instance. For instructions, see How to: Start Reporting Services Configuration.
To download and install the Reporting Services Add-in
-
Click
Microsoft SQL Server 200 to open the download page on the Microsoft Web site.Important: You must be a SharePoint Web farm administrator and Site Collection Administrator to install the Reporting Services Add-in. -
Choose which language to install.
-
In Files to Download, click Download to install either the 32-bit or 64-bit version of the Reporting Services Add-in.
-
Click Save to save the file to a location on your computer.
-
Open Windows Explorer and browse to the folder where the file is located.
-
Double-click SharePointRS.msi to begin installation. For instructions, see How to: Install or Uninstall the Reporting Services Add-in.
-
Get the latest version of the readme file for the Reporting Services Add-in to review late-breaking changes and known issues. On the download page on the Microsoft Web site, in Files to Download, click Download to open the readme_rsaddin.htm file, and then save the file to your computer.
To configure server integration in Central Administration
-
Click Start, click Administrative Tools, and then click SharePoint 3.0 Central Administration.
Important: To complete the following steps, you must be a member of the SharePoint Farm Administrator group and a Site Collection administrator. -
Click Application Management. You should see a new section named Reporting Services. This section has links to pages used to specify integration settings. If you do not see this section, you must activate the report server integration feature. For more information, see How to: Activate the Report Server Feature in SharePoint Central Administration.
At a minimum, you must set the report server URL, select an authentication mode, and grant report server access to the SharePoint databases. For more information, see How to: Configure Report Server Integration in SharePoint Central Administration.
-
Close Central Administration.
You will get an error if the Reporting Services services are running under built-in accounts. If you already configured the services to use domain user accounts, restart the services to clear out old connection information (assuming that there are existing connections in the current session). For more information about service account configuration, see Configuring the Report Server Service Account.
Next Steps
After you install all the components and configure the settings for connecting server components, you must assign permissions, add content types, and add report server items to a SharePoint library.
To finish the deployment tasks for server integration
-
Open the SharePoint Web application. By default, the URL is http://<your-server-name>.
-
Set permissions to grant user access to the SharePoint site. Security is required, but if you want to inherit existing permissions, you do not have to set permissions on specific items. For more information, see Granting Permissions on Report Server Items on a SharePoint Site or How to: Set Permissions for Report Server Items on a SharePoint Site (Reporting Services in SharePoint Integrated Mode).
-
Add Reporting Services content types if you want to create new shared data sources, report models, and Report Builder reports. For more information, see How to: Add Report Server Content Types to a Library (Reporting Services in SharePoint Integrated Mode).
-
Create shared data sources to use with reports and models. For more information, see How to: Create and Manage Shared Data Sources (Reporting Services in SharePoint Integrated Mode).
-
Create shared schedules to use with subscriptions or unattended report processing. For more information, see How to: Create and Manage Shared Schedules (Reporting Services in SharePoint Integrated Mode).
-
Publish report definition files (.rdl), data source files (.rds), and report model files (.smdl) to a SharePoint library. You can also use the Upload command in a SharePoint library to upload .rdl and .smdl files, but not .rds files. Depending on your permissions, you can also create reports in Report Builder and save them to a library. If the reports include references to shared data sources or external files, you must update the references. For more information, see Deploying Models and Shared Data Sources to a SharePoint Site and How to: Upload Documents to a SharePoint Library (Reporting Services in SharePoint Integrated Mode).
When you upload reports, make sure that the data source properties for the report are correct. The data source must have a valid connection string to an external data source. The credential type must be valid for your network topology. Specifically, if Kerberos authentication is not enabled for your domain, you cannot use the Windows integrated security credential type. Instead, you should specify stored credentials. After you verify the data source properties are correct, you can click the report name to open the report. The report will open in the Report Viewer Web Part automatically.
If the report does not open, check permissions on the report and the data source properties that define a connection to the external data source. On a site or farm, SharePoint permissions are used to control access to reports, report models, shared data sources, and the Report Builder tool used to create ad hoc reports. If these items are not visible to users, you should verify that permissions are set correctly.
A report server that runs in SharePoint integrated mode cannot be managed through Report Manager. For a complete list of supported and unsupported features, see Features Supported by Reporting Services in SharePoint Integrated Mode.
See Also
Tasks
How to: Configure SharePoint Integration on a Stand-alone ServerConcepts
Configuring Reporting Services for SharePoint 3.0 IntegrationConsiderations for Installing Reporting Services
Configuring the Unattended Execution Account
Configuring a Report Server for E-Mail Delivery
Other Resources
Requirements for Running Reporting Services in SharePoint Integrated ModeDeployment Topologies for Reporting Services in SharePoint Integrated Mode
Planning a Deployment Mode
Reporting Services and SharePoint Technology Integration