Capture Panel
- There are 3 ways to trigger a
capture function:
- Click on one of the capture buttons
on the Capture Panel

- Press a hotkey. For example, by
default, pressing the Ctrl+PrtSc key combination will activate a Rectangle capture. Hotkeys
can be configured in the program Settings
- Right Click on the tray icon
 in the Windows tray area
  and
select a capture function from the pop-up menu
- Click on one of the capture buttons
on the Capture Panel
-
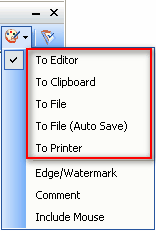
Before making a capture, make sure the right destination is selected. Click on the Output button
 where you can then select one of the following destinations for the captured image:

- To Editor - captured image will be opened in the internal
editor
- To Clipboard - captured image will be sent to the
Windows Clipboard
- To File - a "Save As" dialog will open to save the
captured image
- To File (Auto Save) - captured image will be saved to a specified folder automatically
- To Printer - captured image
will be sent to the print dialog
- To Editor - captured image will be opened in the internal
editor
- During screen capturing, right mouse
click or press Mouse Wheel
or press Esc to
discontinue
- Click on
 to minimize the Capture Panel to the Windows tray area, which keeps the
program running in the background with very little CPU/memory usage. To terminate the
program, click on
- Click on the tray icon
 in the Windows tray area to minimize/restore the floating Capture
Panel
- Use Capture Scrolling Window
 to capture oversize areas such as a scrolling File/Folder list, a PDF
file in Adobe Reader or a web page in a web browser. For web page
capturing, it works with Microsoft Internet Explorer, FireFox
and Opera
- There are 2 ways to open an existing image file in the internal editor:
- Drag the image from a Web browser or Windows Explorer and drop it on the Capture Panel
- Click on the Settings button
and select "Open File in Editor" from the drop-down menu
