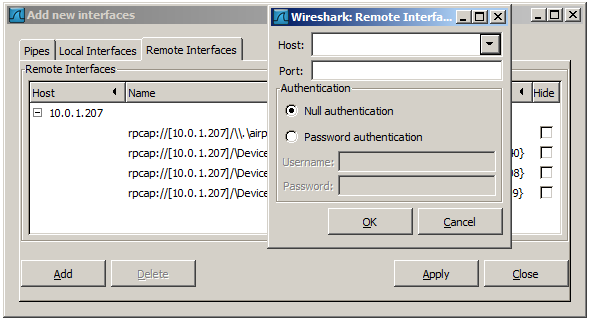
Besides doing capture on local interfaces Wireshark is capable of reaching out across the network to a so called capture daemon or service processes to receive captured data from.
|
|
Microsoft Windows only |
|---|---|
|
This dialog and capability is only available on Microsoft Windows. On Linux/Unix you can achieve the same effect (securely) through an SSH tunnel. |
The Remote Packet Capture Protocol service must first be running on the target platform before Wireshark can connect to it. The easiest way is to install WinPcap from https://www.winpcap.org/install/ on the target. Once installation is completed go to the Services control panel, find the Remote Packet Capture Protocol service and start it.
|
|
Note |
|---|---|
|
Make sure you have outside access to port 2002 on the target platform. This is the port where the Remote Packet Capture Protocol service can be reached by default. |
To access the Remote Capture Interfaces dialog use the “Add New Interfaces - Remote” dialog. See Figure 4.9, “The “Add New Interfaces - Remote Interfaces” dialog box” and select Add.
You have to set the following parameters in this dialog:
- Host
- Enter the IP address or host name of the target platform where the Remote Packet Capture Protocol service is listening. The drop down list contains the hosts that have previously been successfully contacted. The list can be emptied by choosing “Clear list” from the drop down list.
- Port
- Set the port number where the Remote Packet Capture Protocol service is listening on. Leave open to use the default port (2002).
- Null authentication
- Select this if you don’t need authentication to take place for a remote capture to be started. This depends on the target platform. Configuring the target platform like this makes it insecure.
- Password authentication
- This is the normal way of connecting to a target platform. Set the credentials needed to connect to the Remote Packet Capture Protocol service.
The remote capture can be further fine tuned to match your situation. The Remote Settings button in Figure 4.4, “The “Edit Interface Settings” dialog box” gives you this option. It pops up the dialog shown in Figure 4.11, “The “Remote Capture Settings” dialog box”.
You can set the following parameters in this dialog:
- Do not capture own RPCAP traffic
-
This option sets a capture filter so that the traffic flowing back from the Remote Packet Capture Protocol service to Wireshark isn’t captured as well and also send back. The recursion in this saturates the link with duplicate traffic.
You only should switch this off when capturing on an interface other than the interface connecting back to Wireshark.
- Use UDP for data transfer
- Remote capture control and data flows over a TCP connection. This option allows you to choose an UDP stream for data transfer.
- Sampling option None
- This option instructs the Remote Packet Capture Protocol service to send back all captured packets which have passed the capture filter. This is usually not a problem on a remote capture session with sufficient bandwidth.
- Sampling option 1 of x packets
- This option limits the Remote Packet Capture Protocol service to send only a sub sampling of the captured data, in terms of number of packets. This allows capture over a narrow band remote capture session of a higher bandwidth interface.
- Sampling option 1 every x milliseconds
- This option limits the Remote Packet Capture Protocol service to send only a sub sampling of the captured data in terms of time. This allows capture over a narrow band capture session of a higher bandwidth interface.

