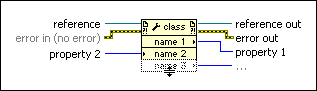
Property Node
Gets (reads) and/or sets (writes) properties of a reference. The Property Node automatically adapts to the class of the object that you reference. LabVIEW includes Property Nodes preconfigured to access VISA properties, .NET properties, and ActiveX properties. Details


Property Node Details
To select the class on which to execute the property, wire the refnum to the reference input. For example, to select the VI, Generic, or Application class, wire the VI, VI object, or application refnum to the reference input. The node adapts to the class automatically. You also can right-click the node and select a class from the shortcut menu.
Move the cursor over terminals in the Property Node to display more information about the property in the Context Help window. You also can right-click a property terminal and select Help For Property from the shortcut menu, where Property is the name of the property.
To get property information, right-click the node and select Change All to Read from the shortcut menu. To set property information, right-click the node and select Change All to Write from the shortcut menu. If a property is read only, Change to Write is dimmed in the shortcut menu.
The node executes each terminal in order from top to bottom. If an error occurs on a terminal, the node stops at that terminal, returns an error, and does not execute any further terminals. You can right-click the node and select Ignore Errors Inside Node from the shortcut menu to ignore any errors and continue executing further terminals. If an error occurs when Ignore Errors Inside Node is set, the property node still returns that error. The error out cluster reports which property caused the error.
If the small direction arrow on the property is on the right, you are getting the property value. If the small direction arrow on a property is on the left, you are setting the property value. Properties have a short or long name that you can change by right-clicking and selecting Name Format from the shortcut menu. The No Names format displays only the data type for each property.
ActiveX Property Node (Windows)
If the property you want to write is variant, you can wire in LabVIEW data types and they automatically convert to variant data types indicated by a coercion dot. ActiveX does not support 64-bit integer data types. If you wire a 64-bit integer data type to a variant parameter of an ActiveX Property Node, LabVIEW converts the data type to a double-precision, floating-point number. If the property is variant, use the Variant To Data function to convert to a LabVIEW data type, if needed. If you right-click the Property Node and select Select Class»ActiveX»Browse from the shortcut menu, LabVIEW displays the Select Object From Type Library dialog box.
On the front panel or block diagram, right-click an ActiveX object, select Create»Property Node, and select a property from the shortcut menu to set a property for the object. You also can select ActiveX-specific properties for an ActiveX object. On the block diagram, right-click an ActiveX object, select Create»Property Node, and select an ActiveX-specific property from the shortcut menu.
.NET Property Node (Windows)
If you right-click the Property Node and select Select Class».NET»Browse from the shortcut menu, LabVIEW displays the Select Object From Assembly dialog box.
On the front panel or block diagram, right-click a .NET object, select Create»Property Node, and select a property from the shortcut menu to set a property for the object. You also can select .NET-specific properties for a .NET object. On the block diagram, right-click a .NET object, select Create»Property Node, and select a .NET-specific property from the shortcut menu.