Command: TEXTMASK
Current settings: Offset factor = <default>, Mask type = <default>
Select text objects to mask or [Masktype/Offset]: Select an option or text or press ENTER to exit
Text objects are grouped together with the mask objects so that they moved, copied, and erased together. To update the mask after editing the text, run TEXTMASK again, and select the text item to be updated. The previous mask object is erased and a new one is created. A companion command, TEXTUNMASK, removes masks from text.
Masktype Options
Command: TEXTMASK
Current settings: Offset factor = <default>, Mask type = <default>
Select text objects to mask or [Masktype/Offset]: Masktype
Mask type currently set to <default>
Specify object type to use for mask [Wipeout/3dface/Solid] <default>
Offset Option
Command: TEXTMASK
Current settings: Offset factor = <default>, Mask type = <default>
Select text objects to mask or [Masktype/Offset]: Offset
Mask offset currently set to <default>
Enter offset factor relative to text height <default>: Specify a value, or select points to set the mask size
Initial default values are Offset factor = 0.35 and Masktype = Wipeout. Subsequent default values are the last specified values.
Objects in paper space used to mask objects in model space are not displayed correctly in plots. The display may look correct but your plot will not. At plot time, AutoCAD processes the model space viewports before processing paper space objects. This makes it impossible for anything in paper space to be "on top of" anything in model space.
Wipeout
A Wipeout is a custom object created by the WIPEOUT tool. Since the Wipeout object is like an image, it has the same requirements for plotting. You need a raster-capable plotter with an ADI 4.3 raster-capable driver or the system printer driver. Masking does not plot properly if the Hide Lines option is used while plotting. One advantage of using a Wipeout mask is that what you see on screen is what you get on your plot.
3Dface
The 3Dface created by TEXTMASK has all of its edges set to invisible. This option is useful if you do not have a raster-capable plotter. The Hide Lines option must be used while plotting for the mask effect to work. With this option, masked text does not look masked on screen.
Solid
If you are using an HP plotter, use the HPCONFIG command and make sure that the In Color option is selected in Print Colors. To make the mask invisible (that is, to hide all objects behind it,) press the pens button in HPCONFIG, and create a pen that uses a shaded fill. Then set the shade percentage to 0%. With this option, masked text appears masked on screen. Also, masks can be colored to highlight text. Masking does not plot properly if the Hide Lines option is used while plotting.
Usage Example:
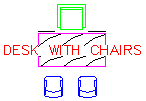
Text over lines:
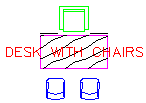
Masked text over lines: