To create a workspace using the Workspace toolbar (Procedure)
From AutoCAD
To create a workspace using the Workspace toolbar
- Right-click
over the Quick Access toolbar or one of the other toolbars that is
currently displayed in the interface.
A shortcut menu is displayed with the available toolbars contained under the customization group that the toolbar belongs to.
- Click
Workspaces to display the toolbar if it is not currently displayed.
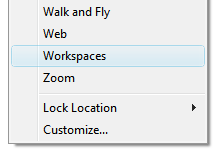
A check mark is displayed to the left of any toolbar that is currently displayed.
- Make the necessary changes to the size, location, and any other properties to the toolbars and palettes that are displayed.
- On
the Workspaces toolbar, select Save Current As.

- In
the Save Workspace dialog box, enter a name in the text box or select an
existing one to overwrite from the drop-down list.
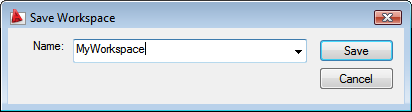
- Click Save to create or modify the workspace.
NoteThe Workspaces toolbar
will be visible when the workspace is restored. If the Workspaces toolbar
is not visible, click Tools menu  Workspaces Save
Current As.If the Workspaces toolbar
is not visible, at the command prompt, enter WSSAVE.
Workspaces Save
Current As.If the Workspaces toolbar
is not visible, at the command prompt, enter WSSAVE.