WinMerge provides several ways to specify paths and open files or folders:
Quick start describes the Select Files or Folders dialog. This section provides more details, and some tips for using the Select Files or Folders dialog more efficiently.
You can use environment variables in your paths. Windows expands the
variable name between % (percent) delimiters. For example, if an
environment variable named WORKDIR has the value c:\workfiles, then the path
%WORKDIR%\project1 is expanded to c:\workfiles\project1 .
WinMerge archive support is provided in the 7-Zip plugin. See Getting and installing WinMerge to install this plugin.
Opening two archive files is similar to opening normal files: specify two archive files in the Open-dialog's Left and Right fields. If WinMerge recognizes the archive format, it opens the contents of the archive files in the Folder Compare window.
The Comparing and merging folders topic describes how to work with
archive files. For example, if an archive file contains two subfolders
named Original/ and Altered/, you can compare the contents of the
two subfolders by specifying the same archive file in both sides in the
Select Files or Folders dialog or WinMerge command line.
![[Tip]](tip.gif) |
Tip |
|---|---|
|
When you drag an archive file to the WinMerge window, press Shift when dropping the file: WinMerge automatically copies the same filename to both sides and opens the archive file. |
The Filter edit field enables you to restrict the files to be included in your folder compare. You can specify one or more file masks, or a single file filter (not both).
A mask is a simple expression based on file extensions. For example, this list of file masks includes only files with the specified extensions; all others are excluded from the selection when the compare operation starts:
*.h;*.cpp *.txt,*.ini
File masks are practical for simple filtering; for more advanced
selecting, use filter files. Filter files are collections of regular
expressions that can either include or exclude files. WinMerge installs a
number of predefined filter files in its Filters
folder, and you can create your own, too.
To specify a filter, click the Select button next to the Filters field to choose from a list of available filters. Or, click the Filter drop-down list and choose a recently-used filter file.
For full information about filter masks and filter files, see Using Filters.
Unpackers are plugins that are installed with WinMerge to provide functionality that is not used by default. Plugins that can be used to preprocess certain types of files before comparing them. For example, WinMerge cannot normally compare MS Word doc files, but by unpacking them, you can compare just the text contents. See Plugins for details.
To apply a plugin to your file comparison, click the Select button for the Unpacker option. In the Select Unpacker dialog:
-
Configure automatic plugin selection or choose a plugin manually:
-
To use automatic mode (which applies the first available plugin), verify that <None> is displayed in the File unpacker control.
-
To choose a different plugin (if available), use the File unpacker control to choose the plugin.
By default, this control lists only suggested plugins for the file type you selected to compare. To see all available plugins, enable the option, Display all packers, don't check the extension.
-
To launch the compare without using any plugin, choose <None> in the File unpacker control.
-
-
Click OK to close the Select Unpacker dialog.
Your choice is displayed in the Unpacker field. Note that you cannot select an unpacker when launching a Folder Compare operation.
The optional Windows shell integration enables you to run WinMerge compare operations directly from Windows Explorer, using WinMerge shortcuts in the context menu.
The Windows Explorer shell integration is available only if enabled.
You can enable it either during
WinMerge installation or later, using the Shell Integration page in the Options window. In the
Options window, configure the Add to context menu option,
including its suboptions if you like.
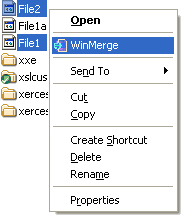
If you enable Add to context menu without the
advanced menu suboption, the WinMerge shortcut
is added to the Explorer context menu. For example:
To use the basic shell integration, begin by selecting two paths in Windows Explorer. Then, right-click and choose WinMerge in the context menu. For example:
WinMerge opens the paths directly in the File Compare or Folder Compare window.
The left and right sides are determined by the sort order in Windows
Explorer. In the preceding screen shot, the Windows Explorer file list is
in ascending order, so WinMerge opens with File2 on
the left side and File1 on the right..
![[Note]](note.gif) |
Note |
|---|---|
|
If either path cannot be opened for any reason, WinMerge opens the Select Files or Folders dialog, where you can specify new paths. Similarly, if you select only a single path, the Select Files or Folders dialog opens with the selected file or folder in the Left field, leaving the Right path for you to specify. |
The WinMerge shortcut is quick and easy to use, but you can compare only files or folders that you are able to select concurrently in Windows Explorer. For more flexible selections, consider enabling the advanced menu, described in the next section.
If you choose the Enable advanced menu, the
WinMerge shortcut is replaced with two
Compare shortcuts:
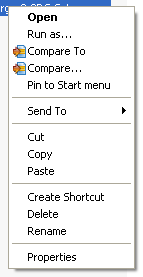
Use the Compare shortcuts in this order:
-
Right-click the first path and choose Compare To. WinMerge stores the path in memory until you select the second path.
-
If you decide that you have chosen the wrong first path, you can change it before choosing the second path:
Right-click the new path and choose the Re-select First shortcut. The new selection overrides your previous path, and you can go on to the next step.
-
Navigate to the second file or folder that you want to compare. The second path can be in any folder, or even in a different Windows Explorer window from the first path. Right-click the second path and choose Compare.
WinMerge opens the File Compare or Folder Compare window, loading the first and second paths in the left and right sides, respectively.
|
Note |
|---|---|
|
If you click Compare before designating the first path, the Select Files or Folders dialog is opened, with your selection as the first (Left) path. Specify the second path in the Right field to continue with the comparison. |
The Compare To paths is stored in memory until WinMerge is opened. As a result, you don't need to select both files at the same time or even using the same Windows Explorer view: you can choose one, open a different directory, and choose the other one. Both paths are discarded from memory after a compare operation. This means that you cannot select one Compare To path and compare it against several paths.
By default, folder compares that you do using the WinMerge or Compare shortcut are not recursive: only files in the top level are included. There are two ways to launch recursive compares with the Windows Explorer integration:
-
Enable Include subfolders by default in the Shell Integration page of the WinMerge Options dialog.
-
Press Control while selecting the WinMerge or Compare shortcut in the Windows Explorer context menu.
|
Note |
|---|---|
|
These settings for the Windows Explorer integration do not change
the |
From any Windows source that allows you to drag objects, such as Windows Explorer or the Desktop, you can drag and drop one or two paths into the WinMerge window. If you drop only one path into WinMerge, the Select Files or Folders dialog opens for you to select the second path. If the single path specifies a project file, then the project file is opened.
By default, WinMerge does not include subfolders in compare operations. To include subfolders, press and hold Control while dropping paths. Another useful key when dropping paths is Shift: To open the same path in both sides of a Compare window, press and hold Shift while dropping only one path. This is a handy way to open archive files (see Opening archive files.
You can drop paths into the Select Files or Folders dialog. A typical procedure is to drag and drop the first path into the WinMerge window, and then drag and drop the second path into the Select Files or Folders dialog. When a path is dropped into the Select Files or Folders dialog, it is loaded into either the left or right path field:
- Left
- Right
You can save the currently open paths and filters in a project file. Then, you can easily open the project later to compare the same files. Project files are handy if you compare the same files repeatedly.
To use a project file In the WinMerge window, click File → Open Project. WinMerge reads the paths from the project file. If the project file has two paths, both paths are opened. If only one path is given or one of paths is invalid, WinMerge opens the Select Files or Folders dialog, where you can add or correct the path information. Here are a few things to consider:
- If you specify two project files, the project files themselves are compared.
- If you specify a project file as the left file but do not specify a right file, the single project file is opened as if you had used the File → Open Project command.
- If you specify a project file as the left file and any other file on the right side, the contents of the project file and the other file are compared.
To specify a project file on the command line, simply enter it as a single file path.
To save a project file, click File → Save Project. The Project File dialog provides fields and options that you can easily edit to build a project file. If a compare window is currently open, the Project File dialog is initialized with values from the current compare; otherwise, you provide the values yourself. To use an existing project, click Open and select a project to load its values (any existing values are overwritten in the dialog).
When you finished editing, click Save to store the file.
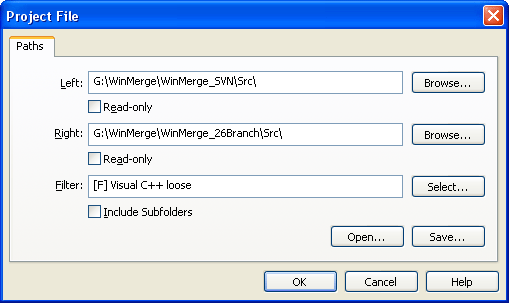
Project files are simple XML files with a .WinMerge extension. For example:
<?xml version='1.0' encoding='UTF-8'?>
<project>
   <paths>
      <left>c:\work\project1</left>
      <left-readonly>1</left-readonly>
      <right>c:\work\project2</right>
      <right-readonly>0</right-readonly>
      <filter>Visual C++ loose</filter>
      <subfolders>0</subfolders>
   </paths>
</project>
A project file contains a paths element that can
contain one of each of these elements:
leftleft-readonlyrightright-readonlyfiltersubfolders
None of the fields is required, and they can be empty (for
example, <left></left> or <left/>).