This topic describes how to use the WinMerge File Compare window to compare and merge text files. To understand the basic concepts about differences discussed here, we suggest you read Overview of file comparing and merging first. See Overview of file comparing and merging for related information about hex files.
You can start a file compare operation from either the WinMerge window or a Command Prompt window.
- From the WinMerge window
- From a Command Prompt window
The File Compare window displays compared files in two File panes, side by side. The WinMerge toolbar and context menu provides functions for viewing, navigating, and merging differences. The screen shot below shows a comparison of two versions of a file.
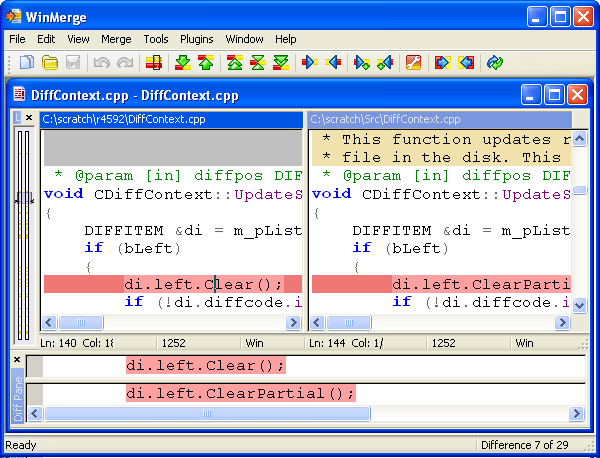
The left and right File panes show the text contents and differences of the two files being compared. The File panes are the main area for navigating and merging differences, and also allow you to edit the text directly. This section describes the features that support these actions, and ways that you can customize the File panes.
The header at the top of each File pane shows the full path of the source file. The left and right file names are also identified in the header of the Compare Window, above the File panes.
One of the File panes is always active (indicated by the dark header background); the other is inactive and has a lighter header bar. You can edit only in the active pane (as described in File pane editing features). Click in either side to make it active and make the other side inactive.
An asterisk (*) before the filename in the header indicates that there are unsaved changes in the file.
The header bar's context menu has shortcuts that are useful for copying and pasting file information:
WinMerge highlights several types of differences in the File panes. The Colors page in the Options dialog defines a set of background and text colors for most difference types, with variations indicating their state: unselected, selected, or deleted. This section describes how each of the basic difference types is detected and displayed.
- Difference
-
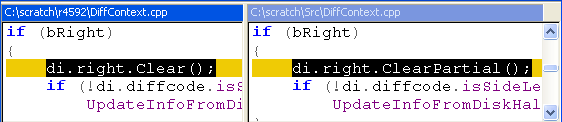
A difference block contains one or more contiguous lines that are different. The default difference background color is gold, but blank lines are marked with the deleted color.
For this and other screens in this section, we enabled
View line numbersto show which lines in the source files are compared.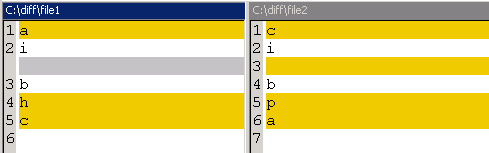
This comparison detects three difference blocks:
-
The first difference is a single line.
-
The blank line in
file2has no corresponding blank line infile1. WinMerge treats the missing blank line as a deleted difference, marked here with the default gray color. -
The last difference block includes two lines.
-
- Ignored Difference
-
This color marks content that you have configured WinMerge to ignore. In contrast to difference blocks, ignored content is not compared, it is simply highlighted to help you see what has been ignored. Ignored differences include:
-
Blank lines, if you have enabled
Ignore blank
                                                            lines
in the Options dialog Compare page. -
Differences that match patterns in line filters that you have defined (see Using Filters to learn how).
The next example repeats the previous comparison, this time with
Ignore blank linesenabled. There are now only two differences. The blank line on the right side is marked with the Ignored Differences color.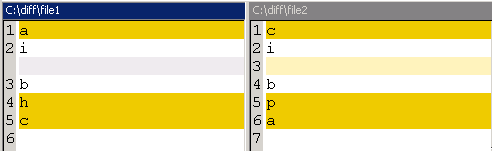
-
- Moved
-
Moved differences are identical lines found in different locations in the compared files, if
Moved block
                                               detection
is enabled in the Options dialog Compare page. The next screen shot repeats the previous comparison, this time with moved block detection enabled.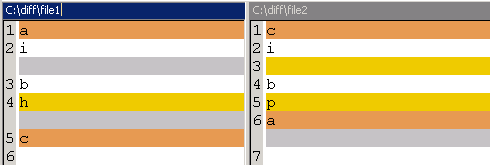
Notice that the two identical lines (containing
aandc) that are in different locations are marked with the default orange moved color. Another effect of moved block detection in this case is that the last two lines are now two separate differences instead of a single difference block.In some cases, showing moved differences can make it easier to visualize changes in files. However, too many moved lines might make your comparison hard to navigate. Use your own judgement!
- Word Difference
- Similar lines
-
WinMerge tries to match similar lines within difference blocks when you enable
Match similar linesin the Options dialog Compare page. What does “similar” mean? Generally, this feature works best in simple cases, for example where lines that have strong similarities. When detected, similar lines are adjusted to align in the File pane. The next figure shows comparisons of the same two files, before and after enabling theMatch similar linesoption:Disabled: 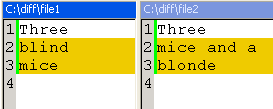
Enabled: 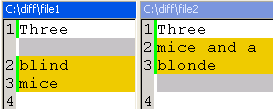
In the second comparison, the lines “blind” and “blonde” are detected as similar. WinMerge adds blank lines in the display to make these lines appear at the same level within the difference block.
Sometimes it's useful to highlight not just difference blocks, but also the text within them that is changed. You can disable or enable them in two ways:
-
Set all
View line differencesoptions in the Options dialog Editor page. -
Click View → View line differences to toggle line differences on or off.
![[Note]](note.gif) |
Note |
|---|---|
|
Remember that WinMerge navigation and merging functions (like Next Difference or Copy Left) work on difference blocks, not on line differences within them. |
This section describes how line differences are detected and marked. Note that the effect of these options is also affected by your current whitespace settings in the Options dialog Compare page.
- Word-level line differences
-
The following examples show how word-level line differences are displayed with each of the whitespace settings:
Example 1. Line differences with Whitespace: Compare
WinMerge detects all different words and spaces:

Example 2. Line differences with Whitespace: Ignore change
Multiple spaces and tabs are treated the same as a single space. In the example, the extra space between the last two words is not marked:

Example 3. Line differences with Whitespace: Ignoring all
No spaces between words are compared, so these lines are treated as identical:

- Character-level line differences
-
A character-level line difference includes the first and last different characters in a word, and all the characters between them. A single character-level difference can span adjacent words. The following example illustrates:

Note As with word-level line differences, character highlighting varies according to how WinMerge is configured to detect word breaks. In the example, the extra space after the word
cureinfile2is highlighted only if whitespace is compared.
- Breaks for words or character
-
Words and characters in line differences can be separated by whitespace, or by a combination of whitespace and punctuation. Whitespace (the default) is the typical choice for comparing most text files. All the preceding line difference examples use whitespace to break words and characters.
In some cases it's useful to break at punctuation. For example, the next screen shot compares a comma-separated list. To highlight meaningful line differences, we have enabled
Break at whitespace or punctuationin the Options dialog Editor page.
Although WinMerge is a not a full-featured editor or IDE, it does provide basic editing functions, like Undo and Redo, Find and Replace, and Goto. These basic editing tasks are often needed during merging (for example, to change text within differences). You can edit in the active File pane (remember, click in a pane to make it active). Changes are not written to a file until you save a pane to a result file.
WinMerge editing features also include syntax highlighting. This optional feature supports several file formats, and you can configure the colors used. Note that syntax highlighting is not applied within differences, as the preceding screen shot shows.
![[Tip]](tip.gif) |
Tip |
|---|---|
|
Make sure that Automatic rescan is enabled, as described in Rescanning files. If it is not, manually refresh your view (press F5) before and after editing a file, to ensure that WinMerge difference detection is up to date. |
You can choose fonts for the File pane by clicking View → Select Font. WinMerge supports only fixed width fonts.
Here are font suggestions for using WinMerge with East Asian languages:
- Simplified Chinese: SimSun or SimHei fixed-width fonts
- Traditional Chinese: MingLiU fixed-width font
- Japanese: MS Gothic or MS Mincho fixed-width fonts
- Korean: GulimChe fixed-width font (not Gulim, because this variant uses proportional-spacing glyphs that are not centered in grid cells and poorly aligned in fixed-width mode).
The File panes have optional gray margins that show line numbers and some symbols. To show or hide the margins, clicking View → View Margins. If you are using multiple File Compare windows, you can control margins for each window independently. The margin can show any or all of these features:
-
Line numbers, if View → View Line Numbers is enabled.
-
Bookmarks, if Edit → Bookmarks is enabled. A bookmark is a blue circle, in the margin next to a line, that you can make WinMerge remember and return to.
-
To set a bookmark on a line, double-click in its margin (or press (Ctrl+F2). The same action deletes an existing bookmark.
-
To navigate bookmarks, click Edit → Bookmarks and choose Next or Previous.
-
Double-click a single bookmark to delete it (or press (Ctrl+F2).
-
Click Edit → Bookmarks → Clear All Bookmarks to delete all bookmarks.
-
-
Word wrap arrow symbols, if View → Wrap Lines is enabled.
The following screen shot shows a margin with bookmarks and word wrap enabled. Without line numbers, the margin width is minimal.
The next screen shot shows a margin with bookmarks and line numbers enabled. Notice that the margin is wider. In fact, the margin is wide enough for the largest line number. Thus, the margins for large files with many lines can be quite wide.
The WinMerge toolbar and menus provide a range of functions to navigate, select, and merge differences within files.
|
Note |
|---|---|
|
WinMerge shortcuts have the same names and buttons whether you open a Folder Compare or File Compare window. However, the functions behave differently: with a File Compare window, the functions operate on differences within files, not on differences within folders. |
The difference functions you can use depend on your context, which often changes as you work. This means that a function is available only when its operation is possible for a given location or other condition in your WinMerge environment. For example, if you click in a line of text within a difference, you might notice several navigation and merge buttons become enabled in the toolbar. If you click in another area of text that is not within a difference, these functions become unavailable.
Difference functions are available in the WinMerge toolbar,and also through these alternate mechanisms:
-
WinMerge menus, especially Merge
-
Context menus within the File Compare window (when you right-click in text)
-
Keyboard shortcuts
Difference functions are described in Navigating differences and Merging differences, later in this topic. Quick start and Overview of file comparing and merging provide examples of comparing and merging.
File → Merge Mode restores these WinMerge 1.7.1 single keyboard shortcuts for difference merging and navigating functions:
- Up and Down keys for the
Previous DifferenceandNext Differencefunctions. - Left and Right keys for
the
Copy LeftandCopy Rightfunctions.
Merge mode omits the Alt key for these common operations (making them quicker to use than the normal mode). Note that the Shift and Alt Arrow key combinations work in merge mode in the same way as normal mode.
Merge mode is indicated in the status bar by the text, Merge.
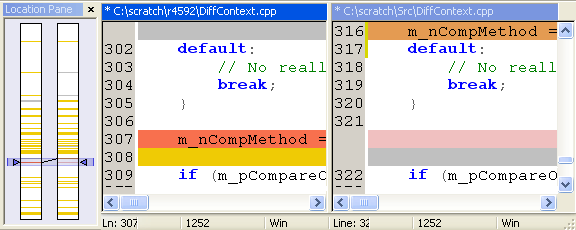
The Location pane, to the left of the File panes, maps the entire length of the compared files into two vertical bars (corresponding to the left and right File panes). It is especially useful for working with files that are too long to easily navigate in the File panes.
The Location pane shows several kinds of items:
 Difference blocks
 Current difference
 View area
- Moved differences
-
Moved differences are identical lines in different locations. They are shown only if the Enable moved block detection is checked in the Options dialog Compare page. See Difference highlighting for more details about moved differences in the File pane. The Location pane draws a line connecting moved differences in the left and right location bars. For example:
The Location pane's context menu contains these shortcuts:
-
Goto Line 1: Moves the cursor to the top of the file.
-
Goto: Moves the cursor to a line you specify (described in Navigation functions).
-
No Moved Blocks: Turns off moved difference color for moved blocks.
-
All Moved Blocks: Turns on moved difference color for all moved blocks.
-
Moved Block for Current Diff: Turns on moved difference color only for current selected moved difference.
The Diff pane shows the contents of the two sides of a selected difference.
When you select a difference, the two versions are loaded in the upper and lower sides of the Diff pane. In this way, the Diff pane confirms which lines are included in a difference, and lets you examine them in isolation from the rest of the file.
You can merge differences directly in the Diff pane by
right-clicking in either the top or bottom side and choosing
Copy to Right or
Copy to Left.
Each File pane contains a status bar at the bottom. The status bar contains several panes with different types of information about the document and your location in it:
- Line status
- Read-only status
- File encoding
- EOL style
-
EOL style of the file: Win for Windows/DOS files (CRLF), Unix (LF), Mac (CR), or Mixed.
Note When the per-line EOL style is used, the file EOL style is not shown (this pane is blank).
When a File Compare window is open, the WinMerge window status bar shows one of these messages about the compared files:
-
Identical: The files contain no differences
-
nDifferences Found: The number of differences detected, displayed only when no difference is selected. -
Difference
xofn: The selected difference's sequence number in the total number of differences, starting with 1.
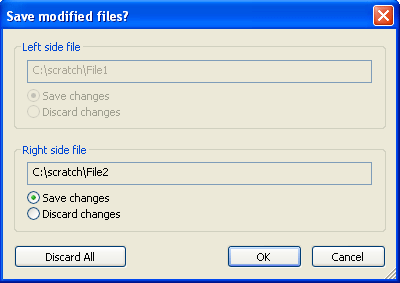
By default, the WinMerge window displays a single File Compare window. If you start another file comparison (by clicking File → Open and selecting another pair of files) while a File Compare window is currently open, the current File Compare window is closed, unless WinMerge detects unsaved changes in the left or right file. If you have modified either file, WinMerge prompts you to save or discard your changes before opening a new File Compare window.
For example, in the next screen shot WinMerge gives you a chance to save changes detected in the right side file:
If you plan to work with multiple compare operations simultaneously, consider setting (checking) the Enable multiple compare windows for File compare option, which is disabled by default. With this option enabled, you can open multiple File Compare windows without the intervening Save step.
By default, Compare windows are displayed as individually resizeable child windows within the WinMerge window, like this:
If you maximize your Compare window (by clicking its Maximixe button), the window fills all the available space in the WinMerge window, giving you the most room possible to work in. However, if you are working with multiple Compare windows, only one one maximized window is visible: any others are hidden. The screen shot below shows the header area of a maximized Compare window:

To access other Compare windows, you could return to the default
view by clicking the  Restore button. But a better solution is to enable
tabs by setting (checking) View → Tab Bar.
Restore button. But a better solution is to enable
tabs by setting (checking) View → Tab Bar.
When you display the Tab bar, each Compare window has a tab that shows the filenames of the two compared files. Now, you can easily identify the available Compare windows. To open any of them, just click its tab:

This section describes how to navigate and select differences in the File Compare window. Note that when you select a difference, it is always selected in both File panes.
|
Tip |
|---|---|
|
To save time, enable Automatically scroll to first difference in the General page of WinMerge options. Then you don't have to manually navigate to the first difference and select it. |
Here are the functions for navigating differences in the File Compare window, and their shortcuts in the toolbar and menus:
- Difference in the Current Line/Select Line Difference
-
Enabled if you have clicked in (or selected) text within a difference in a File pane. Selects the word differences within the line. For example:
If you want to select the difference block itself, use Current Difference instead.
Shortcuts:
 button, Edit → Select Line Difference, F4, context menu in File pane
within a difference.
button, Edit → Select Line Difference, F4, context menu in File pane
within a difference.
- Next Difference
-
Selects the next difference below your current cursor location in the document (not necessarily relative to the current difference). Use to step through differences sequentially from any point. Available except when the last difference is currently selected.
Shortcuts:
 button, Merge → Next Difference, Alt+Down (or Down in merge mode).
- Previous Difference
-
Selects the previous difference above your current cursor location (not necessarily relative to the current difference). Use to step backwards sequentially through differences. Available except when the first difference is currently selected.
Shortcuts:
 button, Merge → Previous Difference, Alt+Up (or Up in merge mode).
- First Difference
-
Use this to begin comparing or merging differences, or to locate the first difference from any other location. Available except when the first difference is currently selected. You can also select a difference by double-clicking its text.
Shortcuts:
 button, Merge → First Difference, Alt+Home.
- Current Difference
-
This function has two modes of action:
- If your cursor is inside a difference but no difference is selected, this function selects the entire difference. This is a very handy way to select a difference using the keyboard.
- When there is a current difference, the function jumps to that location. This is handy if you have scrolled the selected difference out of view, and want to quickly return to its location.
Shortcuts:
 button, Merge → Current Difference, Alt+Enter.
- Last Difference (Alt+End)
-
Enabled except when the last difference is currently selected.
Shortcuts:
 button, Merge → Last Difference, Alt+End.
- Go To
-
Enables you to jump to either a line number or a difference number (for example, difference 2 is the second difference). Opens the Go To dialog, where you specify the number, which file to use (either the left or right), and the type of location (either line or difference).
Tip The Go To line number can be useful when you need to merge the same change from one file to several target files. Jumping to a particular difference can be quicker than using Find to search text, or stepping through differences.
Shortcuts: Edit → Go to, Ctrl+G, context menu in File pane and Location pane.
- Refresh
Merging copies differences from one File pane to the other: either left to right, or right to left. This is different from directly editing text using WinMerge's editing functions (described earlier in this topic).
By default, the Automatic rescan option is enabled in the Editor page of WinMerge options. Rescanning keeps your your compare and merge operations up to date. Without rescanning, WinMerge differences does not detect changes that might occur to files while you are comparing them, for example in an external editor.
Rescanning occurs when you perform certain actions (like merging a difference or editing a file) during a file compare. If a file has changed, WinMerge displays a dialog advising you that another application has updated the file, and asks whether you want to reload the file.
Click Yes to reload the file before proceeding, or No to ignore the changes and work with the earlier loaded version of the file.
![[Important]](important.gif) |
Important |
|---|---|
|
If Automatic rescan is disabled, or if you
suspect that a file might have changed, we strongly advise that you run
Refresh before
performing any merge operation: click Edit → Refresh or the If a merge result looks incorrect, click Edit → Undo or press Ctrl+Z to undo the merge. Then rescan the files and try merging again. |
The merging functions can implicitly select differences based on a cursor location or text selection. For example, if you click anywhere in a difference and then click the Copy Right toolbar button, the entire difference block is merged. This makes it easy to merge many small differences. Similarly, if you select text that spans all or part of multiple differences, all the included differences are merged with a single merge command.
If the result of a merge operation is not what you expected, you can click Undo to reverse the operation.
Here are the merge functions and their shortcuts in the toolbar and menus:
- Copy Right
-
Copies one or more difference from left to right. Note that differences do not need to be fully selected: At its simplest, this means replacing text in the target difference with text in source difference. But because differences can also contain empty lines, new lines may be created or removed.
Shortcuts:
 button, Merge → Copy to Right, Alt+Right ( or Right in merge mode), context
menu in File pane within a difference, and in Diff pane.
button, Merge → Copy to Right, Alt+Right ( or Right in merge mode), context
menu in File pane within a difference, and in Diff pane.
- Copy Left
-
Copies the current difference from the right to the left File pane. See Copy Right description for details.
Shortcuts:
 button, Merge → Copy to Left, Alt+Left (or Left in merge mode), context menu
in File pane within a difference, and in Diff pane.
button, Merge → Copy to Left, Alt+Left (or Left in merge mode), context menu
in File pane within a difference, and in Diff pane.
- Copy Right and Advance
-
Merges the current difference from the right to the left File pane, then selects the next difference (if one exists). Equivalent to Copy Right and Next Difference in one step.
Shortcuts:
 button, Merge → Copy to Left, Ctrl+Alt+Right, context menu in File pane within a difference.
- Copy Left and Advance
-
Merges the current difference from left to right, then selects the next difference (if one exists). Equivalent to Copy Left and Next Difference in one step.
Shortcuts:
 button, Merge → Copy to Left, Ctrl+Alt+Left, context menu in File pane within a difference.
- All Right
-
Copies all differences from the left to the right File pane. Use to synchronize two files with one command. Similarly, you can back out the entire merge by clicking the
 Undo or pressing Ctrl+Z.
Shortcuts:
 button, Merge → Copy to Left, Alt+Left, context menu in File pane within a difference.
- All Left
-
Copies all differences from the right to the left File pane. Effectively, replaces the content of the left File pane. See similar to All Right.
Shortcuts:
 button, Merge → Copy to Left, Alt+Left, context menu in File pane within a difference.
- Refresh
-
Rescans files to update differences. Use after changes are made to files, if automatic scanning is disabled (see Rescanning files for details).
Shortcuts:
 button, View → Refresh, F5.
You can use WinMerge to resolve conflict files that some version control systems produce during their merge operations. A conflict file is created when a merge encounters differences that cannot be automatically resolved. It is a single file containing the incompletely merged content of the two files. WinMerge separates the conflict file into separate files and opens those files in file Compare window. You can then use WinMerge's compare and merge functions to resolve the conflicts and save the merged result file.
-
Click File → Open Conflict File, and use the Open dialog to select the conflict file in your file system. The conflict file opens in the File Compare window:
-
The left File pane file header is titled, Theirs File. This side represents the file that is usually in the version control system's repository. This file usually cannot be edited, so WinMerge sets the left File pane to be read-only. This means that differences can be merged only from this file to the other file.
-
The right File pane is titled, Mine File. This side is the working copy of the file. All changes should be done to this file, which is the result file.
The Mine File side is set to modified after opening conflict file (you will notice the asterisk in the File pane header). This allows you to save the file quickly if the it does not require any changes. It also ensures that you do not forget to resolve the files. If you choose not to save the file, the original conflict file is not modified.
-
-
Use all the normal compare and merge functions described earlier in this topic to resolve the conflicts in the Mine File pane.
-
When you are done, click Ctrl+S to save the Mine File side as the result file. By default, the new version overwrites the original conflict file. Alternatively, you can click File → Save Right → Save As, and choose a different file name.
Many version control systems allow you to configure an external merge tool. If yours does, you might be able to have your version control system launch WinMerge automatically when a merge conflict occurs.
You can also open a conflict file from the WinMerge command line,
which accepts three filename parameters: Theirs,
Mine, and optionally, Resolved (if you
want a different result file from the conflict file). For more
information, see Command line. Single path to the
conflict file is also accepted in command line.