Destination Screen Details
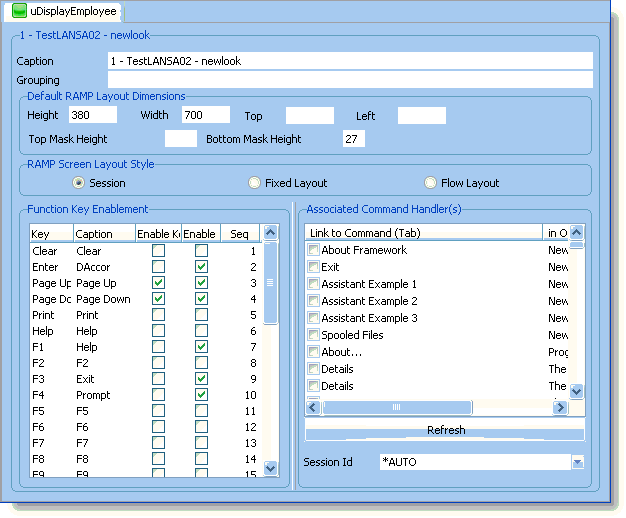
When a Destination Screen is selected in the Screen and Script List, the details of the destination screen are shown:

You can specify these details for the destination screen:
Grouping | Optionally type a grouping name for this screen. You can use this option to enter the same grouping name to related screens so that they can be sorted together in the Screen and Script List. For more fundamental organization of screens and scripts, see Organizing Screens and Scripts. |
Default RAMP Layout Dimensions | Use these properties if you want to permanently override the default layout dimensions set in Session Details for this screen. |
RAMP Screen Layout Style | If RAMP Screen Layout Style is set to Flow, this screen will be automatically resized to fit into the space available to display it. If Flow is used: · Specific positioning and sizing of the screen is not supported, · Top and bottom masking of the screen area cannot be used to hide screen content. · You cannot use or show the function key blue bar. · Display Horizontal Scroll Bars and Display Vertical Scroll Bars options cannot be used for the obvious reasons. Fixed means the RAMP screen is not resized to fit into the space available to display it. Session means the value is inherited from the Session's properties. |
Function Key Enablement | This is a list of all the available function keys in 5250 screens. You can use the list to enable or disable function keys in the 5250 screen and also to enable or disable the runtime appearance of push buttons in the RAMP screen that have the same functionality as the corresponding function key. By default, when a screen is defined as a destination, all function keys are disabled and the corresponding buttons are enabled. This means that when the screen appears, pressing the function key will have no effect, but a corresponding button will appear on the RAMP screen which is functionally equivalent the function key in the original 5250 screen. Note that function key enabling is only valid for those function keys already present in the 5250 screen. For example, if a 5250 screen is designed to have function keys F1, F3, F6 and F12, enabling the F10 key will have no effect in the application since that key has no functionality in the original screen. However, you can still enable the F10 in the RAMP screen if you add your own script for it in the button script of the destination screen. · To enable a function key, tick the check box in the Enable 5250 column. · To display the function key as a button, tick the check box in the Enable VLF column. · The captions of the buttons can be changed in the Caption column. |
Associated Command Handlers | The command handler tab where the RAMP screen will be attached. The command handler tabs are created when you prototype your application. |
Session | Specifies what System i 5250 session (ie: job) should be started for the screen. *AUTO : is the default value and indicates that the Framework should manage the required 5250 session(s) automatically. This type of session is a managed session. It is fully integrated with the Framework, applications, business objects and instance lists and all scripting facilities are available. SESSION_A -> SESSION_Z: allow you to specify that an unmanaged session is to be started for the command handler or tab. Unmanaged sessions are primarily used to log the user on and then drive them to a specific starting point. From that point forward the user can move around inside the 5250 application in an unmanaged way. Since the session is unmanaged only very limited scripting capabilities exist. For example, a script in an unmanaged session can not access the business object instance list. Equally, when a user returns to an active command handler / tab that uses an unmanaged session it is simply redisplayed as it was when they last left it. No attempt to navigate them or execute any scripts is attempted (because it is unmanaged). Unmanaged sessions are useful because they allow large pieces of an existing application to be reused in the Framework very rapidly. For example, an unmanaged session might be used as the only command associated with a business object named "System Tables". When the user clicks on "System Tables" in the Framework menu, a full screen 5250 session appears that logs the user on and then drives them to the 5250 menu that manages the maintenance of 50 (say) system tables. The entire "System Tables" facility composed of hundreds of 5250 screens (say) are now accessible in an unmanaged fashion, without the need to identify and enroll them in the Framework. If the users goes away from the "System Tables" tab and then come back again later the current 5250 session screen, whatever it is, is just redisplayed. No attempt is made to navigate the screen (ie: manage it) because in all likelihood they will have left it on an undefined or unknown 5250 screen. In short, you should always use *AUTO .... unless you have a specific need to log a user on, drive them a defined starting point in the application, and then allow them to move around wherever they like within the 5250 application area. NOTE: When changing the session option ensure that you select associated command handler by clicking on it. This command handler is not correctly selected:
and changes to the session will be ignored. This command handler is correctly selected:
and changes to the session will be recorded. You need to do this because sometimes a single destination screen is associated with multiple command handlers which can have different sessions, so you need to positively indicate the one you wish to work with. |

