About XML lists
From Microsoft Office Web Components
About XML lists
When a user or the designer of a Spreadsheet component queries and imports data from a data source using a data retrieval service or a Data Retrieval Service Connections file (.uxdc), the data is displayed in a table structure that is called an XML list. An XML list behaves much like a datasheet in a database program: each row in the list is treated as a single record when adding, deleting, filtering, and sorting items in the list. An XML list is associated with a query that can be refreshed to display current information from the data source. You can also edit this query to provide different query parameter values, select different fields, filter data, and sort data so you can efficiently retrieve just the subset of data you want.
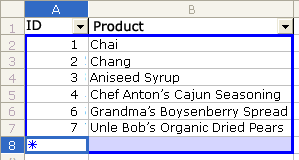
An XML list has the following visual features that distinguish it from other ranges in a spreadsheet.
- A frame clearly outlines the data in the XML list. Data inside the frame is returned from the data source; data outside the frame is not part of the data returned from the data source.
- The XML list can display column headings that are not part of the data retrieved from the data source, so your headings never get sorted with the data or excluded when the data is filtered.
- The XML list displays a new row at the bottom of the list called the insert row to make adding a new record simple: just click in the insert row and type.
If the designer has not locked the entire XML list or disabled other features of the XML list, working with data in an XML list behaves as described in the following sections.
By default, when you click any of the cells within an XML list, a blank row with a blue asterisk character in the leftmost cell is displayed at the end of the list. This row is called the insert row. You use the insert row to add new rows to an XML list. The following rules and behaviors apply when adding records using the insert row.
- You can type values in any of the unlocked columns in the insert row, which automatically displays a new insert row below the row in which you are currently typing.
- When you right-click in any row other than the first row in an XML list, point to Insert, and then click Row, a new row is not inserted. Instead, the selection moves to the insert row. If you right-click in the first row, point to Insert, and then click Row, a new row will be inserted above the XML list.
- If the page designer has applied formatting to a column in an XML list, the same formatting is applied to all values in that column when you add a new record to an XML list.
- When a row is added to an XML list, any values in the spreadsheet below the list are shifted down by one row.
When pasting cells into the insert row, the following rules apply.
- You can paste multiple rows of data.
- If the number of columns pasted is greater than the number in the XML list, the extra columns are pasted to the right of XML list, but do not become part of the list.
- If validation is defined for any of the columns, and validation fails for any of the pasted values, the entire paste operation will fail. An error message displays the first value that failed validation.
The following rules and behaviors apply when deleting rows in an XML list.
- When you select one or more rows other than the insert row in an XML list, right-click, point to Delete, and then click Row, the selected rows are deleted, and all rows below it
— as well as any values below the list — are shifted up. - You cannot delete the insert row.
Sorting XML lists uses the same commands and toolbar buttons as sorting other data in a spreadsheet, but the following rules apply.
- It is not possible to sort a subset of an XML list, regardless of how cells are selected within the list. When sorting, entire rows (records) within the list are sorted, and all rows in the list are sorted.
- The column names in the drop-down lists for the Sort Ascending and Sort Descending buttons on the toolbar come from the values in cells in the row immediately above the first row in an XML list. If the cells in the row immediately above the list do not have values, the labels Column 1 (column letter), Column 2 (column letter), and so on, are used.
- If selection extends outside of the XML list, sorting is disabled.
Filtering values in an XML list by using the AutoFilter button on the toolbar works the same as filtering any other data in a spreadsheet, except that filtering in an XML list filters entire list rows and always applies to all rows in the list. The AutoFilter arrows are displayed in the row immediately above the XML list, unless the list begins on row 1, in which case, the filter arrows are displayed in the first row of the XML list data. For this reason, if the XML list does not have a header row, it is easier to filter data if you insert a row above the XML List and add column headings.
![]() Inserting and deleting columns
Inserting and deleting columns
You cannot insert or delete columns within an XML list. However, if your selection is in the first (leftmost) column of an XML list, you can insert a column to the left (outside) of the list.
The designer of a Spreadsheet component containing an XML list can create calculated columns within the list that are not part of the data source bound to the XML list. For example, if the data source has two columns that contain an item's unit price and the number of items, the designer could add a calculated column to the XML list to calculate the extended price. The formula in a calculated column is applied to any new rows that are added using the insert row.
When using an XML list, you can add formulas to cells in the insert row, but your formula is not applied to each new row, and will not be saved when using the Save command, or after refreshing data from the external data source.
![]() Working with the associated query
Working with the associated query
You can work with the query associated with an XML list by right-clicking the list, and then by using the commands on the External Data submenu. The following table describes these commands.
| Command | Description |
|---|---|
| Refresh Data | Requeries data by using the query associated with the XML list to display current information from the data source. |
| Save Data | If the definition of the query and data source supports updating the data source, this command updates data in the data source with information from the XML list. If the query does not support updates, this command is disabled. Note The Data Connection Wizard does not support creating update queries. |
| Edit Query | Displays the Data Connection Wizard with the Select Fields dialog box displayed to let you select different fields to display. You can click Back to change different settings in the query definition such as selecting the data object to work with, and to specify query parameter values. You can click Next to sort data, specify filter criteria, and to limit the number of rows returned. The settings available to you in the Data Connection Wizard will vary depending on the data source you are working with. When you are finished editing the query, click Finish. |
| Delete Query | Deletes the XML list and its associated query from the spreadsheet. Important Using this command displays a message asking you to confirm that you want to delete the query. If you answer Yes, you cannot undo this command. If the layout and format of the spreadsheet contain the definition of the XML list, you can refresh the page to display the XML list again. |