This topic will help you get started with your first custom CD project. InfraRecorder currently supports three kinds of projects.
Data Disc projects are used for creating discs that contains files and folders (using the ISO9660 filesystem) that can be used on almost any computer. Data discs does not hold as much data per sector as audio discs due to the fact that data discs also stores addition error-check/correction data. As a result of this, data discs can be recorded in higher speed without necessary loose any quality/data. Data discs can be created in multiple steps, allowing data to be added to existing CDs. See this topic for more information on the subject.
Audio Disc projects are used for creating audio discs that will play in any CD-player (and computer). Audio projects should normally be recorded at lower write speeds than data projects because audio discs does not contain any error-checking/correction data.
Mixed-Mode CD projects are used for creating discs that contains one first data track which shares the features of a Data Disc project followed by a number of audio tracks. A Mixed-Mode CD will play in any CD-player, but the first (data) track will sound like noise. The audio tracks will play as normal.
- เพื่อสร้างโปรเจ็คใหม่ ใช้เมนู:
- แฟ้ม
 โปรเจ็คใหม่
<เลือกชนิด
ของโปรเจ็คที่คุณต้องการสร้าง>
โปรเจ็คใหม่
<เลือกชนิด
ของโปรเจ็คที่คุณต้องการสร้าง> - เพื่อเปิดโปรเจ็คที่มีอยู่, ใช้เมนู:
- แฟ้ม เปิดโปรเจ็ค...
- หรือใช้ปุ่มนี้บนแถบเครื่องมือ:

InfraRecorder projects can be recorded directly to a physical compact disc or to a disc image. A disc image is a file stored on your computer that contains all the file data that you have added to your project (with exception for audio tracks in Mixed-Mode and Audio projects). A disc image can be recorded at a later time. See this topic for more information.
- To record your project to a compact disc, you can use the menu:
- งาน เบิร์นรายการ
ไปยังคอมแพกต์ดิสก์...
- หรือใช้ปุ่มนี้บนแถบเครื่องมือ:

รายละเอียดของตัวเลือกการบันทึกสามารถดูได้ที่หัวข้อ นี้
สภาพแวดล้อม
ทั่วไป
- แถบเครื่องมือ Explorer View ใช้ในการดูและเลือกเพื่อเพิ่มไฟล์ไปยัง โปรเจ็คของคุณ

- แถบเครื่องมือ Disc Layout ใช้ในการแสดงและจัดการโปรเจ็ค

การจัดการไฟล์
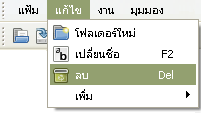
- เมนู แก้ไข ถูกใช้เพื่อการจัดการไฟล์ในโปรเจ็ค:
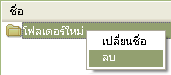
- The options available from the edit menu (above) are also avaiable for faster access by right-clicking in the project view. For example if your right-click on a folder this menu will appear:
- If you add more data to your project than what the selected media can contain, the space meter at the bottom of the view will turn red:

- The space meter will turn orange if the amount of data added to the project exceeds the offical size of the media but will probably fit on the media if recorded with overburn enabled:

You can change the space meter size to match the actual size of the blank disc that you will record your project on. To do so, right click on the space meter and select the apropriate media size.
การจัดการไฟล์
เพิ่มไฟล์
มีวิธีที่แตกต่างมากมายหลายวิธีในการเพิ่มไฟล์ไปยังโปรเจ็คของคุณ คุณสามารถใช้ การลากไปปล่อยจาก Explorer View และจาก Windows Exlporer คุณยังสามารถเลือกจาก Explore View และเลือกไฟล์ที่คุณต้องการจาก เพิ่มไปยังโปรเจ็คของคุณได้
- เมื่อคุณได้เลือกไฟล์ที่คุณต้องการ, คุณสามารถใช้เมนู:
- แก้ไข เพิ่ม
ที่เลือก
- หรือใช้ปุ่มนี้บนแถบเครื่องมือ Explorer View:

คุณสามารถใช้ Explorer View ในการเรียกดูไฟล์และโฟลเดอร์เพื่อเพิ่ม ไปยังโปรเจ็คของคุณได้อย่างรวดเร็ว
- เพื่อเพิ่มไฟล์และโฟลเดอร์ทั้งหมดที่กำลังดูในโฟลเดอร์ Explorer View, ใช้เมนู:
- แก้ไข เพิ่ม
ทั้งหมด
- หรือใช้ปุ่มนี้บนแถบเครื่องมือ Explorer View:

ลบไฟล์
มีหลายวิธีในการลบไฟล์และโฟลเดอร์ออกจากโปรเจ็คของคุณ วิธีที่หนึ่ง กดปุ่ม delete บนคีย์บอร์ด คุณยังสามารถใช้เมนู หรือปุ่มแถบเครื่องมือ
- ในการลบไฟล์โดยใช้เมนู, ทำดังต่อไปนี้:
- แก้ไข ลบ
- คุณยังสามารถใช้ปุ่มนี้บนแถบเครื่องมือ Disc Layout ได้อีกด้วย:

คำสั่งอื่นๆ
- เพื่อเปลี่ยนชื่อไฟล์หรือโฟลเดอร์, ใช้เมนู:
- แก้ไข เปลี่ยนชื่อ
- หรือใช้ปุ่มนี้บนแถบเครื่องมือ Disc Layout:

- เพื่อเพิ่มโฟลเดอร์ว่างเปล่าใหม่ไปยังโปรเจ็คของคุณ, ใช้เมนู:
- แก้ไข โฟลเดอร์ใหม่
- หรือใช้ปุ่มนี้บนแถบเครื่องมือ Disc Layout:
