 |
 |
-
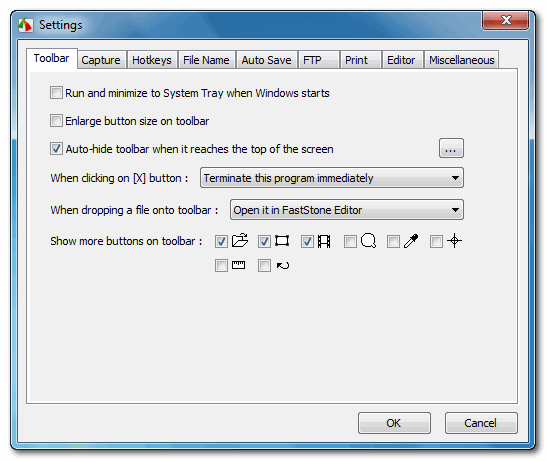
Run and minimize to System Tray when Windows starts - Load the program and minimize it to the System Tray area
 each time you start Windows. When minimized to
the tray area, the program runs in standby mode and uses very little CPU and memory resources. To activate the program:
-
Press a hotkey, or
-
Click on the tray icon
 in the System Tray area
-
Enlarge button size on toolbar - Check this option if you prefer bigger buttons on the capture toolbar.
Auto-hide toolbar when it reaches the top of the screen - Drag the capture toolbar to the top edge of the screen and it automatically retracts into a small bar. To activate the capture toolbar, move your mouse pointer onto the small bar. To specify the color and size of the small bar, click on the "..." button.
-
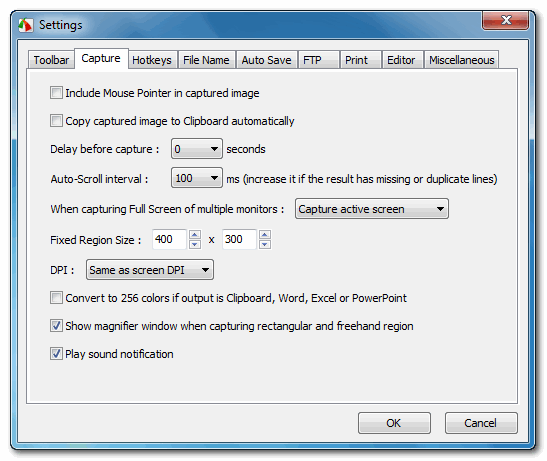
Include Mouse Pointer in the capture - By default, the mouse pointer is not drawn in the captured image. Check this option if you want to display the mouse pointer in the captured image.
-
Copy captured image to Clipboard automatically - Check this option if you want to send a copy of the captured image to Windows Clipboard automatically every time you make a screen capture.
-
Delay before capture - If you need time to prepare the windows or menus before the capture function activates, you can use this option to add a delay in seconds.
-
Auto-Scroll interval - This value is used to control the speed of auto-scrolling in milliseconds. If the capture cannot keep up with the scrolling (e.g. there are some missing lines in the captured image), increase this value to solve the problem.
-
When dropping a file onto toolbar - Graphics files can be dragged and dropped onto the floating Capture Panel, which is an efficient way to edit / view files, especially when working with Windows Explorer. You can specify the desired action to handle dropped files: open in FastStone Editor or view in Full Screen.
-
When capturing Full Screen of multiple monitors
-
Capture active screen - select this option if you only want to capture the screen that contains the mouse cursor.
-
Capture all screens - select this option if you want to capture all screens of your system.
-
-
Show more buttons on toolbar - If you use Open File in Editor, Screen Recorder, Screen Magnifier, Screen Color Picker or Screen Ruler frequently, check this option to make it always accessible from the toolbar.
-
Hotkeys - Hotkeys provide an efficient way (just a key press) to activate capture functions. Please note that the hotkeys are global, so you can use them anytime, anywhere as long as this program is running in the background. This is especially useful when you need to capture pop-up/drop-down menus.
Hotkeys can conflict with other programs. Here are some tips:-
Use rarely used key combinations. For example, by default, <Ctrl + PrtSc> key combination is assigned as the hotkey for capturing a rectangular region.
-
Never use a common key. For example, you should avoid using single keys A-Z because once they become hotkeys, you might not be able to type properly. Other single keys such as F1-F12 are not good choices since they are frequently used in many other programs. However, key combinations like <Ctrl+Shift+F(x)> are usually good choices.
-
If a hotkey conflicts with another program, you can solve the problem by assigning a different one in the Settings. Of course you always have the option of removing a hotkey.
-
-
File name template - This option allows you to customize how file names are generated by the software.
# - One digit of the sequential number
$Y - Year
$M - Month
$D - Day
$H - Hour
$N - Minute
$S - Second
Example1: when using $Y-$M-$D_$H$N$S, a JPEG file might be named as 2006-06-18_190326.jpg
Example2: when using ScreenShot#####, the 32nd screenshot in JPEG format will be named as ScreenShot00032.jpg -
Auto Save - Captured images are automatically saved in a specified Output folder without showing a Save As dialog.
-
Output folder - The folder used to store captured images
-
Copy to Clipboard - Copy the captured image to Windows Clipboard
-
Open output folder - Open the output folder in Windows Explorer
-
Open in external program - Open the captured image in the specified program
-
-
FTP - If you want to share captured images online, you may find "to FTP" output option comes in handy. For example, when you are chatting online with your friend or coworker and need to show him/her something on your screen. If you have a website (an FTP account is required), you can use this program to make a screenshot, post it to your web site and generate the URL of the screenshot automatically. With the URL, the other person can view the screenshot instantly in a web browser.
-
FTP server - The IP address of DNS name of the target FTP server
-
Remote Folder - The directory on the target server, starting with "/"
-
Port - The port on the target server for FTP service, usually 21
-
Use passive mode - Connect with the target server in passive mode
-
User name - User name of your FTP account
-
Password - Password of your FTP account
-
Copy URL to Clipboard - Generate the URL of the screenshot and copy it to Windows Clipboard
-
Open URL in Web browser - Test the URL in the default Web browser
-
