| Using WinExplorer |

In the following page, you'll learn about the options and features of WinExplorer Utility:
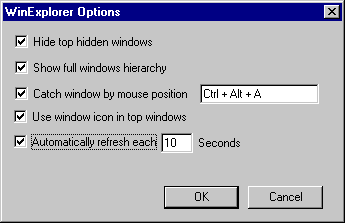
The WinExplorer Options dialog
When you click the options button in the main WinExplorer window, you get a dialog with a few options to set. All options you change are automatically saved in Registry and thus WinExplorer always remembers the last options settings.

The following options are available:
- Hide top hidden windows: If this option is selected, all windows in the top of the hierarchy are shown even if they are hidden. If this option is cleared (the default), the hidden windows in the top of the hierarchy are not shown.
- Show full windows hierarchy: By default, this option is selected. If this option is cleared, all child windows will be shown under the top-windows branches without showing the hierarchical relationships between them.
- Catch window by mouse position: This option allows you to easily find a windows located on the screen. In order to use this option, select the key combination that will activate the windows catching. when you press the key combination you selected, the window located behind the mouse cursor will be instantly selected in the windows tree.
- Use window icon in top windows: If this option is selected (the default), WinExplorer use the window's icon in order to represent the top-window on the screen. otherwise, all top-windows will be represented with the same icons.
- Automatically refresh each X seconds: If you select this option, the windows tree will be automatically refreshed each X seconds.
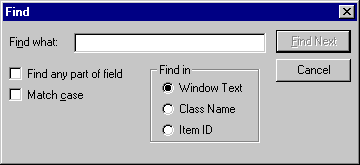
Finding a window with find dialog
You can use the find dialog in order to search a window in the window tree. You can search a window by its caption, class name or item ID. If the window is found, it'll be instantly selected in the windows tree.
Window Properties
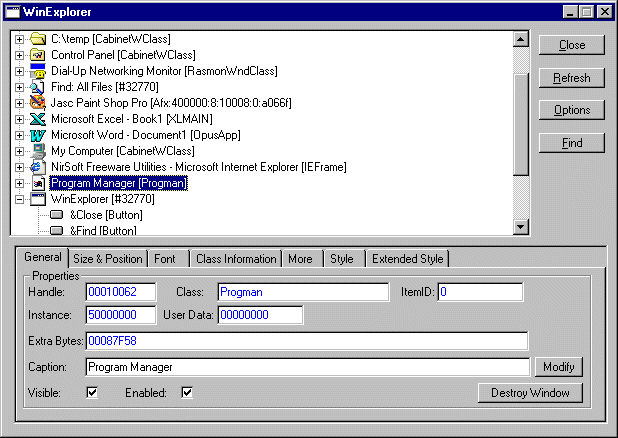
When you select a window in the windows tree, its properties are shown in the section below the windows tree.The properties section contains 7 different properties tabs:
- General Tab:Shows the basic properties of a window, like handle, caption, class name and more.

You can also change some properties that affect the window behavior:
- Caption: When you change the text in the caption field and click "modify" button, The caption of the selected window will be modified instantly.
- Visible: If you clear this check-box, the window will be hidden. If you select it, the window will be shown on the screen.
- Enabled: If you clear this check-box, the window will be disabled. If you select it, the window will be enabled.
- Destroy Window button: This option allows you to destroy a window. You should be aware that destroying a window of an application might cause unexpected behavior of the application.
- Size & Position Tab: Shows the size and position properties of the selected window.

You can use the following options in order to change the position and the size of a window:
- Left, Top, Width and Height: When you change the values of these fields and click "modify" button, the size and the position of the window is changed instantly.
- Window State: You can maximize, minimize or change to normal state of the window by clicking the right option.
- Z Order buttons: You can use these buttons in order to "play" with the Z Order of windows.


The filename field is the most useful and interesting field in the Class Information tab. It represents the module that created the window class.
Here's some examples:
- For TreeView control (and other new controls that were added in Windows 95/NT), the class filename is comctl32.dll, because this module creates and maintains the TreeView control in Windows operating systems.
- For standard controls and forms of Visual Basic applications, the class filename is msvbvm50.dll or msvbvm60.dll depending on which version of VB the application was created.
- If the window is an ActiveX control, the class filename is the control's OCX file.


The left section of this tab represents the standard style bits for all windows. The style bits in the right section represents specifically styles for each window class. (For example: The styles of standard Edit control are: ES_LEFT, ES_CENTER, ES_RIGHT, ES_MULTILINE, etc. )
