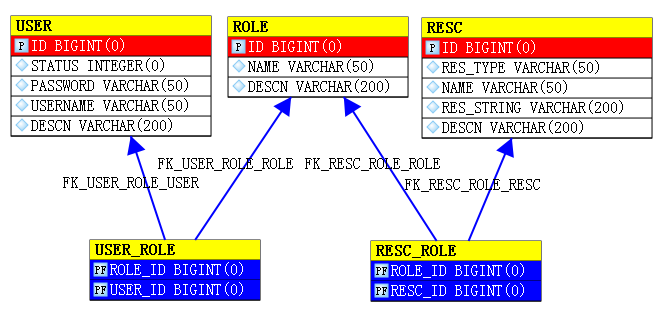
国内对权限系统的基本要求是将用户权限和被保护资源都放在数据库里进行管理,在这点上Spring Security并没有给出官方的解决方案,为此我们需要对Spring Security进行扩展。
这次我们使用五张表,user用户表,role角色表,resc资源表相互独立,它们通过各自之间的连接表实现多对多关系。
-- 资源
create table resc(
    id bigint,
    name varchar(50),
    res_type varchar(50),
    res_string varchar(200),
    descn varchar(200)
);
alter table resc add constraint pk_resc primary key(id);
alter table resc alter column id bigint generated by default as identity(start with 1);

-- 角色
create table role(
    id bigint,
    name varchar(50),
    descn varchar(200)
);
alter table role add constraint pk_role primary key(id);
alter table role alter column id bigint generated by default as identity(start with 1);

-- 用户
create table user(
    id bigint,
    username varchar(50),
    password varchar(50),
    status integer,
    descn varchar(200)
);
alter table user add constraint pk_user primary key(id);
alter table user alter column id bigint generated by default as identity(start with 1);

-- 资源角色连接表
create table resc_role(
    resc_id bigint,
    role_id bigint
);
alter table resc_role add constraint pk_resc_role primary key(resc_id, role_id);
alter table resc_role add constraint fk_resc_role_resc foreign key(resc_id) references resc(id);
alter table resc_role add constraint fk_resc_role_role foreign key(role_id) references role(id);

-- 用户角色连接表
create table user_role(
    user_id bigint,
    role_id bigint
);
alter table user_role add constraint pk_user_role primary key(user_id, role_id);
alter table user_role add constraint fk_user_role_user foreign key(user_id) references user(id);
alter table user_role add constraint fk_user_role_role foreign key(role_id) references role(id);
user表中包含用户登陆信息,role角色表中包含授权信息,resc资源表中包含需要保护的资源。
ER图如下所示:
创建的两个用户分别对应“管理员”角色和“用户”角色。而“管理员”角色可以访问“/admin.jsp”和“/**”,“用户”角色只能访问“/**”。
insert into user(id,username,password,status,descn) values(1,'admin','admin',1,'管理员');
insert into user(id,username,password,status,descn) values(2,'user','user',1,'用户');

insert into role(id,name,descn) values(1,'ROLE_ADMIN','管理员角色');
insert into role(id,name,descn) values(2,'ROLE_USER','用户角色');

insert into resc(id,name,res_type,res_string,descn) values(1,'','URL','/admin.jsp','');
insert into resc(id,name,res_type,res_string,descn) values(2,'','URL','/**','');

insert into resc_role(resc_id,role_id) values(1,1);
insert into resc_role(resc_id,role_id) values(2,1);
insert into resc_role(resc_id,role_id) values(2,2);

insert into user_role(user_id,role_id) values(1,1);
insert into user_role(user_id,role_id) values(1,2);
insert into user_role(user_id,role_id) values(2,2);
Spring Security没有提供从数据库获得获取资源信息的方法,实际上Spring Security甚至没有为我们留一个半个的扩展接口,所以我们这次要费点儿脑筋了。
首先,要搞清楚需要提供何种类型的数据,然后,寻找可以让我们编写的代码替换原有功能的切入点,实现了以上两步之后,就可以宣布大功告成了。
从配置文件上可以看到,Spring Security所需的数据应该是一系列URL网址和访问这些网址所需的权限:
<intercept-url pattern="/login.jsp" access="IS_AUTHENTICATED_ANONYMOUSLY" />1
<intercept-url pattern="/admin.jsp" access="ROLE_ADMIN" />
<intercept-url pattern="/**" access="ROLE_USER" />
Spring Security所做的就是在系统初始化时,将以上XML中的信息转换为特定的数据格式,而框架中其他组件可以利用这些特定格式的数据,用于控制之后的验证操作。
现在这些资源信息都保存在数据库中,我们可以使用上面介绍的SQL语句从数据中查询。
select re.res_string,r.name
  from role r
  join resc_role rr
    on r.id=rr.role_id
  join resc re
    on re.id=rr.resc_id
下面要开始编写实现代码了。
-
搜索数据库获得资源信息。
我们通过定义一个MappingSqlQuery实现数据库操作。
private class ResourceMapping extends MappingSqlQuery {
    protected ResourceMapping(DataSource dataSource,
        String resourceQuery) {
        super(dataSource, resourceQuery);
        compile();
    }

    protected Object mapRow(ResultSet rs, int rownum)
        throws SQLException {
        String url = rs.getString(1);
        String role = rs.getString(2);
        Resource resource = new Resource(url, role);

        return resource;
    }
}
这样我们可以执行它的execute()方法获得所有资源信息。
protected List<Resource> findResources() { ResourceMapping resourceMapping = new ResourceMapping(getDataSource(), resourceQuery); return resourceMapping.execute(); } -
使用获得的资源信息组装requestMap。
protected LinkedHashMap<RequestKey, ConfigAttributeDefinition> buildRequestMap() { LinkedHashMap<RequestKey, ConfigAttributeDefinition> requestMap = null; requestMap = new LinkedHashMap<RequestKey, ConfigAttributeDefinition>(); ConfigAttributeEditor editor = new ConfigAttributeEditor(); List<Resource> resourceList = this.findResources(); for (Resource resource : resourceList) { RequestKey key = new RequestKey(resource.getUrl(), null); editor.setAsText(resource.getRole()); requestMap.put(key, (ConfigAttributeDefinition) editor.getValue()); } return requestMap; } -
使用urlMatcher和requestMap创建DefaultFilterInvocationDefinitionSource。
public Object getObject() {
    return new DefaultFilterInvocationDefinitionSource(this
        .getUrlMatcher(), this.buildRequestMap());
}
这样我们就获得了DefaultFilterInvocationDefinitionSource,剩下的只差把这个我们自己创建的类替换掉原有的代码了。
完整代码如下所示:
package com.family168.springsecuritybook.ch05;

import java.sql.ResultSet;
import java.sql.SQLException;

import java.util.LinkedHashMap;
import java.util.List;

import javax.sql.DataSource;

import org.springframework.beans.factory.FactoryBean;

import org.springframework.jdbc.core.support.JdbcDaoSupport;
import org.springframework.jdbc.object.MappingSqlQuery;

import org.springframework.security.ConfigAttributeDefinition;
import org.springframework.security.ConfigAttributeEditor;
import org.springframework.security.intercept.web.DefaultFilterInvocationDefinitionSource;
import org.springframework.security.intercept.web.FilterInvocationDefinitionSource;
import org.springframework.security.intercept.web.RequestKey;
import org.springframework.security.util.AntUrlPathMatcher;
import org.springframework.security.util.UrlMatcher;


public class JdbcFilterInvocationDefinitionSourceFactoryBean
    extends JdbcDaoSupport implements FactoryBean {
    private String resourceQuery;

    public boolean isSingleton() {
        return true;
    }

    public Class getObjectType() {
        return FilterInvocationDefinitionSource.class;
    }

    public Object getObject() {
        return new DefaultFilterInvocationDefinitionSource(this
            .getUrlMatcher(), this.buildRequestMap());
    }

    protected List<Resource> findResources() {
        ResourceMapping resourceMapping = new ResourceMapping(getDataSource(),
                resourceQuery);

        return resourceMapping.execute();
    }

    protected LinkedHashMap<RequestKey, ConfigAttributeDefinition> buildRequestMap() {
        LinkedHashMap<RequestKey, ConfigAttributeDefinition> requestMap = null;
        requestMap = new LinkedHashMap<RequestKey, ConfigAttributeDefinition>();

        ConfigAttributeEditor editor = new ConfigAttributeEditor();

        List<Resource> resourceList = this.findResources();

        for (Resource resource : resourceList) {
            RequestKey key = new RequestKey(resource.getUrl(), null);
            editor.setAsText(resource.getRole());
            requestMap.put(key,
                (ConfigAttributeDefinition) editor.getValue());
        }

        return requestMap;
    }

    protected UrlMatcher getUrlMatcher() {
        return new AntUrlPathMatcher();
    }

    public void setResourceQuery(String resourceQuery) {
        this.resourceQuery = resourceQuery;
    }

    private class Resource {
        private String url;
        private String role;

        public Resource(String url, String role) {
            this.url = url;
            this.role = role;
        }

        public String getUrl() {
            return url;
        }

        public String getRole() {
            return role;
        }
    }

    private class ResourceMapping extends MappingSqlQuery {
        protected ResourceMapping(DataSource dataSource,
            String resourceQuery) {
            super(dataSource, resourceQuery);
            compile();
        }

        protected Object mapRow(ResultSet rs, int rownum)
            throws SQLException {
            String url = rs.getString(1);
            String role = rs.getString(2);
            Resource resource = new Resource(url, role);

            return resource;
        }
    }
}
在spring中配置我们编写的代码。
<beans:bean id="filterInvocationDefinitionSource"
    class="com.family168.springsecuritybook.ch05.JdbcFilterInvocationDefinitionSourceFactoryBean">
    <beans:property name="dataSource" ref="dataSource"/>
    <beans:property name="resourceQuery" value="
        select re.res_string,r.name
          from role r
          join resc_role rr
            on r.id=rr.role_id
          join resc re
            on re.id=rr.resc_id
    "/>
</beans:bean>
下一步使用这个filterInvocationDefinitionSource创建filterSecurityInterceptor,并使用它替换系统原来创建的那个过滤器。
<beans:bean id="filterSecurityInterceptor"
    class="org.springframework.security.intercept.web.FilterSecurityInterceptor" autowire="byType">
    <custom-filter before="FILTER_SECURITY_INTERCEPTOR" />
    <beans:property name="objectDefinitionSource" ref="filterInvocationDefinitionSource" />
</beans:bean>
注意这个custom-filter标签,它表示将filterSecurityInterceptor放在框架原来的FILTER_SECURITY_INTERCEPTOR过滤器之前,这样我们的过滤器会先于原来的过滤器执行,因为它的功能与老过滤器完全一样,所以这就等于把原来的过滤器替换掉了。
完整的配置文件如下所示:
<?xml version="1.0" encoding="UTF-8"?>
<beans:beans xmlns="http://www.springframework.org/schema/security"
    xmlns:beans="http://www.springframework.org/schema/beans"
    xmlns:xsi="http://www.w3.org/2001/XMLSchema-instance"
    xsi:schemaLocation="http://www.springframework.org/schema/beans
    http://www.springframework.org/schema/beans/spring-beans-2.0.xsd
    http://www.springframework.org/schema/security
    http://www.springframework.org/schema/security/spring-security-2.0.4.xsd">

    <http auto-config="true"/>

    <authentication-provider>
        <jdbc-user-service data-source-ref="dataSource"
            users-by-username-query="select username,password,status as enabled
                                       from user
                                      where username=?"
            authorities-by-username-query="select u.username,r.name as authority
                                             from user u
                                             join user_role ur
                                               on u.id=ur.user_id
                                             join role r
                                               on r.id=ur.role_id
                                            where u.username=?"/>
    </authentication-provider>

    <beans:bean id="filterSecurityInterceptor"
        class="org.springframework.security.intercept.web.FilterSecurityInterceptor" autowire="byType">
        <custom-filter before="FILTER_SECURITY_INTERCEPTOR" />
        <beans:property name="objectDefinitionSource" ref="filterInvocationDefinitionSource" />
    </beans:bean>

    <beans:bean id="filterInvocationDefinitionSource"
        class="com.family168.springsecuritybook.ch05.JdbcFilterInvocationDefinitionSourceFactoryBean">
        <beans:property name="dataSource" ref="dataSource"/>
        <beans:property name="resourceQuery" value="
            select re.res_string,r.name
              from role r
              join resc_role rr
                on r.id=rr.role_id
              join resc re
                on re.id=rr.resc_id
        "/>
    </beans:bean>

    <beans:bean id="dataSource" class="org.springframework.jdbc.datasource.DriverManagerDataSource">
        <beans:property name="driverClassName" value="org.hsqldb.jdbcDriver"/>
        <beans:property name="url" value="jdbc:hsqldb:res:/hsqldb/test"/>
        <beans:property name="username" value="sa"/>
        <beans:property name="password" value=""/>
    </beans:bean>
</beans:beans>
实例见ch05。
如果数据库中的资源出现的变化,需要刷新内存中已加载的资源信息时,使用下面代码:
<%@page import="org.springframework.context.ApplicationContext"%>
<%@page import="org.springframework.web.context.support.WebApplicationContextUtils"%>
<%@page import="org.springframework.beans.factory.FactoryBean"%>
<%@page import="org.springframework.security.intercept.web.FilterSecurityInterceptor"%>
<%@page import="org.springframework.security.intercept.web.FilterInvocationDefinitionSource"%>
<%
    ApplicationContext ctx =  WebApplicationContextUtils.getWebApplicationContext(application);
    FactoryBean factoryBean = (FactoryBean) ctx.getBean("&filterInvocationDefinitionSource");
    FilterInvocationDefinitionSource fids = (FilterInvocationDefinitionSource) factoryBean.getObject();
    FilterSecurityInterceptor filter = (FilterSecurityInterceptor) ctx.getBean("filterSecurityInterceptor");
    filter.setObjectDefinitionSource(fids);
%>
<jsp:forward page="/"/>
现在这些代码只是临时解决方案,我们需要在之后添加ehcache支持。

