How can I reduce polygon counts?
Polygon Reduction Methods: A quick and dirty guide. This article originally started out as an email to someone, but it kept going on and on and on. So, here it is. I'm not claiming this is a complete guide to low polygon counts, but its some quick advice that's good to know.
There are a number of things to keep in mind concerning r_speeds / polygon count.
-
entity brushes will not break up other solid brushes, world brushes will That is, if you have a 10 sided cylinder that makes contact with a flat brush, that flat brush will be broken into many pieces (polygons). This can affect both how the brush looks and how many polygons are required to be drawn. There are two main ways to work around this problem
-
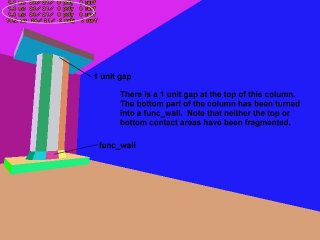
where one object meets another, leave a 1 (or more) unit gap. This is best done when the player can't see the area where the gap is (ie: at the top of a pillar, or under some shallow water.
- where one object meets another, leave a small gap and join the two objects with a func_wall. For example, if you've got a set of pipes that meet up with a wall, put a pipe flange on the wall and connect the pipe to that. Make the flange a func_wall.
-

Below are some screenshots of the above concepts in action. I used columns as examples but the concept is applicable to many different things.
= 4) BSPSPopupOnMouseOver(event)" CLASS="BSSCPopup">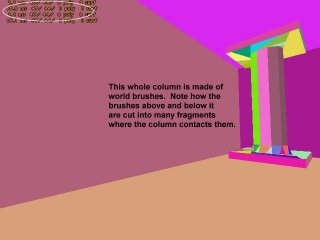
|
This picture shows a normal column with no polygon reduction efforts made. Click to see a larger picture. |
|
This picture shows a normal column with the above mentioned polygon reduction methods. Click to see a larger picture. |
The above two pictures were taken in software mode with r_drawflat turned on. This will draw the world in flat/solid polygons (similar to the editor's flat-shaded view). This is an excellent way of checking out your level for areas that may be causing problems with high polygon counts.
Note: To turn on r_drawflat, type r_drawflat 1 in the Half-Life console. You need to have run Half-Life with the -dev and -console parameters for this to work (but then, you should use those parameters anyway when you're testing maps).
|
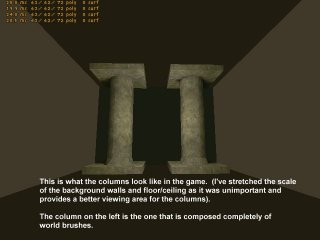
This picture shows a normal in-game shot of both columns. |
There isn't a heck of a lot of difference between the two columns, except that the column on the right has a much lower polygon count.
Another thing to keep in mind is texture size. The compile tools split brushes along their texture sizes. For instance, if you apply a 128 x 128 texture to a large wall, that wall would be split into 128x128 polygons. If you change the scale of the the texture to X*2 and Y*2, the wall will be split into 256x256 polygons. The scale of a texture can have a big effect on the the number of polygons. Whenever possible, when it wont be visually negative, increase the scale of a texture (this isn't that often, mind you, but for outdoor areas, it can be handy).
Note: You can access the scale properties of a texture in Hammer by pressing shift+A to bring up the Texture Application Tool, then clicking on a brush face to select it. Modify its scale and press the Apply button to change the brush face.
You'll notice in the included pictures that the walls and ceiling/floor are single polygons. What I've done is stretched them to X*1000 Y*1000 scale. In the in-game shot, you'll see that this produces a flat shaded texture. The only time you would do this in a real map would be one that is completely surrounded by blackness, when the stretched texture wouldn't be visible. Of course, in that case, you could just use the black sky.
Last, remember that the game engine isn't as smart as you. Or maybe its a whole lot smarter. It can see through doors (and any other brush entity), and can see somewhat around corners. Make sure you have world brushes sufficiently blocking sight into other areas, otherwise the engine will be drawing those areas too.
This article originally appeared at the Half-Life Editing Resource Center