NI PXI-2570 Relay Replacement
The NI PXI-2570 uses electromechanical armature relays.
Refer to the following table for information about ordering replacement relays.
| Relay Manufacturer | Part Number |
|---|---|
| AXICOM (Tyco Electronics) | IM42GR (3-1462037-1) |
| Relay Kit | Part Number |
|---|---|
| National Instruments (10 relays) | 779356-01 |
Complete the following sets of steps to disassemble your module and replace a failed relay.
Disassemble the Module
- Ground yourself using a grounding strap or a ground connected to your PXI chassis.

Note Properly grounding yourself prevents damage to your module from electrostatic discharge. - Locate the relay you want to replace. Refer to the following figure and table for relay locations.
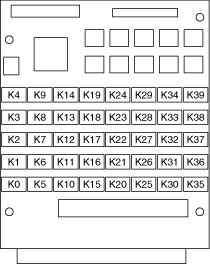
Channel
NameRelay
NameChannel
NameRelay
NameCH0 K0 CH20 K20 CH1 K1 CH21 K21 CH3 K2 CH22 K22 CH4 K3 CH23 K23 CH5 K4 CH24 K24 CH6 K5 CH25 K25 CH7 K6 CH26 K26 CH8 K7 CH27 K27 CH8 K8 CH28 K28 CH9 K9 CH29 K29 CH10 K10 CH30 K30 CH11 K11 CH31 K31 CH12 K12 CH32 K32 CH13 K13 CH33 K33 CH14 K14 CH34 K34 CH15 K15 CH35 K35 CH16 K16 CH36 K36 CH17 K17 CH37 K37 CH18 K18 CH38 K38 CH19 K19 CH39 K39 - Remove the four screws that secure the top-side lead cover. Retain the plastic spacers for reassembly.
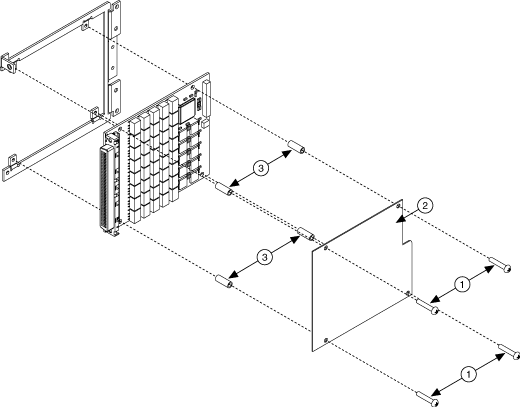
1 Screws 2 Top-side lead cover 3 Plastic spacers
Replace the Relay
Make sure you have the following:
- Temperature-regulated soldering iron set to 300 °C
- 60/40 Lead/Tin solder (flux core)
- Solder wick
- Fine pick
- Isopropyl alcohol
- Cotton swabs
If you have a surface mount rework station, replace the relay as you would any other surface mount part. Otherwise, complete the following steps to replace the relay:
- Use the soldering iron and solder wick to remove as much solder from the relay pads as possible. Do not leave the soldering iron on any lead for more than 5 seconds.
Note If it is necessary to reapply the soldering iron to the pad, allow the connection to cool completely before reapplying the soldering iron. - Apply heat to the pads one at a time, and use the pick to gently pry the relay pins from the pads. Make sure that the solder is molten before prying.

Caution Using excessive force on a soldered pad can result in lifting the PCB trace and ruining the daughterboard. - Remove the relay.
- Clean the pads with isopropyl alcohol and cotton swabs.
- Place the new relay on the PCB pads and solder.
- Remove the excess flux with isopropyl alcohol and cotton swabs.
Caution Do not use flux remover to clean the board after relay replacement.
Reassemble the Module
Reassemble your module using the screws and the plastic spacers removed in Disassemble the Module, step 3.
 |
Tip In NI-SWITCH 3.1 or later, you can use the Switch Soft Front panel to reset the relay count after you have replaced a failed relay. |