1 Руководство пользователя Bazaar
From Bazaar
Просмотр
1 Руководство пользователя Bazaar
Содержание
- 1 Руководство пользователя Bazaar
- 1.1 Введение
- 1.2 Начинаем работать
- 1.3 Личный контроль версий
- 1.4 Делимся с другими
- 1.5 Сотрудничество в команде, централизованный стиль
- 1.6 Сотрудничество в команде, распределенный стиль
- 1.7 Различные темы
- 1.8 Краткое описание некоторых популярных плагинов
- 1.9 Интегрируем Bazaar в нашу среду
- 1.10 Приложения
1.1 Введение
1.1.1 Представляем Bazaar
1.1.1.1 Что такое Bazaar?
Bazaar - это инструмент помогающий людям сотрудничать. Он отслеживает изменения, которые вы и другие люди делают с группой файлов, (таких как исходный код программы) для того что бы дать вам снимок каждого этапа их эволюции. Используя эту информацию, Bazaar может без проблем объединить вашу работу с работой других людей.
Такие инструменты как Bazaar называются системами контроля версий (Version Control System (VCS)) и уже долгое время популярны среди разработчиков ПО. Легкость использования, гибкость и простота настройки Bazaar делают его идеальным не только для разработчиков ПО, но так же и для других групп, работающих совместно с файлами и документами, таких как технические писатели, Web-дизайнеры и переводчики.
Это руководство описывает установку и использование Bazaar вне зависимости от того работает вы один, или в команде с другими людьми. Если вы уже знаете, что такое распределенная система контроля версий и хотите перейти прямо к описанию работы вы можете бегло просмотреть эту секцию и перейти прямо к Продолжаем изучение.
1.1.1.2 Краткая история систем контроля версий
Инструменты для контроля версий на данный момент развиваются уже в течение нескольких десятилетий. Простыми словами можно описать 4 поколения таких инструментов:
- инструменты контроля версий файлов, например CSSC, RCS
- инструменты контроля дерева файлов - централизованный стиль, например CVS
- инструменты контроля дерева файлов - централизованный стиль, этап 2, например Subversion
- инструменты контроля дерева файлов - распределенный стиль, например Bazaar.
Дизайн и реализация Bazaar учитывает уроки полученные на каждом из этих этапов развития подобных инструментов. В частности, Bazaar аккуратно поддерживает и централизованную и распределенную модели контроля версий и таким образом вы можете менять модель работы (когда это имеет смысл) без необходимости смены инструмента.
1.1.1.3 Централизованная модель против распределенной
Многие традиционные инструменты контроля версий требуют наличия центрального сервера, который хранит историю изменений (или репозиторий) для дерева файлов. Что бы работать с файлами пользователю необходимо установить соединение с сервером и получить рабочую версию файлов. Таким образом пользователь получает рабочее дерево в котором он может работать. Для сохранения, или фиксации изменений пользователю нужен доступ к центральному серверу и он должен убедиться, что перед фиксацией он объединил свою работу с последней версией сохраненной на сервере. Такой подход известен как централизованная модель.
Централизованная модель проверена достаточно долгой практикой, но она имеет и некоторые значительные недостатки. Во-первых, централизованная система требует наличия соединения с сервером при выполнении большинства операций по контролю версий. Во-вторых, централизованная модель жестко связывает момент фиксации изменений с моментом их публикации. В каких-то ситуациях это может быть нормально, но может сказываться негативно в других.
Распределенные системы контроля версий позволяют отдельным пользователям и командам иметь несколько репозиториев, вместо одного центрального. В случае с Bazaar история обычно хранится в том же месте, что и код который находится под контролем версий. Это позволяет пользователю фиксировать свои изменения в любой момент когда это нужно, даже при отсутствии сетевого соединения. Сетевое соединение требуется только для публикации изменений, или когда нужен доступ к изменениям в другом месте.
На самом деле для разработчиков использование распределенных систем контроля версий может иметь другие преимущества, кроме очевидных, связанных с работой при отсутствии сетевого соединения. Другие преимущества включают:
- более легкое создание разработчиками экспериментальных веток
- более легкое сотрудничество с другими разработчикам
- меньше времени требуется для механических задач и больше для творчества
- увеличение гибкости в управлении релизами через использование фиксаций включающих набор изменений для конкретной функциональности
- качество и стабильность основной ветки может быть выше, что делает работу проще для каждого
- для сообществ с открытым исходным кодом:
- более легкое создание и поддержка изменений для сторонних разработчиков
- упрощение взаимодействия основных разработчиков со сторонними разработчиками и более простая миграция сторонних разработчиков в основные
- для компаний - упрощение работы с распределенными и внешними командами.
Для более детального взгляда на преимущества распределенных систем контроля версий по сравнению с централизованными смотрите http://bazaar-vcs.org/BzrWhy.
1.1.1.4 Ключевые особенности Bazaar
Хотя Bazaar не единственная распределенная система контроля версий, она имеет некоторые значимые преимущества, которые делают ее прекрасным выбором для многих команд и сообществ. Описание этих особенностей и сравнение с другими системами контроля версий может быть найдено на Wiki Bazaar - http://bazaar-vcs.org.
Из большинства особенностей, одна требует особого упоминания: Bazaar - это полностью свободное ПО написанное на языке Python. Это упрощает сотрудничество для внесения улучшений. Если вы хотите помочь, обратите внимание на http://bazaar-vcs.org/BzrSupport.
1.1.1.5 Продолжаем изучение
Это руководство представляет из себя легкое для чтения введение в Bazaar и описание его использования. Всем пользователям рекомендуется прочесть хотя бы окончание этой главы, так как:
- она описывает основные концепции, которые нужно знать пользователям
- она описывает некоторые популярные пути использования Bazaar для сотрудничества.
Главы 2-6 более детально описывают использование Bazaar для выполнения различных задач. Большинству пользователей рекомендуется прочесть их одну за другой сразу после начала использования Bazaar. Глава 7 и дальше содержат дополнительную информацию, которая поможет получить максимум от Bazaar после того как понятны основные функции. Этот материал может быть прочитан когда потребуется и в любом порядке.
Если вы уже хорошо знакомы с другими системами контроля версий, вы возможно захотите вникнуть скорее через чтение следующих документов:
- Bazaar за пять минут - небольшое введение
- Bazaar. Карточка быстрого старта - наиболее часто используемые команды на одной странице.
Плюс к этому справка на сайте и Справка по Bazaar предоставляют все детали по доступным командам и опциям.
Мы надеемся, что вам понравится это руководство. Если у вас есть пожелания по улучшению документации Bazaar вы можете написать в список рассылки bazaar@lists.canonical.com.
1.1.2 Основные концепции
1.1.2.1 Простая модель для пользователя
Для использования Bazaar нужно понимать четыре основные концепции:
- Ревизия - снимок файлов с которыми вы работаете.
- Рабочее дерево - каталог содержащий файлы и каталоги под контролем версий
- Ветка - упорядоченный набор ревизий, описывающий историю набора файлов.
- Репозиторий - хранилище ревизий.
Давайте рассмотрим каждую концепцию более детально.
1.1.2.2 Ревизия
Ревизия - это снимок состояния дерева файлов и каталогов включающий их содержимое и форму. С ревизией так же связаны некоторые мета-данные, например:
- Кто зафиксировал ревизию
- Когда ревизия была зафиксирована
- Комментарий к ревизии
- Родительские ревизии от которых была унаследована данная ревизия
Ревизии не изменяются и могут быть глобально и уникально идентифицированы идентификатором ревизии. Пример идентификатора:
pqm@pqm.ubuntu.com-20071129184101-u9506rihe4zbzyyz
Идентификаторы ревизий создаются во время фиксации, или, в случае импорта из других систем, в момент импорта. Хотя идентификаторы ревизий необходимы для внутреннего использования и интеграции с внешними инструментами, специфичные для веток номера ревизий предпочтительны для людей.
Номера ревизий - это разделенные точками десятичные идентификаторы, такие как 1, 42 и 2977.1.59, которые отслеживают путь через граф номеров ревизий на ветке. Номера ревизий обычно короче чем идентификаторы ревизий и, в пределах одной ветки, могут сравниваться друг с другом для получения картины их отношений. Например, ревизия 10 - это основная ревизия (см. ниже) следующая непосредственно после ревизии 9. Номера ревизий создаются налету, при выполнении каждой команды, т.к. они зависят от ревизии являющейся верхушкой (т.е. самой последней ревизией) на ветке.
Смотрите Определение ревизий в приложениях для более детального описания огромного количества методов задания ревизий и их диапазонов в Bazaar и Понимание номеров ревизий для более детального описания нумерации ревизий.
1.1.2.3 Рабочее дерево
Рабочее дерево - это каталог под контролем версий содержащий файлы которые может редактировать пользователь. Рабочее дерево связано с веткой.
Многие команды используют рабочее дерево как контекст, например commit создает новую ревизию используя текущее содержимое файлов в рабочем дереве.
1.1.2.4 Ветка
В простейшем случае, ветка - это упорядоченная серия ревизий. Самая последняя ревизия известна как верхушка.
Ветки могут быть разделены и объединены обратно, формируя граф ревизий. Технически, граф показывает прямые отношения (между родительской и дочерними ревизиями) и не имеет петель, и известен как направленный ациклический граф (directed acyclic graph (DAG)).
Но не стоит бояться этого названия. Основные вещи которые нужно помнить:
- Основная линия разработки внутри графа называется основная линия, или просто левая сторона.
- Ветка может иметь другие линии разработки и в этом случае они начинаются в одной точке и заканчиваются в другой.
1.1.2.5 Репозиторий
Репозиторий - это просто хранилище ревизий. В простейшем случае, каждая ветка имеет свой собственный репозиторий. В других случаях имеет смысл разделять репозиторий между ветками для оптимизации дискового пространства.
1.1.2.6 Складывая концепции вместе
Как только вы поняли описанные выше концепции, различные пути использования Bazaar станут более понятными. Простейший способ использования Bazaar - это использовать самостоятельное дерево, совмещающее рабочее дерево, ветку и репозиторий в одном месте. Другие часто используемые сценарии включают:
- Разделяемые репозитории - рабочее дерево и ветка находятся вместе, но репозиторий находится в каталоге выше.
- Стек веток - ветка хранит только уникальные для нее ревизии и использует родительский репозиторий для общих ревизий.
- Легковесные рабочие копии - ветка хранится в другом месте по сравнению с рабочим деревом.
Лучший путь для использования Bazaar конечно зависит от ваших потребностей. Давайте дальше рассмотрим некоторые часто употребляемые способы использования.
1.1.3 Workflows
1.1.3.1 Bazaar is just a tool
Bazaar supports many different ways of working together. This means that you can start with one workflow and adapt it over time as circumstances change. There is no “one true way” that always makes sense and there never will be. This section provides a brief overview of some popular workflows supported by Bazaar.
Keep in mind that these workflow are just some examples of how Bazaar can be used. You may want to use a workflow not listed here, perhaps building on the ideas below.
1.1.3.2 Solo
Whether developing software, editing documents or changing configuration files, having an easy-to-use VCS tool can help. A single user can use this workflow effectively for managing projects where they are the only contributor.

Advantages of this workflow over not using version control at all include:
- backup of old versions
- rollback to an earlier state
- tracking of history.
The key features of Bazaar appropriate for this workflow are low administration (no server setup) and ease of use.
1.1.3.3 Partner
Sometimes two people need to work together sharing changes as they go. This commonly starts off as a Solo workflow (see above) or a team-oriented workflow (see below). At some point, the second person takes a branch (copy including history) of what the first person has done. They can then work in parallel exchanging changes by merging when appropriate.
Advantages over Solo are:
- easier sharing of changes
- each line of each text file can be attributed to a particular change including who changed it, when and why.
When implementing this workflow, Bazaar’s advantages over CVS and Subversion include:
- no server to setup
- intelligent merging means merging multiple times isn’t painful.
1.1.3.4 Centralized
Also known as lock-step, this is essentially the same as the workflow encouraged/enforced by CVS and Subversion. All developers work on the same branch (or branches). They run bzr update to get their checkout up-to-date, then bzr commit to publish their changes to the central location.
Subversion and CVS are good choices for implementing this workflow because they make it easy. Bazaar directly supports it as well while providing some important advantages over CVS and Subversion:
- better branching and merging
- better renaming support.
1.1.3.5 Centralized with local commits
This is essentially the same as the Centralized model, except that when developers are making a series of changes, they do commit --local or unbind their checkout. When it is complete, they commit their work to the shared mainline.
Advantages over Centralized:
- Can work offline, e.g. when disconnected during travel
- Less chance for a bad commit to interfere with everyone else’s work
Subversion and CVS do not support this model. Other distributed VCS tools can support it but do so less directly than Bazaar does.
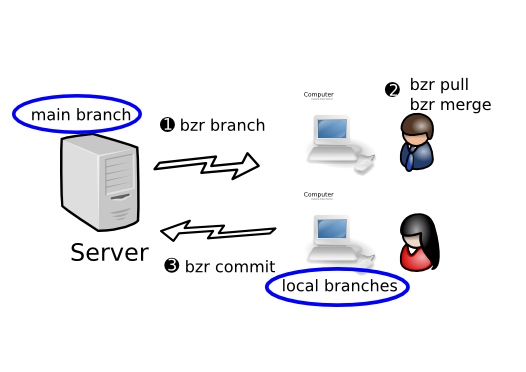
1.1.3.6 Decentralized with shared mainline
In this workflow, each developer has their own branch or branches, plus commit rights to the main branch. They do their work in their personal branch, then merge it into the mainline when it is ready.
Advantage over Centralized with local commits:
- Easier organization of work - separate changes can be developed in their own branches
- Developers can merge one another’s personal branches when working on something together.
Subversion and CVS do not support this model. Other distributed VCS tools support it. Many features of Bazaar are good for this workflow including ease of use, shared repositories, integrated merging and rich metadata (including directory rename tracking).
1.1.3.7 Decentralized with human gatekeeper
In this workflow, each developer has their own branch or branches, plus read-only access to the main branch. One developer (the gatekeeper) has commit rights to the main branch. When a developer wants their work merged, they ask the gatekeeper to merge it. The gatekeeper does code review, and merges the work into the main branch if it meets the necessary standards.
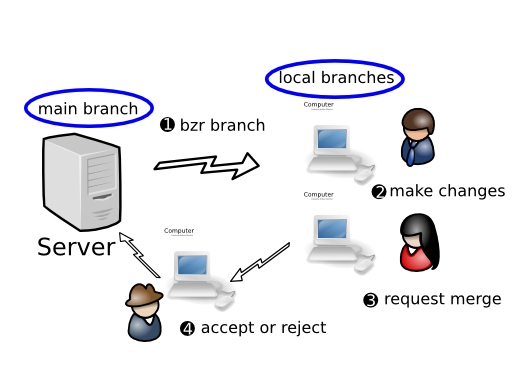
Advantage over Decentralized with shared mainline:
- Code is always reviewed before it enters the mainline
- Tighter control over when changes get incorporated into the mainline.
A companion tool of Bazaar’s called Bundle Buggy can be very useful for tracking what changes are up for review, their status and reviewer comments.
1.1.3.8 Decentralized with automatic gatekeeper
In this workflow, each developer has their own branch or branches, plus read-only access to the mainline. A software gatekeeper has commit rights to the main branch. When a developer wants their work merged, they request another person to review it. Once it has passed review, either the original author or the reviewer asks the gatekeeper software to merge it, depending on team policies. The gatekeeper software does a merge, a compile, and runs the test suite. If and only if the code passes, it is merged into the mainline.
Note: As an alternative, the review step can be skipped and the author can submit the change to the automatic gatekeeper without it. (This is particularly appropriate when using practices such as Pair Programming that effectively promote just-in-time reviews instead of reviewing code as a separate step.)
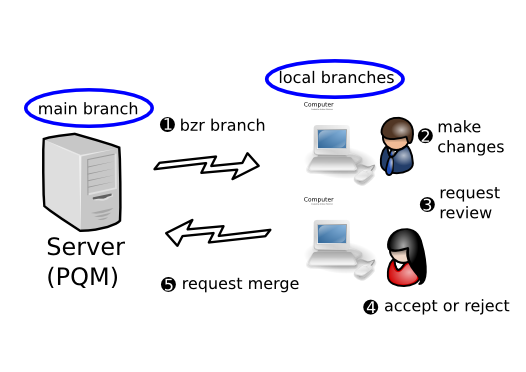
Advantages over Decentralized with human gatekeeper:
- Code is always tested before it enters the mainline (so the integrity of the mainline is higher)
- Scales better as teams grow.
A companion tool of Bazaar’s called Patch Queue Manager (PQM) can provide the automated gatekeeper capability.
1.1.3.9 Implementing a workflow
For an in-depth look at how to implement each of the workflows above, see chapters 3 to 6 in this manual. First though, chapter 2 explains some important pre-requisites including installation, general usage instructions and configuration tips.
1.2 Начинаем работать
1.2.1 Installing Bazaar
1.2.1.1 Linux
Bazaar packages are available for most popular Linux distributions including Ubuntu/Debian, Red Hat and Gentoo. See http://bazaar-vcs.org/Download for the latest instructions.
1.2.1.2 Windows
For Windows users, an installer is available that includes the core Bazaar package together with necessary pre-requisites and some useful plug-ins. See http://bazaar-vcs.org/Download for the latest instructions.
Note: If you are running Cygwin on Windows, a Bazaar for Cygwin package is available and ought to be used instead of the Windows version.
1.2.1.3 Other operating systems
Beyond Linux and Windows, Bazaar packages are available for a large range of other operating systems include Mac OS X, FreeBSD and Solaris. See http://bazaar-vcs.org/Download for the latest instructions.
1.2.1.4 Installing from scratch
If you wish to install Bazaar from scratch rather than using a pre-built package, the steps are:
- If it is not installed already, install Python 2.4 or later.
- Download the bazaar-xxx.tar.gz file (where xxx is the version number) from http://bazaar-vcs.org/Download or from Launchpad (https://launchpad.net/~bzr/).
- Unpack the archive using tar, WinZip or equivalent.
- Put the created directory on your PATH.
To test the installation, try running the bzr command like this:
bzr version
This will display the version of Bazaar you have installed. If this doesn’t work, please contact us via email or IRC so we can help you get things working.
1.2.1.4.1 Installing into site-wide locations
Instead of adding the directory to your PATH, you can install bzr into the system locations using:
python setup.py install
If you do not have a compiler, or do not have the python development tools installed, bzr supplies a (slower) pure-python implementation of all extensions. You can install without compiling extensions with:
python setup.py install build_ext --allow-python-fallback
1.2.1.5 Running the development version
You may wish to always be using the very latest development version of Bazaar. Note that this is not recommended for the majority of users as there is an increased risk of bugs. On the other hand, the development version is remarkably solid (thanks to the processes we follow) and running it makes it easier for you to send us changes for bugs and improvements. It also helps us by having more people testing the latest software.
Here are the steps to follow:
Install Bazaar using one of the methods given above.
Get a copy of the development version like this:
bzr branch lp:bzrPut the created directory on your PATH.
Advanced users may also wish to build the optional C extensions for greater speed. This can be done using make and requires pyrex and a C compiler. Please contact us on email or IRC if you need assistance with this.
1.2.1.6 Running multiple versions
It’s easy to have multiple versions of Bazaar installed and to switch between them. To do this, simply provide the full pathname to the bzr command you wish to run. The relevant libraries will be automatically detected and used. Of course, if you do not provide a pathname, then the bzr used will be the one found on your system path as normal.
Note that this capability is particularly useful if you wish to run (or test) both the latest released version and the development version say.
1.2.2 Entering commands
1.2.2.1 User interfaces
There are numerous user interfaces available for Bazaar. The core package provides a command line tool called bzr and graphical user interfaces (GUIs) are available as plug-ins.
1.2.2.2 Using bzr
The syntax is:
bzr [global-options] command [options and arguments]
Global options affect how Bazaar operates and can appear either before or after command. Command specific options must appear after the command but may be given either before, during or after any command-specific arguments.
1.2.2.3 Common options
Some options are legal for all commands as shown below.
Short form Long form Description -h –help get help -v –verbose be more verbose -q –quiet be more quiet
Quiet mode implies that only errors and warnings are displayed. This can be useful in scripts.
Note: Most commands typically only support one level of verbosity though that may change in the future. To ask for a higher level of verbosity, simply specify the -v option multiple times.
1.2.3 Getting help
Bazaar comes with a built-in on-line help system, accessed through:
bzr help
You can ask for help on a command, or on non-command topics. To see a list of available help of each kind, use either:
bzr help commands
bzr help topics
For help on a particular command, use either of these forms:
bzr help status
bzr status --help
If you wish to search the help or read it as a larger document, the information is also available in the Bazaar User Reference.
1.2.4 Configuring Bazaar
1.2.4.1 Telling Bazaar about yourself
One function of a version control system is to keep track of who changed what. In a decentralized system, that requires an identifier for each author that is globally unique. Most people already have one of these: an email address. Bazaar is smart enough to automatically generate an email address by looking up your username and hostname. If you don’t like the guess that Bazaar makes, then use the whoami command to set the identifier you want:
% bzr whoami "Your Name <email@example.com>"
If whoami is used without an argument, the current value is displayed.
1.2.4.2 Configuration files
Configuration files are located in $HOME/.bazaar on Linux/Unix and C:\Documents and Settings\<username>\Application Data\Bazaar\2.0 on Windows. There are three primary configuration files in this location:
- bazaar.conf describes default configuration options,
- locations.conf describes configuration information for specific branch locations,
- authentication.conf describes credential information for remote servers.
Each branch can also contain a configuration file that sets values specific to that branch. This file is found at .bzr/branch/branch.conf within the branch. This file is visible to all users of a branch. If you wish to override one of the values for a branch with a setting that is specific to you, then you can do so in locations.conf.
Here is sample content of bazaar.conf after setting an email address using the whoami command:
[DEFAULT]
email = Your Name <email@example.com>
For further details on the syntax and configuration settings supported, see Configuration Settings in the Bazaar User Reference.
1.2.4.3 Rule-based preferences
Some commands and plugins provide custom processing on files matching certain patterns. Per-user rule-based preferences are defined in BZR_HOME/rules.
For further information on how rules are searched and the detailed syntax of the relevant files, see Rules in the Bazaar User Reference.
1.2.5 Using aliases
1.2.5.1 What are aliases?
Aliases are an easy way to create shortcuts for commonly-typed commands, or to set defaults for commands.
1.2.5.2 Defining aliases
Command aliases can be defined in the [ALIASES] section of your bazaar.conf file. Aliases start with the alias name, then an equal sign, then a command fragment. Here’s an example ALIASES section:
[ALIASES]
recentlog=log -r-3..-1
ll=log --line -r-10..-1
commit=commit --strict
diff=diff --diff-options -p
Here are the explanations of the examples above:
- The first alias makes a new recentlog command that shows the logs for the last three revisions
- The ll alias shows the last 10 log entries in line format.
- the commit alias sets the default for commit to refuse to commit if new files in the tree are not recognized.
- the diff alias adds the coveted -p option to diff
1.2.5.3 Using the aliases
The aliases defined above would be used like so:
% bzr recentlog
% bzr ll
% bzr commit
% bzr diff
1.2.5.4 Rules for aliases
- You can override a portion of the options given in an alias by specifying the new part on the command-line. For example, if you run lastlog -r-5.., you will only get five line-based log entries instead of 10. Note that all boolean options have an implicit inverse, so you can override the commit alias with commit --no-strict.
- Aliases can override the standard behaviour of existing commands by giving an alias name that is the same as the original command. For example, default commit is changed with commit=commit --strict.
- Aliases cannot refer to other aliases. In other words making a lastlog alias and referring to it with a ll alias will not work. This includes aliases that override standard commands.
- Giving the --no-aliases option to the bzr command will tell it to ignore aliases for that run. For example, running bzr --no-aliases commit will perform a standard commit instead, not do a commit --strict.
1.2.6 Using plugins
1.2.6.1 What is a plugin?
A plugin is an external component for Bazaar that is typically made by third parties. A plugin is capable of augmenting Bazaar by adding new functionality. A plugin can also change current Bazaar behavior by replacing current functionality. Sample applications of plugins are:
- overriding commands
- adding new commands
- providing additional network transports
- customizing log output.
The sky is the limit for the customization that can be done through plugins. In fact, plugins often work as a way for developers to test new features for Bazaar prior to inclusion in the official codebase. Plugins are helpful at feature retirement time as well, e.g. deprecated file formats may one day be removed from the Bazaar core and be made available as a plugin instead.
Plugins are good for users, good for external developers and good for Bazaar itself.
1.2.6.2 Where to find plugins
We keep our list of plugins on the http://bazaar-vcs.org/BzrPlugins page.
1.2.6.3 How to install a plugin
Installing a plugin is very easy! If not already created, create a plugins directory under your Bazaar configuration directory, ~/.bazaar/ on Linux and C:\Documents and Settings\<username>\Application Data\Bazaar\2.0\ on Windows. Within this directory (referred to as $BZR_HOME below), each plugin is placed in its own subdirectory.
Plugins work particularly well with Bazaar branches. For example, to install the bzrtools plugins for your main user account on Linux, one can perform the following:
bzr branch http://panoramicfeedback.com/opensource/bzr/bzrtools
~/.bazaar/plugins/bzrtools
When installing plugins, the directories that you install them in must be valid python identifiers. This means that they can only contain certain characters, notably they cannot contain hyphens (-). Rather than installing bzr-gtk to $BZR_HOME/plugins/bzr-gtk, install it to $BZR_HOME/plugins/gtk.
1.2.6.4 Alternative plugin locations
If you have the necessary permissions, plugins can also be installed on a system-wide basis. One can additionally override the personal plugins location by setting the environment variable BZR_PLUGIN_PATH (see User Reference for a detailed explanation).
1.2.6.5 Listing the installed plugins
To do this, use the plugins command like this:
bzr plugins
The name, location and version of each plugin installed will be displayed.
New commands added by plugins can be seen by running bzr help commands. The commands provided by a plugin are shown followed by the name of the plugin in brackets.
1.2.6.6 Popular plugins
Here is a sample of some of the more popular plugins.
Category Name Description GUI QBzr Qt-based GUI tools GUI bzr-gtk GTK-based GUI tools GUI bzr-eclipse Eclipse integration General bzrtools misc. enhancements including shelf General difftools external diff tool helper General extmerge external merge tool helper Integration bzr-svn use Subversion as a repository Migration cvsps migrate CVS patch-sets
If you wish to write your own plugins, it is not difficult to do. See Writing a plugin in the appendices to get started.
1.2.7 Путь Bazaar
1.2.7.1 Глубокое понимание Bazaar
Хотя Bazaar во многом похож на другие инструменты контроля версий, есть некоторые важные различия, которые не всегда очевидны на первый взгляд. Этот раздел пытается объяснить некоторые вещи, который пользователь должен знать чтобы разбираться в Bazaar, т.е. глубоко его понимать.
Заметьте: чтобы использовать Bazaar совсем необязательно полностью понимать этот раздел. Вы можете просмотреть этот раздел сейчас и вернуться к нему позже.
1.2.7.2 Понимание номеров ревизий
All revisions in the mainline of a branch have a simple increasing integer. (First commit gets 1, 10th commit gets 10, etc.) This makes them fairly natural to use when you want to say “grab the 10th revision from my branch”, or “fixed in revision 3050”.
For revisions which have been merged into a branch, a dotted notation is used (e.g., 3112.1.5). Dotted revision numbers have three numbers [2]. The first number indicates what mainline revision change is derived from. The second number is the branch counter. There can be many branches derived from the same revision, so they all get a unique number. The third number is the number of revisions since the branch started. For example, 3112.1.5 is the first branch from revision 3112, the fifth revision on that branch.
| [2] | Versions prior to bzr 1.2 used a slightly different algorithm. Some nested branches would get extra numbers (such as 1.1.1.1.1) rather than the simpler 3-number system. |
1.2.7.3 Hierarchical history is good
Imagine a project with multiple developers contributing changes where many changes consist of a series of commits. To give a concrete example, consider the case where:
- The tip of the project’s trunk is revision 100.
- Mary makes 3 changes to deliver feature X.
- Bill makes 4 changes to deliver feature Y.
If the developers are working in parallel and using a traditional centralized VCS approach, the project history will most likely be linear with Mary’s changes and Bill’s changes interleaved. It might look like this:
107: Add documentation for Y
106: Fix bug found in testing Y
105: Fix bug found in testing X
104: Add code for Y
103: Add documentation for X
102: Add code and tests for X
101: Add tests for Y
100: ...
Many teams use this approach because their tools make branching and merging difficult. As a consequence, developers update from and commit to the trunk frequently, minimizing integration pain by spreading it over every commit. If you wish, you can use Bazaar exactly like this. Bazaar does offer other ways though that you ought to consider.
An alternative approach encouraged by distributed VCS tools is to create feature branches and to integrate those when they are ready. In this case, Mary’s feature branch would look like this:
103: Fix bug found in testing X
102: Add documentation for X
101: Add code and tests for X
100: ...
And Bill’s would look like this:
104: Add documentation for Y
103: Fix bug found in testing Y
102: Add code for Y
101: Add tests for Y
100: ...
If the features were independent and you wanted to keep linear history, the changes could be pushed back into the trunk in batches. (Technically, there are several ways of doing that but that’s beyond the scope of this discussion.) The resulting history might look like this:
107: Fix bug found in testing X
106: Add documentation for X
105: Add code and tests for X
104: Add documentation for Y
103: Fix bug found in testing Y
102: Add code for Y
101: Add tests for Y
100: ...
While this takes a bit more effort to achieve, it has some advantages over having revisions randomly intermixed. Better still though, branches can be merged together forming a non-linear history. The result might look like this:
102: Merge feature X
     100.2.3: Fix bug found in testing X
     100.2.2: Add documentation for X
     100.2.1: Add code and tests for X
101: Merge feature Y
     100.1.4: Add documentation for Y
     100.1.3: Fix bug found in testing Y
     100.1.2: Add code for Y
     100.1.1: Add tests for Y
100: ...
Or more likely this:
102: Merge feature X
     100.2.3: Fix bug
     100.2.2: Add documentation
     100.2.1: Add code and tests
101: Merge feature Y
     100.1.4: Add documentation
     100.1.3: Fix bug found in testing
     100.1.2: Add code
     100.1.1: Add tests
100: ...
This is considered good for many reasons:
- It makes it easier to understand the history of a project. Related changes are clustered together and clearly partitioned.
- You can easily collapse history to see just the commits on the mainline of a branch. When viewing the trunk history like this, you only see high level commits (instead of a large number of commits uninteresting at this level).
- If required, it makes backing out a feature much easier.
- Continuous integration tools can be used to ensure that all tests still pass before committing a merge to the mainline. (In many cases, it isn’t appropriate to trigger CI tools after every single commit as some tests will fail during development. In fact, adding the tests first - TDD style - will guarantee it!)
In summary, the important points are:
Organize your work using branches.
Integrate changes using merge.
Ordered revision numbers and hierarchy make history easier to follow.
1.2.7.4 Each branch has its own view of history
As explained above, Bazaar makes the distinction between:
- mainline revisions, i.e. ones you committed in your branch, and
- merged revisions, i.e. ones added as ancestors by committing a merge.
Each branch effectively has its own view of history, i.e. different branches can give the same revision a different “local” revision number. Mainline revisions always get allocated single number revision numbers while merged revisions always get allocated dotted revision numbers.
To extend the example above, here’s what the revision history of Mary’s branch would look like had she decided to merge the project trunk into her branch after completing her changes:
104: Merge mainline
     100.2.1: Merge feature Y
     100.1.4: Add documentation
     100.1.3: Fix bug found in testing
     100.1.2: Add code
     100.1.1: Add tests
103: Fix bug found in testing X
102: Add documentation for X
101: Add code and tests for X
100: ...
Once again, it’s easy for Mary to look at just her top level of history to see the steps she has taken to develop this change. In this context, merging the trunk (and resolving any conflicts caused by doing that) is just one step as far as the history of this branch is concerned.
It’s important to remember that Bazaar is not changing history here, nor is it changing the global revision identifiers. You can always use the latter if you really want to. In fact, you can use the branch specific revision numbers when communicating as long as you provide the branch URL as context. (In many Bazaar projects, developers imply the central trunk branch if they exchange a revision number without a branch URL.)
Merges do not change revision numbers in a branch, though they do allocate local revision numbers to newly merged revisions. The only time Bazaar will change revision numbers in a branch is when you explicitly ask it to mirror another branch.
Note: Revisions are numbered in a stable way: if two branches have the same revision in their mainline, all revisions in the ancestry of that revision will have the same revision numbers. For example, if Alice and Bob’s branches agree on revision 10, they will agree on all revisions before that.
1.2.7.5 Резюме
Обычно, если вы следовали ранее полученным советам - организовать вашу работу в ветках и использовать объединение для сотрудничества - вы обнаружите что чаще всего Bazaar делает то что вы ожидаете.
В следующих главах, мы проверим различный способы использования Bazaar, начиная с самого простого: использование Bazaar для личных проектов.
1.3 Личный контроль версий
1.3.1 Going solo
1.3.1.1 A personal productivity tool
Some tools are designed to make individuals productive (e.g. editors) while other tools (e.g. back-end services) are focused on making teams or whole companies more productive. Version control tools have traditionally been in the latter camp.
One of the cool things about Bazaar is that it is so easy to setup that version control can now be treated as a personal productivity tool. If you wish to record changes to files for the purposes of checkpointing good known states or tracking history, it is now easy to do so. This chapter explains how.
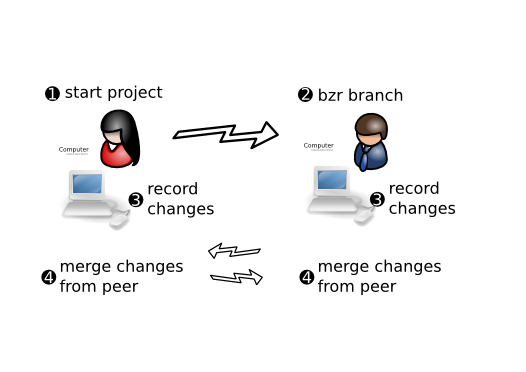
1.3.1.2 The solo workflow
If you are creating your own masterpiece, whether that be a software project or a set of related documents, the typical workflow looks like this:
Even if you will always be working as part of a team, the tasks covered in this chapter will be the basis of what you’ll be doing so it’s a good place to start.
1.3.2 Starting a project
1.3.2.1 Putting an existing project under version control
If you already have a tree of source code (or directory of documents) you wish to put under version control, here are the commands to use:
cd my-stuff
bzr init
bzr add
bzr commit -m "Initial import"
bzr init creates a .bzr directory in the top level directory (my-stuff in the example above). Note that:
- Bazaar has everything it needs in that directory - you do not need to setup a database, web server or special service to use it
- Bazaar is polite enough to only create one .bzr in the directory given, not one in every subdirectory thereof.
bzr add then finds all the files and directories it thinks ought to be version controlled and registers them internally. bzr commit then records a snapshot of the content of these and records that information, together with a commit message.
More information on init, add and commit will be provided later. For now, the important thing to remember is the recipe above.
1.3.2.2 Starting a new project
If you are starting a project from scratch, you can also use the recipe above, after creating an empty directory first of course. For efficiency reasons that will be explored more in later chapters though, it is a good idea to create a repository for the project at the top level and to nest a main branch within it like this:
bzr init-repo my.repo
cd my.repo
bzr init my.main
cd my.main
hack, hack, hack
bzr add
bzr commit -m "Initial import"
Some users prefer a name like trunk or dev to main. Choose whichever name makes the most sense to you.
Note that the init-repo and init commands both take a path as an argument and will create that path if it doesn’t already exist.
1.3.3 Controlling file registration
1.3.3.1 What does Bazaar track?
As explained earlier, bzr add finds and registers all the things in and under the current directory that Bazaar thinks ought to be version controlled. These things may be:
- files
- directories
- symbolic links.
Bazaar has default rules for deciding which files are interesting and which ones are not. You can tune those rules as explained in Ignoring files below.
Unlike many other VCS tools, Bazaar tracks directories as first class items. As a consequence, empty directories are correctly supported - you don’t need to create a dummy file inside a directory just to ensure it gets tracked and included in project exports.
For symbolic links, the value of the symbolic link is tracked, not the content of the thing the symbolic link is pointing to.
Note: Support for tracking projects-within-projects (“nested trees”) is currently under development. Please contact the Bazaar developers if you are interested in helping develop or test this functionality.
1.3.3.2 Selective registration
In some cases, you may want or need to explicitly nominate the things to register rather than leave it up to Bazaar to find things. To do this, simply provide paths as arguments to the add command like this:
bzr add fileX dirY/
Adding a directory implicitly adds all interesting things underneath it.
1.3.3.3 Ignoring files
Many source trees contain some files that do not need to be versioned, such as editor backups, object or bytecode files, and built programs. You can simply not add them, but then they’ll always crop up as unknown files. You can also tell Bazaar to ignore these files by adding them to a file called .bzrignore at the top of the tree.
This file contains a list of file wildcards (or “globs”), one per line. Typical contents are like this:
*.o
*~
*.tmp
*.py[co]
If a glob contains a slash, it is matched against the whole path from the top of the tree; otherwise it is matched against only the filename. So the previous example ignores files with extension .o in all subdirectories, but this example ignores only config.h at the top level and HTML files in doc/:
./config.h
doc/*.html
To get a list of which files are ignored and what pattern they matched, use bzr ignored:
% bzr ignored
config.h                 ./config.h
configure.in~            *~
Note that ignore patterns are only matched against non-versioned files, and control whether they are treated as “unknown” or “ignored”. If a file is explicitly added, it remains versioned regardless of whether it matches an ignore pattern.
The .bzrignore file should normally be versioned, so that new copies of the branch see the same patterns:
% bzr add .bzrignore
% bzr commit -m "Add ignore patterns"
The command bzr ignore PATTERN can be used to easily add PATTERN to the .bzrignore file (creating it if necessary and registering it to be tracked by Bazaar). Removing and modifying patterns are done by directly editing the .bzrignore file.
1.3.3.4 Global ignores
There are some ignored files which are not project specific, but more user specific. Things like editor temporary files, or personal temporary files. Rather than add these ignores to every project, bzr supports a global ignore file in ~/.bazaar/ignore [3]. It has the same syntax as the per-project ignore file.
| [3] | On Windows, the users configuration files can be found in the application data directory. So instead of ~/.bazaar/branch.conf the configuration file can be found as: C:\Documents and Settings\<username>\Application Data\Bazaar\2.0\branch.conf. The same is true for locations.conf, ignore, and the plugins directory. |
1.3.4 Reviewing changes
1.3.4.1 Looking before you leap
Once you have completed some work, it’s a good idea to review your changes prior to permanently recording it. This way, you can make sure you’ll be committing what you intend to.
Two bzr commands are particularly useful here: status and diff.
1.3.4.2 bzr status
The status command tells you what changes have been made to the working directory since the last revision:
% bzr status
modified:
   foo
bzr status hides “boring” files that are either unchanged or ignored. The status command can optionally be given the name of some files or directories to check.
1.3.4.3 bzr diff
The diff command shows the full text of changes to all files as a standard unified diff. This can be piped through many programs such as ‘’patch’‘, ‘’diffstat’‘, ‘’filterdiff’’ and ‘’colordiff’‘:
% bzr diff
=== added file 'hello.txt'
--- hello.txt   1970-01-01 00:00:00 +0000
+++ hello.txt   2005-10-18 14:23:29 +0000
@@ -0,0 +1,1 @@
+hello world
With the -r option, the tree is compared to an earlier revision, or the differences between two versions are shown:
% bzr diff -r 1000..          # everything since r1000
% bzr diff -r 1000..1100      # changes from 1000 to 1100
To see the changes introduced by a single revision, you can use the -c option to diff.
% bzr diff -c 1000            # changes from r1000
                              # identical to -r999..1000
The --diff-options option causes bzr to run the external diff program, passing options. For example:
% bzr diff --diff-options --side-by-side foo
Some projects prefer patches to show a prefix at the start of the path for old and new files. The --prefix option can be used to provide such a prefix. As a shortcut, bzr diff -p1 produces a form that works with the command patch -p1.
1.3.5 Recording changes
1.3.5.1 bzr commit
When the working tree state is satisfactory, it can be committed to the branch, creating a new revision holding a snapshot of that state.
The commit command takes a message describing the changes in the revision. It also records your userid, the current time and timezone, and the inventory and contents of the tree. The commit message is specified by the -m or --message option. You can enter a multi-line commit message; in most shells you can enter this just by leaving the quotes open at the end of the line.
% bzr commit -m "added my first file"
You can also use the -F option to take the message from a file. Some people like to make notes for a commit message while they work, then review the diff to make sure they did what they said they did. (This file can also be useful when you pick up your work after a break.)
1.3.5.2 Message from an editor
If you use neither the -m nor the -F option then bzr will open an editor for you to enter a message. The editor to run is controlled by your $VISUAL or $EDITOR environment variable, which can be overridden by the editor setting in ~/.bazaar/bazaar.conf; $BZR_EDITOR will override either of the above mentioned editor options. If you quit the editor without making any changes, the commit will be cancelled.
The file that is opened in the editor contains a horizontal line. The part of the file below this line is included for information only, and will not form part of the commit message. Below the separator is shown the list of files that are changed in the commit. You should write your message above the line, and then save the file and exit.
If you would like to see the diff that will be committed as you edit the message you can use the --show-diff option to commit. This will include the diff in the editor when it is opened, below the separator and the information about the files that will be committed. This means that you can read it as you write the message, but the diff itself wont be seen in the commit message when you have finished. If you would like parts to be included in the message you can copy and paste them above the separator.
1.3.5.3 Selective commit
If you give file or directory names on the commit command line then only the changes to those files will be committed. For example:
% bzr commit -m "documentation fix" commit.py
By default bzr always commits all changes to the tree, even if run from a subdirectory. To commit from only the current directory down, use:
% bzr commit .
1.3.5.4 Giving credit for a change
If you didn’t actually write the changes that you are about to commit, for instance if you are applying a patch from someone else, you can use the --author commit option to give them credit for the change:
% bzr commit --author "Jane Rey <jrey@example.com>"
The person that you specify there will be recorded as the “author” of the revision, and you will be recorded as the “committer” of the revision.
If more than one person works on the changes for a revision, for instance if you are pair-programming, then you can record this by specifying --author multiple times:
% bzr commit --author "Jane Rey <jrey@example.com>" \
    --author "John Doe <jdoe@example.com>"
1.3.6 Browsing history
1.3.6.1 bzr log
The bzr log command shows a list of previous revisions.
As with bzr diff, bzr log supports the -r argument:
% bzr log -r 1000..          # Revision 1000 and everything after it
% bzr log -r ..1000          # Everything up to and including r1000
% bzr log -r 1000..1100      # changes from 1000 to 1100
% bzr log -r 1000            # The changes in only revision 1000
1.3.6.2 Viewing merged revisions
As distributed VCS tools like Bazaar make merging much easier than it is in central VCS tools, the history of a branch may often contain lines of development splitting off the mainline and merging back in at a later time. Technically, the relationship between the numerous revision nodes is known as a Directed Acyclic Graph or DAG for short.
In many cases, you typically want to see the mainline first and drill down from there. The default behaviour of log is therefore to show the mainline and indicate which revisions have nested merged revisions. To explore the merged revisions for revision X, use the following command:
bzr log -n0 -rX
To see all revisions and all their merged revisions:
bzr log -n0
Note that the -n option is used to indicate the number of levels to display where 0 means all. If that is too noisy, you can easily adjust the number to only view down so far. For example, if your project is structured with a top level gatekeeper merging changes from team gatekeepers, bzr log shows what the top level gatekeeper did while bzr log -n2 shows what the team gatekeepers did. In the vast majority of cases though, -n0 is fine.
1.3.6.3 Tuning the output
The log command has several options that are useful for tuning the output. These include:
- --forward presents the log in chronological order, i.e. the most recent revisions are displayed last.
- the --limit option controls the maximum number of revisions displayed.
See the online help for the log command or the User Reference for more information on tuning the output.
1.3.6.4 Viewing the history for a file
It is often useful to filter the history so that it only applies to a given file. To do this, provide the filename to the log command like this:
bzr log foo.py
1.3.6.5 Viewing an old version of a file
To get the contents of a file at a given version, use the cat command like this:
bzr cat -r X file
where X is the revision identifier and file is the filename. This will send output to the standard output stream so you’ll typically want to pipe the output through a viewing tool (like less or more) or redirect it like this:
bzr cat -r -2 foo.py | less
bzr cat -r 1 foo.py > /tmp/foo-1st-version.py
1.3.6.6 Graphical history viewers
History browsing is one area where GUI tools really make life easier. Bazaar has numerous plug-ins that provide this capability including QBzr and bzr-gtk. See Using plugins for details on how to install these if they are not already installed.
To use the graphical viewer from QBzr:
bzr qlog
To use the graphical viewer from bzr-gtk:
bzr viz
viz is actually a built-in alias for visualize so use the longer command name if you prefer.
1.3.7 Releasing a project
1.3.7.1 Packaging a release
The export command is used to package a release, i.e. to take a copy of the files and directories in a branch and package them into a fresh directory or archive. For example, this command will package the last committed version into a tar.gz archive file:
bzr export ../releases/my-stuff-1.5.tar.gz
The export command uses the suffix of the archive file to work out the type of archive to create as shown below.
Supported formats Autodetected by extension dir (none) tar .tar tbz2 .tar.bz2, .tbz2 tgz .tar.gz, .tgz zip .zip
If you wish to package a revision other than the last one, use the -r option. If you wish to tune the root directory inside the archive, use the --root option. See the online help or User Reference for further details on the options supported by export.
1.3.7.2 Tagging a release
Rather than remembering which version was used to package a release, it’s useful to define a symbolic name for a version using the tag command like this:
bzr tag version-1-5
That tag can be used later whenever a revision identifier is required, e.g.:
bzr diff -r tag:version-1-5
To see the list of tags defined in a branch, use the tags command.
1.3.8 Undoing mistakes
1.3.8.1 Mistakes happen
Bazaar has been designed to make it easy to recover from mistakes as explained below.
1.3.8.2 Dropping the revision history for a project
If you accidentally put the wrong tree under version control, simply delete the .bzr directory.
1.3.8.3 Deregistering a file or directory
If you accidentally register a file using add that you don’t want version controlled, you can use the remove command to tell Bazaar to forget about it.
remove has been designed to Do the Safe Thing in that it will not delete a modified file. For example:
bzr add foo.html
(oops - didn't mean that)
bzr remove foo.html
This will complain about the file being modified or unknown. If you want to keep the file, use the --keep option. Alternatively, if you want to delete the file, use the --force option. For example:
bzr add foo.html
(oops - didn't mean that)
bzr remove --keep foo.html
(foo.html left on disk, but deregistered)
On the other hand, the unchanged TODO file is deregistered and removed from disk without complaint in this example:
bzr add TODO
bzr commit -m "added TODO"
(hack, hack, hack - but don't change TODO)
bzr remove TODO
(TODO file deleted)
Note: If you delete a file using your file manager, IDE or via an operating system command, the commit command will implicitly treat it as removed.
1.3.8.4 Undoing changes since the last commit
One of the reasons for using a version control tool is that it lets you easily checkpoint good tree states while working. If you decide that the changes you have made since the last commit ought to be thrown away, the command to use is revert like this:
bzr revert
As a precaution, it is good practice to use bzr status and bzr diff first to check that everything being thrown away really ought to be.
1.3.8.5 Undoing changes to a file since the last commit
If you want to undo changes to a particular file since the last commit but keep all the other changes in the tree, pass the filename as an argument to revert like this:
bzr revert foo.py
1.3.8.6 Undoing the last commit
If you make a commit and really didn’t mean to, use the uncommit command to undo it like this:
bzr uncommit
Unlike revert, uncommit leaves the content of your working tree exactly as it is. That’s really handy if you make a commit and accidently provide the wrong error message. For example:
bzr commit -m "Fix bug #11"
(damn - wrong bug number)
bzr uncommit
bzr commit -m "Fix bug #1"
Another common reason for undoing a commit is because you forgot to add one or more files. Some users like to alias commit to commit --strict so that commits fail if unknown files are found in the tree.
Note: While the merge command is not introduced until the next chapter, it is worth noting now that uncommit restores any pending merges. (Running bzr status after uncommit will show these.) merge can also be used to effectively undo just a selected commit earlier in history. For more information on merge, see Merging changes in the next chapter and the Bazaar User Reference.
1.3.8.7 Undoing multiple commits
You can use the -r option to undo several commits like this:
bzr uncommit -r -3
If your reason for doing this is that you really want to back out several changes, then be sure to remember that uncommit does not change your working tree: you’ll probably need to run the revert command as well to complete the task. In many cases though, it’s arguably better to leave your history alone and add a new revision reflecting the content of the last good state.
1.3.8.8 Reverting to the state of an earlier version
If you make an unwanted change but it doesn’t make sense to uncommit it (because that code has been released to users say), you can use revert to take your working tree back to the desired state. For example:
% bzr commit "Fix bug #5"
Committed revision 20.
(release the code)
(hmm - bad fix)
bzr revert -r 19
bzr commit -m "Backout fix for bug #5"
This will change your entire tree back to the state as of revision 19, which is probably only what you want if you haven’t made any new commits since then. If you have, the revert would wipe them out as well. In that case, you probably want to use Reverse cherrypicking instead to back out the bad fix.
Note: As an alternative to using an absolute revision number (like 19), you can specify one relative to the tip (-1) using a negative number like this:
bzr revert -r -2
1.3.8.9 Correcting a tag
If you have defined a tag prematurely, use the --force option of the tag command to redefine it. For example:
bzr tag 2.0-beta-1
(oops, we're not yet ready for that)
(make more commits to include more fixes)
bzr tag 2.0-beta-1 --force
1.3.8.10 Clearing a tag
If you have defined a tag and no longer want it defined, use the --delete option of the tag command to remove it. For example:
bzr tag 2.0-beta-4
(oops, we're not releasing a 4th beta)
bzr tag 2.0-beta-4 --delete
1.4 Делимся с другими
1.4.1 Working with another
1.4.1.1 Peer-to-peer rocks
In many cases, two minds can be better than one. You may be the one who started a project and someone wishes to help, or perhaps it’s you who wants to help another. Perhaps you are both members of a larger team that have been assigned a task together as pair programmers. Either way, two people need to agree on a process, a set of guidelines and a toolset in order to work together effectively.
Imagine if you were not allowed to call someone on the phone directly and the only way to talk to them was by registering a conference call first? Companies and communities that only share code via a central VCS repository are living with a similar straitjacket to that every day. There are times when central control makes a lot of sense and times when peer-to-peer rocks. Either way, Bazaar is designed to help.
1.4.1.2 The partner workflow
While it’s certainly not the only way to do it, the partner workflow below is a good starting point for a pair of people who wish to collaborate using Bazaar.
Over and above the tasks covered in the previous chapter, this chapter introduces two essential collaboration activities:
- getting a copy of a branch
- merging changes between branches.
Even when it’s just you working on a code base, it can be very useful to keep multiple branches around (for different releases say) and to merge changes between them as appropriate. Your “partner” may indeed be yourself.
1.4.2 Branching a project
1.4.2.1 Branch URLs
Before someone else can get a copy of your work, you need to agree on a transfer technology. You may decide to make the top level directory of your branch a network share, an approach familiar to Windows users. Linux and OS X users might prefer access to be via SFTP, a secure protocol built-in to most SSH servers. Bazaar is very flexible in this regard with support for lots of protocols some of which are given below.
Prefix Description file:// Access using the standard filesystem (default) sftp:// Access using SFTP (most SSH servers provide SFTP). bzr:// Fast access using the Bazaar smart server. ftp:// Access using passive FTP. http:// Read-only access to branches exported by a web server.
As indicated above, branches are identified using URLs with the prefix indicating the transfer technology. If no prefix is given, normal filenames are assumed. For a complete list of supported protocols, see the urlspec online help topic or the URL Identifiers section of the Bazaar User Reference.
1.4.2.3 The branch command
To get a branch based on an existing branch, use the branch command. The syntax is:
bzr branch URL [directory]
If a directory is not given, one is created based on the last part of the URL. Here are some examples showing a drive qualified path (M:/) and an sftp URL respectively:
bzr branch M:/cool-trunk
bzr branch sftp://bill@mary-laptop/cool-repo/cool-trunk
This example shows explicitly giving the directory name to use for the new branch:
bzr branch /home/mary/cool-repo/cool-trunk cool
1.4.2.4 Time and space considerations
Depending on the size of the branch being transferred and the speed and latency of the network between your computer and the source branch, this initial transfer might take some time. Subsequent updates should be much faster as only the changes are transferred then.
Keep in mind that Bazaar is transferring the complete history of the branch, not just the latest snapshot. As a consequence, you can be off the network (or disconnected from the network share) after branch completes but you’ll still be able to log and diff the history of the branch as much as you want. Furthermore, these operations are quick as the history is stored locally.
Note that Bazaar uses smart compression technology to minimize the amount of disk space required to store version history. In many cases, the complete history of a project will take up less disk space than the working copy of the latest version.
As explained in later chapters, Bazaar also has support for lightweight checkouts of a branch, i.e. working trees with no local storage of history. Of course, disconnected usage is not available then but that’s a tradeoff you can decide to make if local disk space is really tight for you. Support for limited lookback into history - history horizons - is currently under development as well.
1.4.2.5 Viewing branch information
If you wish to see information about a branch including where it came from, use the info command. For example:
bzr info cool
If no branch is given, information on the current branch is displayed.
1.4.3 Merging changes
1.4.3.1 Parallel development
Once someone has their own branch of a project, they can make and commit changes in parallel to any development proceeding on the original branch. Pretty soon though, these independent lines of development will need to be combined again. This process is known as merging.
1.4.3.2 The merge command
To incorporate changes from another branch, use the merge command. Its syntax is:
bzr merge [URL]
If no URL is given, a default is used, initially the branch this branch originated from. For example, if Bill made a branch from Mary’s work, he can merge her subsequent changes by simply typing this:
bzr merge
On the other hand, Mary might want to merge into her branch the work Bill has done in his. In this case, she needs to explicitly give the URL the first time, e.g.:
bzr merge sftp://mary@bill-laptop/cool-repo/cool-trunk
This sets the default merge branch if one is not already set. To change the default after it is set, use the --remember option.
1.4.3.3 How does merging work?
A variety of algorithms exist for merging changes. Bazaar’s default algorithm is a variation of 3-way merging which works as follows. Given an ancestor A and two branches B and C, the following table provides the rules used.
A B C Result Comment x x x x unchanged x x y y line from C x y x y line from B x y z ? conflict
Note that some merges can only be completed with the assistance of a human. Details on how to resolve these are given in Resolving conflicts.
1.4.3.4 Recording a merge
After any conflicts are resolved, the merge needs to be committed. For example:
bzr commit -m "Merged Mary's changes"
Even if there are no conflicts, an explicit commit is still required. Unlike some other tools, this is considered a feature in Bazaar. A clean merge is not necessarily a good merge so making the commit a separate explicit step allows you to run your test suite first to verify all is good. If problems are found, you should correct them before committing the merge or throw the merge away using revert.
1.4.3.5 Merge tracking
One of the most important features of Bazaar is distributed, high quality merge tracking. In other words, Bazaar remembers what has been merged already and uses that information to intelligently choose the best ancestor for a merge, minimizing the number and size of conflicts.
If you are a refugee from many other VCS tools, it can be really hard to “unlearn” the please-let-me-avoid-merging-at-any-cost habit. Bazaar lets you safely merge as often as you like with other people. By working in a peer-to-peer manner when it makes sense to do so, you also avoid using a central branch as an “integration swamp”, keeping its quality higher. When the change you’re collaborating on is truly ready for wider sharing, that’s the time to merge and commit it to a central branch, not before.
Merging that Just Works truly can change how developers work together.
1.4.4 Resolving conflicts
1.4.4.1 Workflow
Unlike some other tools that force you to resolve each conflict during the merge process, Bazaar merges as much as it can and then reports the conflicts. This can make conflict resolution easier because the contents of the whole post-merge tree are available to help you decide how things ought to be resolved. You may also wish to selectively run tests as you go to confirm each resolution or group or resolutions is good.
1.4.4.2 Listing conflicts
As well as being reported by the merge command, the list of outstanding conflicts may be displayed at any time by using the conflicts command. It is also included as part of the output from the status command.
1.4.4.3 Resolving a conflict
When a conflict is encountered, the merge command puts embedded markers in each file showing the areas it couldn’t resolve. It also creates 3 files for each file with a conflict:
- foo.BASE
- foo.THIS
- foo.OTHER
where foo is the name of the conflicted file. In many cases, you can resolve conflicts by simply manually editing each file in question, fixing the relevant areas and removing the conflict markers as you go.
After fixing all the files in conflict, and removing the markers, ask Bazaar to mark them as resolved using the resolve command like this:
bzr resolve
Alternatively, after fixing each file, you can mark it as resolved like this:
bzr resolve foo
Among other things, the resolve command cleans up the BASE, THIS and OTHER files from your working tree.
1.4.4.4 Using the remerge command
In some cases, you may wish to try a different merge algorithm on a given file. To do this, use the remerge command nominating the file like this:
bzr remerge --weave foo
where foo is the file and weave is one of the available merge algorithms. This algorithm is particularly useful when a so-called criss-cross merge is detected, e.g. when two branches merge the same thing then merge each other. See the online help for criss-cross and remerge for further details.
1.4.4.5 Using external tools to resolve conflicts
If you have a GUI tool you like using to resolve conflicts, be sure to install the extmerge plugin. Once installed, it can be used like this:
bzr extmerge foo
where foo is the conflicted file. Rather than provide a list of files to resolve, you can give the --all option to implicitly specify all conflicted files.
The extmerge command uses the tool specified by the external_merge setting in your bazaar.conf file. If not set, it will look for some popular merge tools such as kdiff3 or opendiff, the latter being a command line interface to the FileMerge utility in OS X.
1.4.5 Annotating changes
1.4.5.1 Seeing the origin of content
When two or more people are working on files, it can be highly useful at times to see who created or last changed certain content. To do this, using the annotate command like this:
bzr annotate readme.txt
If you are a pessimist or an optimist, you might prefer to use one of built-in aliases for annotate: blame or praise. Either way, this displays each line of the file together with information such as:
- who changed it last
- when it was last changed
- the commit message.
1.4.5.2 GUI tools
The various GUI plugins for Bazaar provide graphical tools for viewing annotation information. For example, the bzr-gtk plugin provides a GUI tool for this that can be launched using the gannotate command:
bzr gannotate readme.txt
The GUI tools typically provide a much richer display of interesting information (e.g. all the changes in each commit) so you may prefer them over the text-based command.
1.5 Сотрудничество в команде, централизованный стиль
1.5.1 Centralized development
1.5.1.1 Motivation
Rather than working in parallel and occasionally merging, it can be useful at times to work in lockstep, i.e. for multiple people to be continuously committing changes to a central location, merging their work with the latest content before every commit.
This workflow is very familiar to users of central VCS tools like Subversion and CVS. It is also applicable to a single developer who works on multiple machines, e.g. someone who normally works on a desktop computer but travels with a laptop, or someone who uses their (Internet connected) home computer to complete office work out of hours.
If centralized development works well for your team already, that’s great. Many teams begin using Bazaar this way and experiment with alternative workflows later.
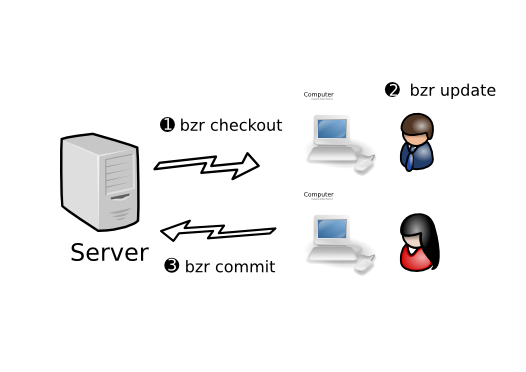
1.5.1.2 Centralized workflow
The diagram below provides an overview of the centralized workflow.
Even if your team is planning to use a more distributed workflow, many of the tasks covered in this chapter may be useful to you, particularly how to publish branches.
1.5.2 Publishing a branch
1.5.2.1 Setting up a central repository
While the centralized workflow can be used by socially nominating any branch on any computer as the central one, in practice most teams have a dedicated server for hosting central branches.
Just as it’s best practice to use a shared repository locally, it’s advisable to put central branches in a shared repository. Note that central shared branches typically only want to store history, not working copies of files, so their enclosing repository is usually creating using the no-trees option, e.g.:
bzr init-repo --no-trees sftp://centralhost/srv/bzr/PROJECT
You can think of this step as similar to setting up a new cvsroot or Subversion repository. However, Bazaar gives you more flexibility in how branches may be organised in your repository. See Advanced shared repository layouts in the appendices for guidelines and examples.
1.5.2.2 Starting a central branch
There are two ways of populating a central branch with some initial content:
- Making a local branch and pushing it to a central location
- Making an empty central branch then committing content to it.
Here is an example of the first way:
bzr init-repo PROJECT  (prepare local repository)
bzr init PROJECT/trunk
cd PROJECT/trunk
                       (copy development files)
cp -ar ~/PROJECT .     (copy files in using OS-specific tools)
bzr add                (populate repository; start version control)
bzr commit -m "Initial import"
                       (publish to central repository)
bzr push sftp://centralhost/srv/bzr/PROJECT/trunk
Here is an example of the second way:
bzr init-repo PROJECT  (prepare local repository)
cd PROJECT
bzr init sftp://centralhost/srv/bzr/PROJECT/trunk
bzr checkout sftp://centralhost/srv/bzr/PROJECT/trunk
cd trunk
cp -ar ~/PROJECT .     (copy files in using OS-specific tools)
bzr add                (populate repository; start version control)
bzr commit -m "Initial import"
                       (publish to central repository)
Note that committing inside a working tree created using the checkout command implicitly commits the content to the central location as well as locally. Had we used the branch command instead of checkout above, the content would have only been committed locally.
Working trees that are tightly bound to a central location like this are called checkouts. The rest of this chapter explains their numerous features in more detail.
1.5.3 Using checkouts
1.5.3.1 Turning a branch into a checkout
If you have a local branch and wish to make it a checkout, use the bind command like this:
bzr bind sftp://centralhost/srv/bzr/PROJECT/trunk
This is necessary, for example, after creating a central branch using push as illustrated in the previous section.
After this, commits will be applied to the bound branch before being applied locally.
1.5.3.2 Turning a checkout into a branch
If you have a checkout and wish to make it a normal branch, use the unbind command like this:
bzr unbind
After this, commits will only be applied locally.
1.5.3.3 Getting a checkout
When working in a team using a central branch, one person needs to provide some initial content as shown in the previous section. After that, each person should use the checkout command to create their local checkout, i.e. the sandbox in which they will make their changes.
Unlike Subversion and CVS, in Bazaar the checkout command creates a local full copy of history in addition to creating a working tree holding the latest content. This means that operations such as diff and log are fast and can still be used when disconnected from the central location.
1.5.3.4 Создание легковесной рабочей копии
While Bazaar does its best to efficiently store version history, there are occasions when the history is simply not wanted. For example, if your team is managing the content of a web site using Bazaar with a central repository, then your release process might be as simple as updating a checkout of the content on the public web server. In this case, you probably don’t want the history downloaded to that location as doing so:
- wastes disk space holding history that isn’t needed there
- exposes a Bazaar branch that you may want kept private.
To get a history-less checkout in Bazaar, use the --lightweight option like this:
bzr checkout --lightweight sftp://centralhost/srv/bzr/PROJECT/trunk
Of course, many of the benefits of a normal checkout are lost by doing this but that’s a tradeoff you can make if and when it makes sense.
The --lightweight option only applies to checkouts, not to all branches.
Note: If your code base is really large and disk space on your computer is limited, lightweight checkouts may be the right choice for you. Be sure to consider all your options though including shared repositories, stacked branches, and reusing a checkout.
1.5.3.5 Updating to the latest content
One of the important aspects of working in lockstep with others is keeping your checkout up to date with the latest changes made to the central branch. Just as you would in Subversion or CVS, you do this in Bazaar by using the update command like this:
bzr update
This gets any new revisions available in the bound branch and merges your local changes, if any.
1.5.3.6 Handling commit failures
Note that your checkout must be up to date with the bound branch before running commit. Bazaar is actually stricter about this than Subversion or CVS - you need to be up to date with the full tree, not just for the files you’ve changed. Bazaar will ask you to run update if it detects that a revision has been added to the central location since you last updated.
If the network connection to the bound branch is lost, the commit will fail. Some alternative ways of working around that are outlined next.
1.5.4 Working offline on a central branch
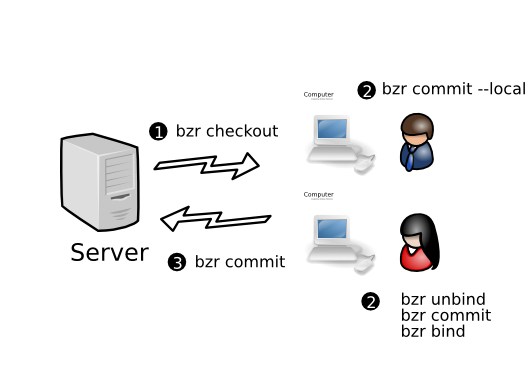
1.5.4.1 The centralized with local commits workflow
If you lose your network connection because you are travelling, the central server goes down, or you simply want to snapshot changes locally without publishing them centrally just yet, this workflow is for you.
1.5.4.2 Committing locally
If you’re working in a checkout and need/wish to commit locally only, add the --local option to the commit command like this:
bzr commit --local
1.5.4.3 Being disconnected for long time periods
If you will be or want to be disconnected from the bound branch for a while, then remembering to add --local to every commit command can be annoying. An alternative is to use the unbind command to make the checkout temporarily into a normal branch followed by the bind command at some later point in time when you want to keep in lockstep again.
Note that the bind command remembers where you were bound to last time this branch was a checkout so it isn’t necessary to enter the URL of the remote branch when you use bind after an earlier unbind.
1.5.4.4 Merging a series of local commits
When you make commits locally independent of ongoing development on a central branch, then Bazaar treats these as two lines of development next time you update. In this case, update does the following:
- it brings the latest revisions from the bound branch down and makes that the mainline of development within your checkout
- it moves your local changes since you last updated into a logical parallel branch
- it merges these together so that your local changes are reported as a pending merge by status.
As always, you will need to run commit after this to send your work to the central branch.
1.5.5 Reusing a checkout
1.5.5.1 Motivation
At times, it can be useful to have a single checkout as your sandbox for working on multiple branches. Some possible reasons for this include:
- saving disk space when the working tree is large
- developing in a fixed location.
In many cases, working tree disk usage swamps the size of the .bzr directory. If you want to work on multiple branches but can’t afford the overhead of a full working tree for each, reusing a checkout across multiples branches is the way to go.
On other occasions, the location of your sandbox might be configured into numerous development and testing tools. Once again, reusing a checkout across multiple branches can help.
1.5.5.2 Changing where a branch is bound to
To change where a checkout is bound to, follow these steps:
- Make sure that any local changes have been committed centrally so that no work is lost.
- Use the bind command giving the URL of the new remote branch you wish to work on.
- Make your checkout a copy of the desired branch by using the update command followed by the revert command.
Note that simply binding to a new branch and running update merges in your local changes, both committed and uncommitted. You need to decide whether to keep them or not by running either revert or commit.
An alternative to the bind+update recipe is using the switch command. This is basically the same as removing the existing branch and running checkout again on the new location, except that any uncommitted changes in your tree are merged in.
Note: As switch can potentially throw away committed changes in order to make a checkout an accurate cache of a different bound branch, it will fail by design if there are changes which have been committed locally but are not yet committed to the most recently bound branch. To truly abandon these changes, use the --force option.
1.5.5.3 Switching a lightweight checkout
With a lightweight checkout, there are no local commits and switch effectively changes which branch the working tree is associated with. One possible setup is to use a lightweight checkout in combination with a local tree-less repository. This lets you switch what you are working on with ease. For example:
bzr init-repo --no-trees PROJECT
cd PROJECT
bzr branch sftp://centralhost/srv/bzr/PROJECT/trunk
bzr checkout --lightweight trunk my-sandbox
cd my-sandbox
(hack away)
Note that trunk in this example will have a .bzr directory within it but there will be no working tree there as the branch was created in a tree-less repository. You can grab or create as many branches as you need there and switch between them as required. For example:
(assuming in my-sandbox)
bzr branch sftp://centralhost/srv/bzr/PROJECT/PROJECT-1.0 ../PROJECT-1.0
bzr switch ../PROJECT-1.0
(fix bug in 1.0)
bzr commit -m "blah, blah blah"
bzr switch ../trunk
(go back to working on the trunk)
Note: The branches may be local only or they may be bound to remote ones (by creating them with checkout or by using bind after creating them with branch).
1.6 Сотрудничество в команде, распределенный стиль
1.6.1 Distributed development
1.6.1.1 Motivation
Distributed VCS tools offer new ways of working together, ways that better reflect the modern world we live in and ways that enable higher quality outcomes.
1.6.1.2 The decentralized with shared mainline workflow
In this workflow, each developer has their own branch or branches, plus a checkout of the main branch. They do their work in their personal branch, then merge it into the mainline when it is ready.
Other distributed workflows are explored later in this chapter.
1.6.2 Organizing branches
1.6.2.1 Mirror branches
A primary difference when using distributed workflows to develop is that your main local branch is not the place to make changes. Instead, it is kept as a pristine copy of the central branch, i.e. it’s a mirror branch.
To create a mirror branch, set-up a shared repository (if you haven’t already) and then use the branch (or checkout) command to create the mirror. For example:
bzr init-repo PROJECT
cd PROJECT
bzr branch sftp://centralhost/srv/bzr/PROJECT/trunk
1.6.2.2 Task branches
Each new feature or fix is developed in its own branch. These branches are referred to as feature branches or task branches - the terms are used interchangeably.
To create a task branch, use the branch command against your mirror branch. For example:
bzr branch trunk fix-123
cd fix-123
(hack, hack, hack)
There are numerous advantages to this approach:
- You can work on multiple changes in parallel
- There is reduced coupling between changes
- Multiple people can work in a peer-to-peer mode on a branch until it is ready to go.
In particular, some changes take longer to cook than others so you can ask for reviews, apply feedback, ask for another review, etc. By completing work to sufficient quality in separate branches before merging into a central branch, the quality and stability of the central branch are maintained at higher level than they otherwise would be.
1.6.2.3 Refreshing a mirror branch
Use the pull command to do this:
cd trunk
bzr pull
1.6.2.4 Merging the latest trunk into a feature branch
Use the merge command to do this:
cd fix-123
bzr merge
(resolve any conflicts)
bzr commit -m "merged trunk"
1.6.2.5 Merging a feature into the trunk
The policies for different distributed workflows vary here. The simple case where all developers have commit rights to the main trunk are shown below.
If your mirror is a checkout:
cd trunk
bzr update
bzr merge ../fix-123
(resolve any conflicts)
bzr commit -m "Fixed bug #123"
If your mirror is a branch:
cd trunk
bzr pull
bzr merge ../fix-123
(resolve any conflicts)
bzr commit -m "Fixed bug #123"
bzr push
1.6.2.6 Backing up task branches
One of the side effects of centralized workflows is that changes get frequently committed to a central location which is backed up as part of normal IT operations. When developing on task branches, it is a good idea to publish your work to a central location (but not necessarily a shared location) that will be backed up. You may even wish to bind local task branches to remote ones established on a backup server just for this purpose.
1.6.3 Using gatekeepers
1.6.3.1 The decentralized with human gatekeeper workflow
In this workflow, one developer (the gatekeeper) has commit rights to the main branch while other developers have read-only access. All developers make their changes in task branches.
When a developer wants their work merged, they ask the gatekeeper to review their change and merge it if acceptable. If a change fails review, further development proceeds in the relevant task branch until it is good to go.
Note that a key aspect of this approach is the inversion of control that is implied: developers no longer decide when to “commit/push” changes into the central branch: the code base evolves by gatekeepers “merging/pulling” changes in a controlled manner. It’s perfectly acceptable, indeed common, to have multiple central branches with different gatekeepers, e.g. one branch for the current production release and another for the next release. In this case, a task branch holding a bug fix will most likely be advertised to both gatekeepers.
One of the great things about this workflow is that it is hugely scalable. Large projects can be broken into teams and each team can have a local master branch managed by a gatekeeper. Someone can be appointed as the primary gatekeeper to merge changes from the team master branches into the primary master branch when team leaders request it.
1.6.3.2 The decentralized with automatic gatekeeper workflow
To obtain even higher quality, all developers can be required to submit changes to an automated gatekeeper that only merges and commits a change if it passes a regression test suite. One such gatekeeper is a software tool called PQM.
For further information on PQM, see https://launchpad.net/pqm.
1.6.4 Sending changes
1.6.4.1 Motivation
In many distributed development scenarios, it isn’t always feasible for developers to share task branches by advertising their URLs. For example, a developer working on a laptop might take it home overnight so his/her task branches could well be inaccessible when a gatekeeper in another timezone wants to review or merge it.
Bazaar provides a neat feature to assist here: merge directives.
1.6.4.2 Understanding merge directives
You can think of a merge directive as a “mini branch” - just the new growth on a branch since it was created. It’s a software patch showing what’s new but with added intelligence: metadata like interim commits, renames and digital signatures.
Another useful metaphor is a packet cake: a merge directive has a recipe together with the ingredients you need bundled inside it. To stretch the metaphor, the ingredients are all the metadata on the changes made to the branch; the recipe is instructions on how those changes ought to be merged, i.e. information for the merge command to use in selecting common ancestors.
Regardless of how you think of them, merge directives are neat. They are easy to create, suitable for mailing around as attachments and can be processed much like branches can on the receiving end.
1.6.4.3 Creating a merge directive
To create and optionally send a merge directive, use the send command.
By default, send will email the merge directive to the “submission address” for the branch, which is typically the lead developer or the development mailing list. send without options will create a merge directive, fire up your email tool and attach it, ready for you to add the explanatory text bit. (See the online help for send and Configuration Settings in the User Reference for further details on how to configure this.)
Most projects like people to add some explanation to the mail along with the patch, explaining the reason for the patch, and why it is done the way it is. This gives a reviewer some context before going into the line-by-line diff.
Alternatively, if the --output (or -o) option is given, send will write the merge directive to a file, so you can mail it yourself, examine it, or save it for later use. If an output file of - is given, the directive is written to stdout. For example:
cd X-fix-123
bzr send -o ../fix-123.patch
1.6.4.4 Applying a merge directive
Merge directives can be applied in much the same way as branches: by using the merge and pull commands.
They can also be useful when communicating with upstream projects that don’t use Bazaar. In particular, the preview of the overall change in a merge directive looks like a vanilla software patch, so they can be applied using patch -p0 for example.
1.7 Различные темы
1.7.1 The journey ahead
We hope that earlier chapters have given you a solid understanding of how Bazaar can assist you in being productive on your own and working effectively with others. If you are learning Bazaar for the first time, it might be good to try the procedures covered already for a while, coming back to this manual once you have mastered them.
Remaining chapters covers various topics to guide you in further optimizing how you use Bazaar. Unless stated otherwise, the topics in this and remaining chapters are independent of each other and can therefore be read in whichever order you wish.
1.7.2 Pseudo merging
1.7.2.1 Cherrypicking
At times, it can be useful to selectively merge some of the changes in a branch, but not all of them. This is commonly referred to as cherrypicking. Here are some examples of where cherrypicking is useful:
- selectively taking fixes from the main development branch into a release branch
- selectively taking improvements out of an experimental branch into a feature branch.
To merge only the changes made by revision X in branch foo, the command is:
bzr merge -c X foo
To merge only the changes up to revision X in branch foo, the command is:
bzr merge -r X foo
To merge only the changes since revision X in branch foo, the command is:
bzr merge -r X.. foo
To merge only the changes from revision X to revision Y in branch foo, the command is:
bzr merge -r X..Y foo
Like a normal merge, you must explicitly commit a cherrypick. You may wish to see the changes made using bzr diff, and run your test suite if any, before doing this.
Unlike a normal merge, Bazaar does not currently track cherrypicks. In particular, the changes look like a normal commit and the (internal) revision history of the changes from the other branch is lost. In many cases where they are useful (see above), this is not a major problem because there are good reasons why a full merge should never be done at a later time. In other cases, additional conflicts will need to be resolved when the changes are merged again.
1.7.2.2 Merging without parents
A related technique to cherrypicking, in that it makes changes without reference to the revisions that they came from is to perform a merge, but forget about the parent revisions before committing. This has the effect of making all of the changes that would have been in the merge happen in a single commit. After the merge and before the corresponding commit, you can do:
bzr revert --forget-merges
to keep the changes in the working tree, but remove the record of the revisions where the changes originated. The next commit would then record all of those changes without any record of the merged revisions.
This is desired by some users to make their history “cleaner”, but you should be careful that the loss of history does not outweigh the value of cleanliness, particularly given Bazaar’s capabilities for progressively disclosing merged revisions. In particular, because this will include the changes from the source branch, but without attribution to that branch, it can lead to additional conflicts on later merges that involve the same source and target branches.
1.7.2.3 Reverse cherrypicking
Cherrypicking can be used to reverse a set of changes made by giving an upper bound in the revision range which is below the lower bound. For example, to back-out changes made in revision 10, the command is:
bzr merge -r 10..9
If you want to take most changes, but not all, from somewhere else, you may wish to do a normal merge followed by a few reverse cherrypicks.
1.7.2.4 Merging uncommitted changes
If you have several branches and you accidentally start making changes in the wrong one, here are the steps to take to correct this. Assuming you began working in branch foo when you meant to work in branch bar:
- Change into branch bar.
- Run bzr merge --uncommitted foo
- Check the changes came across (bzr diff)
- Change into branch foo
- Run bzr revert.
1.7.2.5 Rebasing
Another option to normal merging is rebasing, i.e. making it look like the current branch originated from a different point than it did. Rebasing is supported in Bazaar by the rebase command provided by the rebase plugin.
The rebase command takes the location of another branch on which the branch in the current working directory will be rebased. If a branch is not specified then the parent branch is used, and this is usually the desired result.
The first step identifies the revisions that are in the current branch that are not in the parent branch. The current branch is then set to be at the same revision as the target branch, and each revision is replayed on top of the branch. At the end of the process it will appear as though your current branch was branched off the current last revision of the target.
Each revision that is replayed may cause conflicts in the tree. If this happens the command will stop and allow you to fix them up. Resolve the commits as you would for a merge, and then run bzr resolve to marked them as resolved. Once you have resolved all the conflicts, you should run bzr rebase-continue to continue the rebase operation. If conflicts are encountered and you decide not to continue, you can run bzr rebase-abort. You can also use rebase-todo to show the list of commits still to be replayed.
Note: Some users coming from central VCS tools with poor merge tracking like rebasing because it’s similar to how they are use to working in older tools, or because “perfectly clean” history seems important. Before rebasing in Bazaar, think about whether a normal merge is a better choice. In particular, rebasing a private branch before sharing it is OK but rebasing after sharing a branch with someone else is strongly discouraged.
1.7.3 Shelving Changes
Sometimes you will want to temporarily remove changes from your working tree and restore them later, For instance to commit a small bug-fix you found while working on something. Bazaar allows you to put changes on a shelf to achieve this. When you want to restore the changes later you can use unshelve to apply them to your working tree again.
For example, consider a working tree with one or more changes made ...
$ bzr diff
=== modified file 'description.txt'
--- description.txt
+++ description.txt
@@ -2,7 +2,7 @@
 ===============

 These plugins
-by Michael Ellerman
+written by Michael Ellerman
 provide a very
 fine-grained 'undo'
 facility
@@ -11,6 +11,6 @@
 This allows you to
 undo some of
 your changes,
-commit, and get
+perform a commit, and get
 back to where you
 were before.
The shelve command interactively asks which changes you want to retain in the working tree:
$ bzr shelve
--- description.txt
+++ description.txt
@@ -2,7 +2,7 @@
 ===============

 These plugins
-by Michael Ellerman
+written by Michael Ellerman
 provide a very
 fine-grained 'undo'
 facility

Shelve? [yNfrq?]: y
--- description.txt
+++ description.txt
@@ -11,6 +11,6 @@
 This allows you to
 undo some of
 your changes,
-commit, and get
+perform a commit, and get
 back to where you
 were before.

Shelve? [yNfrq?]: n
Shelve 2 change(s)? [yNfrq?]', 'y'
Selected changes:
 M  description.txt
Changes shelved with id "1".
If there are lots of changes in the working tree, you can provide the shelve command with a list of files and you will only be asked about changes in those files. After shelving changes, it’s a good idea to use diff to confirm the tree has just the changes you expect:
$ bzr diff
=== modified file 'description.txt'
--- description.txt
+++ description.txt
@@ -2,7 +2,7 @@
 ===============

 These plugins
-by Michael Ellerman
+written by Michael Ellerman
 provide a very
 fine-grained 'undo'
 facility
Great - you’re ready to commit:
$ bzr commit -m "improve first sentence"
At some later time, you can bring the shelved changes back into the working tree using unshelve:
$ bzr unshelve
Unshelving changes with id "1".
 M  description.txt
All changes applied successfully.
If you want to, you can put multiple items on the shelf. Normally each time you run unshelve the most recently shelved changes will be reinstated. However, you can also unshelve changes in a different order by explicitly specifying which changes to unshelve.
Bazaar merges the changes in to your working tree, so they will apply even if you have edited the files since you shelved them, though they may conflict, in which case you will have to resolve the conflicts in the same way you do after a conflicted merge.
1.7.4 Filtered views
1.7.4.1 Introducing filtered views
Views provide a mask over the tree so that users can focus on a subset of a tree when doing their work. There are several cases where this masking can be helpful. For example, technical writers and testers on many large projects may prefer to deal with just the directories/files in the project of interest to them.
Developers may also wish to break a large set of changes into multiple commits by using views. While shelve and unshelve let developers put some changes aside for a later commit, views let developers specify what to include in (instead of exclude from) the next commit.
After creating a view, commands that support a list of files - status, diff, commit, etc - effectively have that list of files implicitly given each time. An explicit list of files can still be given to these commands but the nominated files must be within the current view. In contrast, tree-centric commands - pull, merge, update, etc. - continue to operate on the whole tree but only report changes relevant to the current view. In both cases, Bazaar notifies the user each time it uses a view implicitly so that it is clear that the operation or output is being masked accordingly.
Note: Filtered views are only supported in format 2a, the default in Bazaar 2.0, or later.
1.7.4.2 Creating a view
This is done by specifying the files and directories using the view command like this:
bzr view file1 file2 dir1 ...
The output is:
Using 'my' view: file1, file2, dir1
1.7.4.3 Listing the current view
To see the current view, use the view command without arguments:
bzr view
If no view is current, a message will be output saying No current view.. Otherwise the name and content of the current view will be displayed like this:
'my' view is: a, b, c
1.7.4.4 Switching between views
In most cases, a view has a short life-span: it is created to make a selected change and is deleted once that change is committed. At other times, you may wish to create one or more named views and switch between them.
To define a named view and switch to it:
bzr view --name view-name file1 dir1 ...
For example:
bzr view --name doc NEWS doc/
Using doc view: NEWS, doc/
To list a named view:
bzr view --name view-name
To switch to a named view:
bzr view --switch view-name
To list all views defined:
bzr view --all
1.7.4.5 Temporarily disabling a view
To disable the current view without deleting it, you can switch to the pseudo view called off. This can be useful when you need to see the whole tree for an operation or two (e.g. merge) but want to switch back to your view after that.
To disable the current view without deleting it:
bzr view --switch off
After doing the operations you need to, you can switch back to the view you were using by name. For example, if the previous view used the default name:
bzr view --switch my
1.7.4.6 Deleting views
To delete the current view:
bzr view --delete
To delete a named view:
bzr view --name view-name --delete
To delete all views:
bzr view --delete --all
1.7.4.7 Things to be aware of
Defining a view does not delete the other files in the working tree - it merely provides a “lens” over the working tree.
Views are stored as working tree metadata. They are not propagated by branch commands like pull, push and update.
Views are defined in terms of file paths. If you move a file in a view to a location outside of the view, the view will no longer track that path. For example, if a view is defined as doc/ and doc/NEWS gets moved to NEWS, the views stays defined as doc/ and does not get changed to doc/ NEWS. Likewise, deleting a file in a view does not remove the file from that view.
The commands that use the current view are:
- status
- diff
- commit
- add
- remove
- revert
- mv
- ls.
Commands that operate on the full tree but only report changes inside the current view are:
- pull
- update
- merge.
Many commands currently ignore the current view. Over time, some of these commands may be added to the lists above as the need arises. By design, some commands will most likely always ignore the current view because showing the whole picture is the better thing to do. Commands in this group include:
- log
- info.
1.7.5 Использование стека веток
1.7.5.1 Что такое ветка в стеке?
Ветка в стеке - это ветка которая знает как найти ревизии в другой ветке. Ветка в стеке хранит только уникальные ревизии, которые при этом быстрее создавать и они более эффективны по занимаемому месту. По этим показателям стек веток похож на разделяемые репозитории. Конечно стек веток имеет дополнительные преимущества:
- Новая ветка может быть в абсолютно другом месте по сравнению с веткой на которой она основана как стек.
- Удаление ветки в стеке на самом деле удаляет ревизии (а не оставляет их в разделяемом репозитории).
- Стек веток более безопасен чем разделяемые репозитории, т.к. репозиторий на котором основан стек может иметь доступ только для чтения для разработчиков которые фиксируют изменения на ветке в стеке.
Эти преимущества делают стек веток идеальным выбором для различных сценариев, включая экспериментальные ветки и сайты с хостингом кода.
1.7.5.2 Создание ветки в стеке
Что бы создать ветку в стеке нужно использовать опцию stacked для команды branch. Например:
bzr branch --stacked source-url my-dir
Здесь мы создадим my-dir как ветку в стеке без локальных ревизий. Если определено открытая ветка связанная с source-url будет использована как основа стека. Иначе source-url будет основой стека.
1.7.5.3 Создание рабочего каталога в стеке
Поддержка прямого создания рабочего каталога в стеке скоро ожидается. Пока для этого требуется два шага:
- Создать ветку в стеке, как описано выше.
- Конвертировать ветку в рабочий каталог используя либо команду reconfigure, либо команду bind.
1.7.5.4 Публикация ветки в стеке
Многие изменения в большинстве проектов создаются на основе готовых веток, таких как основная линия разработки, или текущая стабильная. Создание новой ветки в стеке основанной на таких ветках легко сделать с использованием команды push:
bzr push --stacked-on reference-url my-url
Эта команда создаст новую ветку my-url, которая будет основана на reference-url и содержать только ревизии из текущей ветки, которых еще нет на ветке reference-url.
Если локальная ветка была создана как ветка в стеке то мы можем использовать опцию --stacked для команды push и тогда ветка на которой будет основан стек будет задана неявно. Например:
bzr branch --stacked source-url my-dir
cd my-dir
(меняем, меняем, меняем)
bzr commit -m "исправление ошибки"
bzr push --stacked
1.7.5.5 Ограничения веток в стеке
Важная вещь которую надо запомнить в отношении веток в стеке - ветка на которой основан стек должна быть доступна практически для всех операций. Конечно это не проблема если обе ветки локальные, или находятся на одном сервере.
1.7.6 Running a smart server
Bazaar does not require a specialised server because it operates over HTTP, FTP or SFTP. There is an optional smart server that can be invoked over SSH, from inetd, or in a dedicated mode.
1.7.6.1 Dumb servers
We describe HTTP, FTP, SFTP and HTTP-WebDAV as “dumb” servers because they do not offer any assistance to Bazaar. If you make a Bazaar repository available over any of these protocols, Bazaar will allow you to read it remotely. Just enter the URL to the branch in the Bazaar command you are running.:
bzr log http://bazaar-vcs.org/bzr/bzr.dev
Bazaar supports writing over FTP, SFTP and (via a plugin) over HTTP-WebDAV.
1.7.6.2 High-performance smart server
The high-performance smart server (hpss) performs certain operations much faster than dumb servers are capable of. In future releases, the range of operations that are improved by using the smart server will increase as we continue to tune performance.
To maintain the highest security possible, the current smart server provides read-only access by default. To enable read-write access, run it with --allow-writes. When using the SSH access method, bzr automatically runs with the --allow-writes option.
The alternative ways of configuring a smart server are explained below.
1.7.6.2.1 SSH
Using Bazaar over SSH requires no special configuration on the server; so long as Bazaar is installed on the server you can use bzr+ssh URLs, e.g.:
bzr log bzr+ssh://host/path/to/branch
If bzr is not installed system-wide on the server you may need to explicitly tell the local bzr where to find the remote bzr:
BZR_REMOTE_PATH=~/bin/bzr bzr log bzr+ssh://host/path/to/branch
The BZR_REMOTE_PATH environment variable adjusts how bzr will be invoked on the remote system. By default, just bzr will be invoked, which requires the bzr executable to be on the default search path. You can also set this permanently per-location in locations.conf.
Like SFTP, paths starting with ~ are relative to your home directory, e.g. bzr+ssh://example.com/~/code/proj. Additionally, paths starting with ~user will be relative to that user’s home directory.
1.7.6.2.2 inetd
This example shows how to run bzr with a dedicated user bzruser for a shared repository in /srv/bzr/repo which has a branch at /srv/bzr/repo/branchname.
Running a Bazaar server from inetd requires an inetd.conf entry:
4155 stream tcp nowait bzruser /usr/bin/bzr /usr/bin/bzr serve --inet --directory=/srv/bzr/repo
When running client commands, the URL you supply is a bzr:// URL relative to the --directory option given in inetd.conf:
bzr log bzr://host/branchname
If possible, paths starting with ~ and ~user will be expanded as for bzr+ssh. Home directories outside the --directory specified to bzr serve will not be accessible.
1.7.6.2.3 Dedicated
This mode has the same path and URL behaviour as the inetd mode. To run as a specific user, you should use su or login as that user.
This example runs bzr on its official port number of 4155 and listens on all interfaces. This allows connections from anywhere in the world that can reach your machine on port 4155.
server:
bzr serve --directory=/srv/bzr/repo
client:
bzr log bzr://host/branchname
This example runs bzr serve on localhost port 1234.
server:
bzr serve --port=localhost:1234 --directory=/srv/bzr/repo
client:
bzr log bzr://localhost:1234/branchname
1.7.7 Using hooks
1.7.7.1 What is a hook?
One way to customize Bazaar’s behaviour is with hooks. Hooks allow you to perform actions before or after certain Bazaar operations. The operations include commit, push, pull, and uncommit. For a complete list of hooks and their parameters, see Hooks in the User Reference.
Most hooks are run on the client, but a few are run on the server. (Also see the push-and-update plugin that handles one special case of server-side operations.)
1.7.7.2 Using hooks
To use a hook, you should write a plugin. Instead of creating a new command, this plugin will define and install the hook. Here’s an example:
from bzrlib import branch


def post_push_hook(push_result):
    print "The new revno is %d" % push_result.new_revno


branch.Branch.hooks.install_named_hook('post_push', post_push_hook,
                                 'My post_push hook')
To use this example, create a file named push_hook.py, and stick it in plugins subdirectory of your configuration directory. (If you have never installed any plugins, you may need to create the plugins directory).
That’s it! The next time you push, it should show “The new revno is...”. Of course, hooks can be much more elaborate than this, because you have the full power of Python at your disposal. Now that you know how to use hooks, what you do with them is up to you.
The plugin code does two things. First, it defines a function that will be run after push completes. (It could instead use an instance method or a callable object.) All push hooks take a single argument, the push_result.
Second, the plugin installs the hook. The first argument 'post_push' identifies where to install the hook. The second argument is the hook itself. The third argument is a name 'My post_push hook', which can be used in progress messages and error messages.
1.7.7.3 Debugging hooks
To get a list of installed hooks, use the hidden hooks command:
bzr hooks
1.7.8 Exporting version information
1.7.8.1 Getting the last revision number
If you only need the last revision number in your build scripts, you can use the revno command to get that value like this:
$ bzr revno
3104
1.7.8.2 Getting more version information
The version-info command can be used to output more information about the latest version like this:
$ bzr version-info
revision-id: pqm@pqm.ubuntu.com-20071211175118-s94sizduj201hrs5
date: 2007-12-11 17:51:18 +0000
build-date: 2007-12-13 13:14:51 +1000
revno: 3104
branch-nick: bzr.dev
You can easily filter that output using operating system tools or scripts. For example (on Linux/Unix):
$ bzr version-info | grep ^date
date: 2007-12-11 17:51:18 +0000
The --all option will actually dump version information about every revision if you need that information for more advanced post-processing.
1.7.8.3 Python projects
If using a Makefile to build your project, you can generate the version information file as simply as:
library/_version.py:
      bzr version-info --format python > library/_version.py
This generates a file which contains 3 dictionaries:
- version_info: A dictionary containing the basic information about the current state.
- revisions: A dictionary listing all of the revisions in the history of the tree, along with the commit times and commit message. This defaults to being empty unless --all or --include-history is supplied. This is useful if you want to track what bug fixes, etc, might be included in the released version. But for many projects it is more information than needed.
- file_revisions: A dictionary listing the last-modified revision for all files in the project. This can be used similarly to how $Id$ keywords are used in CVS-controlled files. The last modified date can be determined by looking in the revisions map. This is also empty by default, and enabled only by --all or --include-file-revisions.
1.7.8.4 Getting version info in other formats
Bazaar supports a template-based method for getting version information in arbitrary formats. The --custom option to version-info can be used by providing a --template argument that contains variables that will be expanded based on the status of the working tree. For example, to generate a C header file with a formatted string containing the current revision number:
bzr version-info --custom \
     --template="#define VERSION_INFO \"Project 1.2.3 (r{revno})\"\n" \
     > version_info.h
where the {revno} will be replaced by the revision number of the working tree. (If the example above doesn’t work on your OS, try entering the command all on one line.) For more information on the variables that can be used in templates, see Version Info in the Bazaar User Reference.
Predefined formats for dumping version information in specific languages are currently in development. Please contact us on the mailing list about your requirements in this area.
1.7.8.5 Check clean
Most information about the contents of the project can be cheaply determined by just reading the revision entry. However, it can be useful to know if the working tree was completely up-to-date when it was packaged, or if there was a local modification. By supplying either --all or --check-clean, bzr will inspect the working tree, and set the clean flag in version_info, as well as set entries in file_revisions as modified where appropriate.
1.8 Краткое описание некоторых популярных плагинов
1.8.1 BzrTools
1.8.1.1 Overview
BzrTools is a collection of useful enhancements to Bazaar. For installation instructions, see the BzrTools home page: http://bazaar-vcs.org/BzrTools. Here is a sample of the frequently used commands it provides.
1.8.1.2 shell
bzr shell starts up a command interpreter than understands Bazaar commands natively. This has several advantages:
- There’s no need to type bzr at the front of every command.
- Intelligent auto-completion is provided.
- Commands run slightly faster as there’s no need to load Bazaar’s libraries each time.
1.8.1.3 cdiff
bzr cdiff provides a colored version of bzr diff output. On GNU/Linux, UNIX and OS X, this is often used like this:
bzr cdiff | less -R
1.8.2 bzr-svn
1.8.2.1 Overview
bzr-svn lets developers use Bazaar as their VCS client on projects still using a central Subversion repository. Access to Subversion repositories is largely transparent, i.e. you can use most bzr commands directly on Subversion repositories exactly the same as if you were using bzr on native Bazaar branches.
Many bzr-svn users create a local mirror of the central Subversion trunk, work in local feature branches, and submit their overall change back to Subversion when it is ready to go. This lets them gain many of the advantages of distributed VCS tools without interrupting existing team-wide processes and tool integration hooks currently built on top of Subversion. Indeed, this is a common interim step for teams looking to adopt Bazaar but who are unable to do so yet for timing or non-technical reasons.
For installation instructions, see the bzr-svn home page: http://bazaar-vcs.org/BzrForeignBranches/Subversion.
1.8.2.2 A simple example
Here’s a simple example of how you can use bzr-svn to hack on a GNOME project like beagle. Firstly, setup a local shared repository for storing your branches in and checkout the trunk:
bzr init-repo beagle-repo
cd beagle-repo
bzr checkout svn+ssh://svn.gnome.org/svn/beagle/trunk beagle-trunk
Next, create a feature branch and hack away:
bzr branch beagle-trunk beagle-feature1
cd beagle-feature1
(hack, hack, hack)
bzr commit -m "blah blah blah"
(hack, hack, hack)
bzr commit -m "blah blah blah"
When the feature is cooked, refresh your trunk mirror and merge your change:
cd ../beagle-trunk
bzr update
bzr merge ../beagle-feature1
bzr commit -m "Complete comment for SVN commit"
As your trunk mirror is a checkout, committing to it implicitly commits to the real Subversion trunk. That’s it!
1.8.2.3 Using a central repository mirror
For large projects, it often makes sense to tweak the recipe given above. In particular, the initial checkout can get quite slow so you may wish to import the Subversion repository into a Bazaar one once and for all for your project, and then branch from that native Bazaar repository instead. bzr-svn provides the svn-import command for doing this repository-to-repository conversion. Here’s an example of how to use it:
bzr svn-import svn+ssh://svn.gnome.org/svn/beagle
Here’s the recipe from above updated to use a central Bazaar mirror:
bzr init-repo beagle-repo
cd beagle-repo
bzr branch bzr+ssh://bzr.gnome.org/beagle.bzr/trunk beagle-trunk
bzr branch beagle-trunk beagle-feature1
cd beagle-feature1
(hack, hack, hack)
bzr commit -m "blah blah blah"
(hack, hack, hack)
bzr commit -m "blah blah blah"
cd ../beagle-trunk
bzr pull
bzr merge ../beagle-feature1
bzr commit -m "Complete comment for SVN commit"
bzr push
In this case, committing to the trunk only commits the merge locally. To commit back to the master Subversion trunk, an additional command (bzr push) is required.
Note: You’ll need to give pull and push the relevant URLs the first time you use those commands in the trunk branch. After that, bzr remembers them.
The final piece of the puzzle in this setup is to put scripts in place to keep the central Bazaar mirror synchronized with the Subversion one. This can be done by adding a cron job, using a Subversion hook, or whatever makes sense in your environment.
1.8.2.4 Limitations of bzr-svn
Bazaar and Subversion are different tools with different capabilities so there will always be some limited interoperability issues. Here are some examples current as of bzr-svn 0.5.4:
- Bazaar doesn’t support versioned properties
- Bazaar doesn’t support tracking of file copies.
See the bzr-svn web page, http://bazaar-vcs.org/BzrForeignBranches/Subversion, for the current list of constraints.
1.9 Интегрируем Bazaar в нашу среду
1.9.1 Web browsing
1.9.1.1 Overview
There are a range of options available for providing a web view of a Bazaar repository, the main one being Loggerhead. The homepage of Loggerhead can be found at https://launchpad.net/loggerhead.
A list of alternative web viewers including download links can be found on http://bazaar-vcs.org/WebInterface.
Note: If your project is hosted or mirrored on Launchpad, Loggerhead code browsing is provided as part of the service.
1.9.2 Bug trackers
Bazaar has a facility that allows you to associate a commit with a bug in the project’s bug tracker. Other tools (or hooks) can then use this information to generate hyperlinks between the commit and the bug, or to automatically mark the bug closed in the branches that contain the commit.
1.9.2.1 Associating commits and bugs
When you make a commit, you can associate it with a bug by using the --fixes option of commit. For example:
$ bzr commit --fixes lp:12345 -m "Properly close the connection"
This records metadata in Bazaar linking the commit with bug 12345 in Launchpad. If you use a different bug tracker, it can be given its own tracker code (instead of lp) and used instead. For details on how to configure this for Bugzilla, Trac, Roundup and other bug/issue trackers, refer to Bug Tracker Settings in the Bazaar User Reference.
1.9.2.2 Metadata recording vs bug tracker updating
Recording metadata about bugs fixed at commit time is only one of the features needed for complete bug tracker integration. As Bazaar is a distributed VCS, users may be offline while committing so accessing the bug tracker itself at that time may not be possible. Instead, it is recommended that a hook be installed to update the bug tracker when changes are pushed to a central location appropriate for your project’s workflow.
Note: This second processing stage is part of the integration provided by Launchpad when it scans external or hosted branches.
1.9.2.3 Making corrections
This method of associating revisions and bugs does have some limitations. The first is that the association can only be made at commit time. This means that if you forget to make the association when you commit, or the bug is reported after you fix it, you generally cannot go back and add the link later.
Related to this is the fact that the association is immutable. If a bug is marked as fixed by one commit but that revision does not fully solve the bug, or there is a later regression, you cannot go back and remove the link.
Of course, bzr uncommit can always be used to undo the last commit in order to make it again with the correct options. This is commonly done to correct a bad commit message and it equally applies to correcting metadata recorded (via --fixes for example) on the last commit.
Note: uncommit is best done before incorrect revisions become public.
1.10 Приложения
1.10.1 Определение ревизий
1.10.1.1 Revision identifiers and ranges
Bazaar has a very expressive way to specify a revision or a range of revisions. To specify a range of revisions, the upper and lower bounds are separated by the .. symbol. For example:
$ bzr log -r 1..4
You can omit one bound like:
$ bzr log -r 1..
$ bzr log -r ..4
Some commands take only one revision, not a range. For example:
$ bzr cat -r 42 foo.c
In other cases, a range is required but you want the length of the range to be one. For commands where this is relevant, the -c option is used like this:
$ bzr diff -c 42
1.10.1.2 Available revision identifiers
The revision, or the bounds of the range, can be given using different format specifications as shown below.
argument type description number revision number revno:number positive revision number last:number negative revision number revid:guid globally unique revision id before:rev leftmost parent of ‘’rev’‘ date:value first entry after a given date tag:value revision matching a given tag ancestor:path last merged revision from a branch branch:path latest revision on another branch submit:path common ancestor with submit branch
A brief introduction to some of these formats is given below. For complete details, see Revision Identifiers in the Bazaar User Reference.
1.10.1.2.1 Numbers
Positive numbers denote revision numbers in the current branch. Revision numbers are labelled as “revno” in the output of bzr log. To display the log for the first ten revisions:
$ bzr log -r ..10
Negative numbers count from the latest revision, -1 is the last committed revision.
To display the log for the last ten revisions:
$ bzr log -r -10..
1.10.1.2.2 revid
revid allows specifying a an internal revision ID, as shown by bzr log and some other commands.
For example:
$ bzr log -r revid:Matthieu.Moy@imag.fr-20051026185030-93c7cad63ee570df
1.10.1.2.3 before
- before
- ‘’rev’’ specifies the leftmost parent of ‘’rev’‘, that is the revision that appears before ‘’rev’’ in the revision history, or the revision that was current when ‘’rev’’ was committed.
‘’rev’’ can be any revision specifier and may be chained.
For example:
$ bzr log -r before:before:4
...
revno: 2
...
1.10.1.2.4 date
- date
- ‘’value’’ matches the first history entry after a given date, either at midnight or at a specified time.
Legal values are:
- yesterday
- today
- tomorrow
- A YYYY-MM-DD format date.
- A YYYY-MM-DD,HH:MM:SS format date/time, seconds are optional (note the comma)
The proper way of saying “give me all the log entries for today” is:
$ bzr log -r date:yesterday..date:today
1.10.1.2.5 Ancestor
- ancestor:path
- specifies the common ancestor between the current branch and a different branch. This is the same ancestor that would be used for merging purposes.
path may be the URL of a remote branch, or the file path to a local branch.
For example, to see what changes were made on a branch since it was forked off ../parent:
$ bzr diff -r ancestor:../parent
1.10.1.2.6 Branch
- branch
- path specifies the latest revision in another branch.
path may be the URL of a remote branch, or the file path to a local branch.
For example, to get the differences between this and another branch:
$ bzr diff -r branch:http://example.com/bzr/foo.dev
1.10.2 Organizing your workspace
1.10.2.1 Common workspace layouts
The best way for a Bazaar user to organize their workspace for a project depends on numerous factors including:
- user role: project owner vs core developer vs casual contributor
- workflows: particularly the workflow the project encourages/mandates for making contributions
- size: large projects have different resource requirements to small ones.
There are at least 4 common ways of organizing one’s workspace:
- lightweight checkout
- standalone tree
- feature branches
- switchable sandbox.
A brief description of each layout follows.
1.10.2.2 Lightweight checkout
In this layout, the working tree is local and the branch is remote. This is the standard layout used by CVS and Subversion: it’s simple and well understood.
To set up:
bzr checkout --lightweight URL project
cd project
To work:
(make changes)
bzr commit
(make changes)
bzr commit
Note that each commit implicitly publishes the change to everyone else working from that branch. However, you need to be up to date with changes in the remote branch for the commit to succeed. To grab the latest code and merge it with your changes, if any:
bzr update
1.10.2.3 Standalone tree
In this layout, the working tree & branch are in the one place. Unless a shared repository exists in a higher level directory, the repository is located in that same place as well. This is the default layout in Bazaar and it’s great for small to moderately sized projects.
To set up:
bzr branch URL project
cd project
To work:
(make changes)
bzr commit
(make changes)
bzr commit
To publish changes to a central location:
bzr push [URL]
The URL for push is only required the first time.
If the central location has, in the meantime, received changes from other users, then you’ll need to merge those changes into your local branch before you try to push again:
bzr merge
(resolve conflicts)
bzr commit
As an alternative, a checkout can be used. Like a branch, a checkout has a full copy of the history stored locally but the local branch is bound to the remote location so that commits are published to both locations at once.
Note: A checkout is actually smarter than a local commit followed by a push. In particular, a checkout wil commit to the remote location first and only commit locally if the remote commit succeeds.
1.10.2.4 Feature branches
In this layout, there are multiple branches/trees, typically sharing a repository. One branch is kept as a mirror of “trunk” and each unit-of-work (i.e. bug-fix or enhancement) gets its own “feature branch”. This layout is ideal for most projects, particularly moderately sized ones.
To set up:
bzr init-repo project
cd project
bzr branch URL trunk
To start a feature branch:
bzr branch trunk featureX
cd featureX
To work:
(make changes)
bzr commit
(make changes)
bzr commit
To publish changes to a mailing list for review & approval:
bzr send
To publish changes to a public branch (that can then be registered as a Launchpad merge request, say):
bzr push [URL]
As a variation, the trunk can be created as a checkout. If you have commit privileges on trunk, that lets you merge into trunk and the commit of the merge will implicitly publish your change. Alternatively, if the trunk URL is read-only (e.g. a http address), that prevents accidental submission this way - ideal if the project workflow uses an automated gatekeeper like PQM, say.
1.10.2.5 Local sandbox
This layout is very similar to the feature branches layout except that the feature branches share a single working tree rather than having one each. This is similar to git’s default layout and it’s useful for projects with really large trees (> 10000 files say) or for projects with lots of build artifacts (like .o or .class files).
To set up:
bzr init-repo --no-trees project
cd project
bzr branch URL trunk
bzr checkout --lightweight trunk sandbox
cd sandbox
While you could start making changes in sandbox now, committing while the sandbox is pointing to the trunk would mean that trunk is no longer a mirror of the upstream URL (well unless the trunk is a checkout). Therefore, you usually want to immediately create a feature branch and switch your sandbox to it like this:
bzr branch ../trunk ../featureX
bzr switch ../featureX
The processes for making changes and submitting them are otherwise pretty much the same as those used for feature branches.
1.10.2.6 Advanced layouts
If you wish, you can put together your own layout based on how you like things organized. See Advanced shared repository layouts for examples and inspiration.
1.10.3 Advanced shared repository layouts
Bazaar is designed to give you flexibility in how you layout branches inside a shared repository. This flexibility allows users to tailor Bazaar to their workflow, but it also leads to questions about what is a “good” layout. We present some alternatives and give some discussion about the benefits of each.
One key point which should be mentioned is that any good layout should somehow highlight what branch a “general” user should grab. In SVN this is deemed the “trunk/” branch, and in most of the layouts this naming convention is preserved. Some would call this “mainline” or “dev“, and people from CVS often refer to this as “HEAD“.
1.10.3.1 “SVN-Style” (trunk/, branches/)
Most people coming from SVN will be familiar with their “standard” project layout. Which is to layout the repository as:
repository/       # Overall repository
 +- trunk/        # The mainline of development
 +- branches/     # A container directory
 |   +- foo/      # Branch for developing feature foo
 |     ...
 +- tags/         # Container directory
     +- release-X # A branch specific to mark a given release version
        ...
With Bazaar, that is a perfectly reasonable layout. It has the benefit of being familiar to people coming from SVN, and making it clear where the development focus is.
When you have multiple projects in the same repository, the SVN layout is a little unclear what to do.
1.10.3.1.1 project/trunk
The preferred method for SVN seems to be to give each project a top level directory for a layout like:
repository/            # Overall repository
 +- project1/          # A container directory
 |   +- trunk/         # The mainline of development of project1
 |   +- branches/      # A container directory
 |       +- foo/       # Branch for developing feature foo of project1
 |         ...
 |
 +- project2/          # Container for project2
     +- trunk/         # Mainline for project2
     +- branches/      # Container for project2 branches
This also works with Bazaar. However, with Bazaar repositories are cheap to create (a simple bzr init-repo away), and their primary benefit is when the branches share a common ancestry.
So the preferred way for Bazaar would be:
project1/          # A repository for project1
 +- trunk/         # The mainline of development of project1
 +- branches/      # A container directory
     +- foo/       # Branch for developing feature foo of project1
       ...

project2/          # A repository for project2
 +- trunk/         # Mainline for project2
 +- branches/      # Container for project2 branches
1.10.3.1.2 trunk/project
There are also a few projects who use this layout in SVN:
repository/             # Overall repository
  +- trunk/             # A container directory
  |   +- project1       # Mainline for project 1
  |   +- project2       # Mainline for project 2
  |         ...
  |
  +- branches/          # Container
      +- project1/      # Container (?)
      |   +- foo        # Branch 'foo' of project1
      +- project2/
          +- bar        # Branch 'bar' of project2
A slight variant is:
repository/             # Overall repository
  +- trunk/             # A container directory
  |   +- project1       # Mainline for project 1
  |   +- project2       # Mainline for project 2
  |         ...
  |
  +- branches/          # Container
      +- project1-foo/  # Branch 'foo' of project1
      +- project2-bar/  # Branch 'bar' of project2
I believe the reason for this in SVN, is so that someone can checkout all of “trunk/” and get the all the mainlines for all projects.
This layout can be used for Bazaar, but it is not generally recommended.
- bzr branch/checkout/get is a single branch at a time. So you don’t get the benefit of getting all mainlines with a single command. [1]
- It is less obvious of whether repository/trunk/foo is the trunk of project foo or it is just the foo directory in the trunk branch. Some of this confusion is due to SVN, because it uses the same “namespace” for files in a project that it uses for branches of a project. In Bazaar, there is a clear distinction of what files make up a project, versus the location of the Branch. (After all, there is only one .bzr/ directory per branch, versus many .svn/ directories in the checkout).
| [1] | Note: NestedTreeSupport can provide a way to create “meta-projects” which aggregate multiple projects regardless of the repository layout. Letting you bzr checkout one project, and have it grab all the necessary sub-projects. |
1.10.3.2 Nested Style (project/branch/sub-branch/)
Another style with Bazaar, which is not generally possible in SVN is to have branches nested within each-other. This is possible because Bazaar supports (and recommends) creating repositories with no working trees (--no-trees). With a --no-trees repository, because the working files are not intermixed with your branch locations, you are free to put a branch in whatever namespace you want.
One possibility is:
project/             # The overall repository, *and* the project's mainline branch
 + joe/              # Developer Joe's primary branch of development
 |  +- feature1/     # Developer Joe's feature1 development branch
 |  |   +- broken/   # A staging branch for Joe to develop feature1
 |  +- feature2/     # Joe's feature2 development branch
 |    ...
 + barry/            # Barry's development branch
 |  ...
 + releases/
    +- 1.0/
        +- 1.1.1/
The idea with this layout is that you are creating a hierarchical layout for branches. Where changes generally flow upwards in the namespace. It also gives people a little corner of the namespace to work on their stuff. One nice feature of this layout, is it makes branching “cheaper” because it gives you a place to put all the mini branches without cluttering up the global branches/ namespace.
The other power of this is that you don’t have to repeat yourself when specifying more detail in the branch name.
For example compare:
bzr branch http://host/repository/project/branches/joe-feature-foo-bugfix-10/
Versus:
bzr branch http://host/project/joe/foo/bugfix-10
Also, if you list the repository/project/branches/ directory you might see something like:
barry-feature-bar/
barry-bugfix-10/
barry-bugfix-12/
joe-bugfix-10/
joe-bugfix-13/
joe-frizban/
Versus having these broken out by developer. If the number of branches are small, branches/ has the nice advantage of being able to see all branches in a single view. If the number of branches is large, branches/ has the distinct disadvantage of seeing all the branches in a single view (it becomes difficult to find the branch you are interested in, when there are 100 branches to look through).
Nested branching seems to scale better to larger number of branches. However, each individual branch is less discoverable. (eg. “Is Joe working on bugfix 10 in his feature foo branch, or his feature bar branch?”)
One other small advantage is that you can do something like:
 bzr branch http://host/project/release/1/1/1
or
 bzr branch http://host/project/release/1/1/2
To indicate release 1.1.1 and 1.1.2. This again depends on how many releases you have and whether the gain of splitting things up outweighs the ability to see more at a glance.
1.10.3.3 Sorted by Status (dev/, merged/, experimental/)
One other way to break up branches is to sort them by their current status. So you would end up with a layout something like:
project/               # Overall layout
 +- trunk/             # The development focus branch
 +- dev/               # Container directory for in-progress work
 |   +- joe-feature1   # Joe's current feature-1 branch
 |   +- barry-bugfix10 # Barry's work for bugfix 10
 |    ...
 +- merged/            # Container indicating these branches have been merged
 |   +- bugfix-12      # Bugfix which has already been merged.
 +- abandonded/        # Branches which are considered 'dead-end'
This has a couple benefits and drawbacks. It lets you see what branches are actively being developed on, which is usually only a small number, versus the total number of branches ever created. Old branches are not lost (versus deleting them), but they are “filed away”, such that the more likely you are to want a branch the easier it is to find. (Conversely, older branches are likely to be harder to find).
The biggest disadvantage with this layout, is that branches move around. Which means that if someone is following the project/dev/new-feature branch, when it gets merged into trunk/ suddenly bzr pull doesn’t mirror the branch for them anymore because the branch is now at project/merged/new-feature. There are a couple ways around this. One is to use HTTP redirects to point people requesting the old branch to the new branch. bzr >= 0.15 will let users know that http://old/path redirects to http://new/path. However, this doesn’t help if people are accessing a branch through methods other than HTTP (SFTP, local filesystem, etc).
It would also be possible to use a symlink for temporary redirecting (as long as the symlink is within the repository it should cause little trouble). However eventually you want to remove the symlink, or you don’t get the clutter reduction benefit. Another possibility instead of a symlink is to use a BranchReference. It is currently difficult to create these through the bzr command line, but if people find them useful that could be changed. This is actually how Launchpad allows you to bzr checkout https://launchpad.net/bzr. Effectively a BranchReference is a symlink, but it allows you to reference any other URL. If it is extended to support relative references, it would even work over http, sftp, and local paths.
1.10.3.4 Sorted by date/release/etc (2006-06/, 2006-07/, 0.8/, 0.9)
Another method of allowing some scalability while also allowing the browsing of “current” branches. Basically, this works on the assumption that actively developed branches will be “new” branches, and older branches are either merged or abandoned.
Basically the date layout looks something like:
project/                # Overall project repository
 +- trunk/              # General mainline
 +- 2006-06/            # containing directory for branches created in this month
 |   +- feature1/       # Branch of "project" for "feature1"
 |   +- feature2/       # Branch of "project" for "feature2"
 +- 2005-05/            # Containing directory for branches create in a different month
     +- feature3/
     ...
This answers the question “Where should I put my new branch?” very quickly. If a feature is developed for a long time, it is even reasonable to copy a branch into the newest date, and continue working on it there. Finding an active branch generally means going to the newest date, and going backwards from there. (A small disadvantage is that most directory listings sort oldest to the top, which may mean more scrolling). If you don’t copy old branches to newer locations, it also has the disadvantage that searching for a branch may take a while.
Another variant is by release target:
project/          # Overall repository
 +- trunk/        # Mainline development branch
 +- releases/     # Container for release branches
 |   +- 0.8/      # The branch for release 0.8
 |   +- 0.9/      # The branch for release 0.9
 +- 0.8/          # Container for branches targeting release 0.8
 |   +- feature1/ # Branch for "feature1" which is intended to be merged into 0.8
 |   +- feature2/ # Branch for "feature2" which is targeted for 0.8
 +- 0.9/
     +- feature3/ # Branch for "feature3", targeted for release 0.9
Some possible variants include having the 0.9 directory imply that it is branched from 0.9 rather than for 0.9, or having the 0.8/release as the official release 0.8 branch.
The general idea is that by targeting a release, you can look at what branches are waiting to be merged. It doesn’t necessarily give you a good idea of what the state of the branch (is it in development or finished awaiting review). It also has a history-hiding effect, and otherwise has the same benefits and deficits as a date-based sorting.
1.10.3.5 Simple developer naming (project/joe/foo, project/barry/bar)
Another possibly layout is to give each developer a directory, and then have a single sub-directory for branches. Something like:
project/      # Overall repository
 +- trunk/    # Mainline branch
 +- joe/      # A container for Joe's branches
 |   +- foo/  # Joe's "foo" branch of "project"
 +- barry/
     +- bar/  # Barry's "bar" branch of "project"
The idea is that no branch is “nested” underneath another one, just that each developer has his/her branches grouped together.
A variant which is used by Launchpad is:
repository/
 +- joe/             # Joe's branches
 |   +- project1/    # Container for Joe's branches of "project1"
 |   |   +- foo/     # Joe's "foo" branch of "project1"
 |   +- project2/    # Container for Joe's "project2" branches
 |       +- bar/     # Joe's "bar" branch of "project2"
 |        ...
 |
 +- barry/
 |   +- project1/    # Container for Barry's branches of "project1"
 |       +- bug-10/  # Barry's "bug-10" branch of "project1"
 |   ...
 +- group/
     +- project1/
         +- trunk/   # The main development focus for "project1"
This lets you easily browse what each developer is working on. Focus branches are kept in a “group” directory, which lets you see what branches the “group” is working on.
This keeps different people’s work separated from each-other, but also makes it hard to find “all branches for project X”. Launchpad compensates for this by providing a nice web interface with a database back end, which allows a “view” to be put on top of this layout. This is closer to the model of people’s home pages, where each person has a “~/public_html” directory where they can publish their own web-pages. In general, though, when you are creating a shared repository for centralization of a project, you don’t want to split it up by person and then project. Usually you would want to split it up by project and then by person.
1.10.3.6 Summary
In the end, no single naming scheme will work for everyone. It depends a lot on the number of developers, how often you create a new branch, what sort of lifecycles your branches go through. Some questions to ask yourself:
- Do you create a few long-lived branches, or do you create lots of “mini” feature branches (Along with this is: Would you like to create lots of mini feature branches, but can’t because they are a pain in your current VCS?)
- Are you a single developer, or a large team?
- If a team, do you plan on generally having everyone working on the same branch at the same time? Or will you have a “stable” branch that people are expected to track.
1.10.4 Configuring email
1.10.4.1 Why set up an email address with Bazaar?
Bazaar stores the specified email address in revisions when they’re created so that people can tell who committed which revisions. The email addresses are not verified, therefore they could be bogus, so you have to trust the people involved in your project. Additionally, the email address in a revision gives others a way to contact the author of a revision for credit and/or blame. :)
1.10.4.2 How to set up your email address
Bazaar will try to guess an email address based on your username and the hostname if none is set. This will probably not be what you want, so three ways exist to tell Bazaar what email to use:
You can set your email in one of several configuration files. Like other configuration values, you can set it in bazaar.conf as a general setting. If you want to override the value for a particular branch, or set of branches, you can use locations.conf. .bzr/branch/branch.conf will also work, but will cause all commits to that branch to use the same email address, even if someone else does them.
The order of precedence is
- If the BZR_EMAIL environment variable is set.
- If an email is set for your current branch in the locations.conf file.
- If an email is set four your current branch in the .bzr/branch/branch.conf file.
- If an email is set in the bazaar.conf default configuration file.
- If the EMAIL environment variable is set.
- Bazaar will try to guess based on your username and the hostname.
To check on what Bazaar thinks your current email is, use the whoami (“who am i?”) command:
% bzr whoami
Joe Cool <joe@example.com>
1.10.4.3 Setting email via the ‘whoami’ command
You can use the whoami command to set your email globally:
% bzr whoami "Joe Cool <joe@example.com>"
or only for the current branch:
% bzr whoami --branch "Joe Cool <joe@example.com>"
These modify your global bazaar.conf or branch branch.conf file, respectively.
1.10.4.4 Setting email via default configuration file
To use the default ini file, create or edit the bazaar.conf file (in ~/.bazaar/ on Linux and in %APPDATA%\bazaar\2.0\ in Windows) and set an email address as shown below. Please note that the word DEFAULT is case sensitive, and must be in upper-case.
[DEFAULT]
email=Your Name <name@isp.com>
For more information on the ini file format, see Configuration Settings in the Bazaar User Reference.
1.10.4.5 Setting email on a per-branch basis
The second approach is to set email on a branch by branch basis by using the locations.conf configuration file like this:
[/some/branch/location]
email=Your Name <name@other-isp.com>
This will set your email address in the branch at /some/branch/location, overriding the default specified in the bazaar.conf above.
1.10.4.6 Setting email via environment variable
The final method Bazaar will use is checking for the BZR_EMAIL and EMAIL environment variables. Generally, you would use this method to override the email in a script context. If you would like to set a general default, then please see the ini methods above.
1.10.4.7 Concerns about spam
Some people want to avoid sharing their email address so as not to get spam. Bazaar will never disclose your email address, unless you publish a branch or changeset in a public location. It’s recommended that you do use a real address, so that people can contact you about your work, but it’s not required. You can use an address which is obfuscated, which bounces, or which goes through an anti-spam service such as spamgourmet.com.
1.10.5 Serving Bazaar with Apache
This document describes one way to set up a Bazaar HTTP smart server, using Apache 2.0 and FastCGI or mod_python or mod_wsgi.
For more information on the smart server, and other ways to configure it see the main smart server documentation.
1.10.5.1 Example
You have a webserver already publishing /srv/example.com/www/code as http://example.com/code/... with plain HTTP. It contains bzr branches and directories like /srv/example.com/www/code/branch-one and /srv/example.com/www/code/my-repo/branch-two. You want to provide read-only smart server access to these directories in addition to the existing HTTP access.
1.10.5.2 Configuring Apache 2.0
1.10.5.2.1 FastCGI
First, configure mod_fastcgi, e.g. by adding lines like these to your httpd.conf:
LoadModule fastcgi_module /usr/lib/apache2/modules/mod_fastcgi.so
FastCgiIpcDir /var/lib/apache2/fastcgi
In our example, we’re already serving /srv/example.com/www/code at http://example.com/code, so our existing Apache configuration would look like:
Alias /code /srv/example.com/www/code
<Directory /srv/example.com/www/code>
    Options Indexes
    # ...
</Directory>
We need to change it to handle all requests for URLs ending in .bzr/smart. It will look like:
Alias /code /srv/example.com/www/code
<Directory /srv/example.com/www/code>
    Options Indexes FollowSymLinks
    RewriteEngine On
    RewriteBase /code
    RewriteRule ^(.*/|)\.bzr/smart$ /srv/example.com/scripts/bzr-smart.fcgi
</Directory>

# bzr-smart.fcgi isn't under the DocumentRoot, so Alias it into the URL
# namespace so it can be executed.
Alias /srv/example.com/scripts/bzr-smart.fcgi /srv/example.com/scripts/bzr-smart.fcgi
<Directory /srv/example.com/scripts>
    Options ExecCGI
    <Files bzr-smart.fcgi>
        SetHandler fastcgi-script
    </Files>
</Directory>
This instructs Apache to hand requests for any URL ending with /.bzr/smart inside /code to a Bazaar smart server via FastCGI.
Refer to the mod_rewrite and mod_fastcgi documentation for further information.
1.10.5.2.2 mod_python
First, configure mod_python, e.g. by adding lines like these to your httpd.conf:
LoadModule python_module /usr/lib/apache2/modules/mod_python.so
Define the rewrite rules with mod_rewrite the same way as for FastCGI, except change:
RewriteRule ^(.*/|)\.bzr/smart$ /srv/example.com/scripts/bzr-smart.fcgi
to:
RewriteRule ^(.*/|)\.bzr/smart$ /srv/example.com/scripts/bzr-smart.py
Like with mod_fastcgi, we also define how our script is to be handled:
Alias /srv/example.com/scripts/bzr-smart.py /srv/example.com/scripts/bzr-smart.py
<Directory /srv/example.com/scripts>
    <Files bzr-smart.py>
        PythonPath "sys.path+['/srv/example.com/scripts']"
        AddHandler python-program .py
        PythonHandler bzr-smart::handler
    </Files>
</Directory>
This instructs Apache to hand requests for any URL ending with /.bzr/smart inside /code to a Bazaar smart server via mod_python.
NOTE: If you don’t have bzrlib in your PATH, you will be need to change the following line:
PythonPath "sys.path+['/srv/example.com/scripts']"
To:
PythonPath "['/path/to/bzr']+sys.path+['/srv/example.com/scripts']"
Refer to the mod_python documentation for further information.
1.10.5.2.3 mod_wsgi
First, configure mod_wsgi, e.g. enabling the mod with a2enmod wsgi. We need to change it to handle all requests for URLs ending in .bzr/smart. It will look like:
WSGIScriptAliasMatch ^/code/.*/\.bzr/smart$ /srv/example.com/scripts/bzr.wsgi

#The three next lines allow regular GETs to work too
RewriteEngine On
RewriteCond %{REQUEST_URI} !^/code/.*/\.bzr/smart$
RewriteRule ^/code/(.*/\.bzr/.*)$ /srv/example.com/www/code/$1 [L]

<Directory /srv/example.com/www/code>
    WSGIApplicationGroup %{GLOBAL}
</Directory>
This instructs Apache to hand requests for any URL ending with /.bzr/smart inside /code to a Bazaar smart server via WSGI, and any other URL inside /code to be served directly by Apache.
Refer to the mod_wsgi documentation for further information.
1.10.5.3 Configuring Bazaar
1.10.5.3.1 FastCGI
We’ve configured Apache to run the smart server at /srv/example.com/scripts/bzr-smart.fcgi. This is just a simple script we need to write to configure a smart server, and glue it to the FastCGI gateway. Here’s what it looks like:
import fcgi
from bzrlib.transport.http import wsgi

smart_server_app = wsgi.make_app(
    root='/srv/example.com/www/code',
    prefix='/code/',
    path_var='REQUEST_URI',
    readonly=True,
    load_plugins=True,
    enable_logging=True)

fcgi.WSGIServer(smart_server_app).run()
The fcgi module can be found at http://svn.saddi.com/py-lib/trunk/fcgi.py. It is part of flup.
1.10.5.3.2 mod_python
We’ve configured Apache to run the smart server at /srv/example.com/scripts/bzr-smart.py. This is just a simple script we need to write to configure a smart server, and glue it to the mod_python gateway. Here’s what it looks like:
import modpywsgi
from bzrlib.transport.http import wsgi

smart_server_app = wsgi.make_app(
    root='/srv/example.com/www/code',
    prefix='/code/',
    path_var='REQUEST_URI',
    readonly=True,
    load_plugins=True,
    enable_logging=True)

def handler(request):
    """Handle a single request."""
    wsgi_server = modpywsgi.WSGIServer(smart_server_app)
    return wsgi_server.run(request)
The modpywsgi module can be found at http://ice.usq.edu.au/svn/ice/trunk/apps/ice-server/modpywsgi.py. It was part of pocoo. You sould make sure you place modpywsgi.py in the same directory as bzr-smart.py (ie. /srv/example.com/scripts/).
1.10.5.3.3 mod_wsgi
We’ve configured Apache to run the smart server at /srv/example.com/scripts/bzr.wsgi. This is just a simple script we need to write to configure a smart server, and glue it to the WSGI gateway. Here’s what it looks like:
from bzrlib.transport.http import wsgi

def application(environ, start_response):
    app = wsgi.make_app(
        root="/srv/example.com/www/code/",
        prefix="/code",
        readonly=True,
        enable_logging=False)
    return app(environ, start_response)
1.10.5.4 Clients
Now you can use bzr+http:// URLs or just http:// URLs, e.g.:
bzr log bzr+http://example.com/code/my-branch
Plain HTTP access should continue to work:
bzr log http://example.com/code/my-branch
1.10.5.5 Advanced configuration
Because the Bazaar HTTP smart server is a WSGI application, it can be used with any 3rd-party WSGI middleware or server that conforms the WSGI standard. The only requirements are:
- to construct a SmartWSGIApp, you need to specify a root transport that it will serve.
- each request’s environ dict must have a ‘bzrlib.relpath’ variable set.
The make_app helper used in the example constructs a SmartWSGIApp with a transport based on the root path given to it, and calculates the ‘bzrlib.relpath` for each request based on the prefix and path_var arguments. In the example above, it will take the ‘REQUEST_URI’ (which is set by Apache), strip the ‘/code/’ prefix and the ‘/.bzr/smart’ suffix, and set that as the ‘bzrlib.relpath’, so that a request for ‘/code/foo/bar/.bzr/smart’ will result in a ‘bzrlib.relpath’ of ‘foo/bzr’.
It’s possible to configure a smart server for a non-local transport, or that does arbitrary path translations, etc, by constructing a SmartWSGIApp directly. Refer to the docstrings of bzrlib.transport.http.wsgi and the WSGI standard for further information.
1.10.5.5.1 Pushing over the http smart server
It is possible to allow pushing data over the http smart server. The easiest way to do this, is to just supply readonly=False to the wsgi.make_app() call. But be careful, because the smart protocol does not contain any Authentication. So if you enable write support, you will want to restrict access to .bzr/smart URLs to restrict who can actually write data on your system, e.g. in apache it looks like:
<Location /code>
    AuthType Basic
    AuthName "example"
    AuthUserFile /srv/example.com/conf/auth.passwd
    <LimitExcept GET>
        Require valid-user
    </LimitExcept>
</Location>
At this time, it is not possible to allow some people to have read-only access and others to have read-write access to the same urls. Because at the HTTP layer (which is doing the Authenticating), everything is just a POST request. However, it would certainly be possible to have HTTPS require authentication and use a writable server, and plain HTTP allow read-only access.
If bzr gives an error like this when accessing your HTTPS site:
bzr: ERROR: Connection error: curl connection error (server certificate verification failed.
CAfile:/etc/ssl/certs/ca-certificates.crt CRLfile: none)
You can workaround it by using https+urllib rather than http in your URL, or by uninstalling pycurl. See bug 82086 for more details.
1.10.6 Writing a plugin
1.10.6.1 Introduction
Plugins are very similar to bzr core functionality. They can import anything in bzrlib. A plugin may simply override standard functionality, but most plugins supply new commands.
1.10.6.2 Creating a new command
To create a command, make a new object that derives from bzrlib.commands.Command, and name it cmd_foo, where foo is the name of your command. If you create a command whose name contains an underscore, it will appear in the UI with the underscore turned into a hyphen. For example, cmd_baz_import will appear as baz-import. For examples of how to write commands, please see builtins.py.
Once you’ve created a command you must register the command with bzrlib.commands.register_command(cmd_foo). You must register the command when your file is imported, otherwise bzr will not see it.
1.10.6.3 Specifying a plugin version number
Simply define version_info to be a tuple defining the current version number of your plugin. eg. version_info = (0, 9, 0) version_info = (0, 9, 0, 'dev', 0)
1.10.6.4 Plugin searching rules
Bzr will scan ~/.bazaar/plugins and bzrlib/plugins for plugins by default. You can override this with BZR_PLUGIN_PATH (see User Reference for details).
Plugins may be either modules or packages. If your plugin is a single file, you can structure it as a module. If it has multiple files, or if you want to distribute it as a bzr branch, you should structure it as a package, i.e. a directory with an __init__.py file.
1.10.6.5 More information
Please feel free to contribute your plugin to BzrTools, if you think it would be useful to other people.
See the Bazaar Developer Guide for details on Bazaar’s development guidelines and policies.